The star adjuster wasn't even adjusted, it was just installed and that was it. First time stupidity.glad you got it..so it wasn't bad hardware? that existing hardware needed to be adjusted?
You are using an out of date browser. It may not display this or other websites correctly.
You should upgrade or use an alternative browser.
You should upgrade or use an alternative browser.
Bad news on top of more bad news.
- Thread starter R18Civic
- Start date
well cool.. that was simple! cheap and good fixes are the best!The star adjuster wasn't even adjusted, it was just installed and that was it. First time stupidity.
Hook up the two big springs at top and bottom that go across between the shoes before attaching the shoes to the back plate. Then fold the shoes down into place. In other words the two "nail" pins that hold the shoes onto the plate are the last thing to put on.
We tried that a gouged the cylinder boot. On both sides. Seems to be holding but I'll be replacing the cylinder sooner than later. Keep in mind these springs are brand new and are a major pita to deal withHook up the two big springs at top and bottom that go across between the shoes before attaching the shoes to the back plate. Then fold the shoes down into place. In other words the two "nail" pins that hold the shoes onto the plate are the last thing to put on.
You probably got air in the wheel cylinder now due to overextending the piston(s) past the rubber cup seal. If so, you will need to open the brake bleeder valve to compress the pistons back into the cylinder bore. Streching the big spring is much easier with one of the following tools:Great. Passenger rear wheel cylinder is fully extended. Couldn't get the spring on the top and noticed the dust boots were super swollen. Pushed them back in and the slid slowly back out. Must be bad. Opinions?
I think we figured out yet another issue. I cracked the bleeder on the offending wheel cylinder and compressed the pistons. They seem to holding fine now. Just had to send my buddy out to grab a new set of needle nose as I've work all 4 of his out lol. Should be finished before too long.
We opened the bleeder screw, bled the brakes and tried pushing them in. No progress.
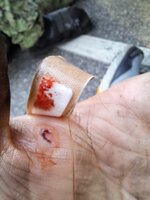
And I have to say be very careful with needle nose. I hit the bone.
I think we figured out yet another issue. I cracked the bleeder on the offending wheel cylinder and compressed the pistons. They seem to holding fine now. Just had to send my buddy out to grab a new set of needle nose as I've work all 4 of his out lol. Should be finished before too long.
What I suggested in post #27 was to open the bleeder nipple to purge the trapped air by compressing the pistons into the wheel cylinder. Then close the bleeder with the pistons retracted and reassemble all of the brake shoes, hardware and drum, BEFORE doing a final bleed of the fluid.
Sorry if I was not clear, but it appears that you have finally accomplished that goal today by using a convoluted process.
Thank you for the advice. It worked.What I suggested in post #27 was to open the bleeder nipple to purge the trapped air by compressing the pistons into the wheel cylinder. Then close the bleeder with the pistons retracted and reassemble all of the brake shoes, hardware and drum, BEFORE doing a final bleed of the fluid.
Sorry if I was not clear, but it appears that you have finally accomplished that goal today by using a convoluted process.
When it comes to adjusting brakes, please clarify.
Here's what I did. I adjusted both sides to the point there was a light drag on both drums but I could spin the hub with the drum on freely by hand, and when I stopped spinning it would continue to spin for another 1-1 1/2 turns.
Does this sound correct? Car stops fine and pedal feels nice and firm.
I agree with eljefino in that it is a bit loose. Instead of taking anything apart, just drive in reverse for about 10 feet and hit the brakes hard. Do this 4 or 5 times and the self-adjusting feature will tighten the star wheel up to the correct tolerance.

Alright, I tried the reverse braking thing about 4-5 times. Pedal feels nice and car stops great but after taking the car on a 10 minute drive I started developing a scraping noise from the passenger rear drum when braking. It isn't consistent however, it's on and off like it's grabbing and letting go. After a long drive I can't smell burning friction material so I assume it isn't major however I'm going to pull the drum tomorrow and ensure that the shoes are in correct position.
Alright. I think I found the issue but I would like others opinions before I attempt to rectify it. It appears the automatic adjustment didn't work very well.
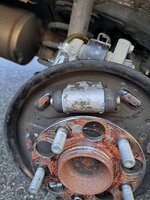
Everything in the drum looked great with the exception of a good amount of brake dust for having driven only 15-20 miles. I think the shoes are over-adjusted.
Can anyone confirm?
Everything in the drum looked great with the exception of a good amount of brake dust for having driven only 15-20 miles. I think the shoes are over-adjusted.
Can anyone confirm?
Attachments

By the description in your last 2 posts, I'd say that it is adjusted correctly. It is not too tight unless you had to manually back off the star adjuster to get the drum off. Rear drum brakes on Hondas have a tendency to wear more on the bottom edges than on top due to the slightly non-linear articulation of the initial contact points. The friction material will wear down eventually to conform to the drum's rotation. As long as the friction material is not heavily glazed/burnt, it should be OK. I say clean the brake dust with Brakleen and close her up.Alright. I think I found the issue but I would like others opinions before I attempt to rectify it. It appears the automatic adjustment didn't work very well.
Everything in the drum looked great with the exception of a good amount of brake dust for having driven only 15-20 miles. I think the shoes are over-adjusted.
Can anyone confirm?
I dunno. I realize you have much more experience than me however the driver drum rotates more freely than the passenger side. Is that cause for concern?By the description in your last 2 posts, I'd say that it is adjusted correctly. It is not too tight unless you had to manually back off the star adjuster to get the drum off. Rear drum brakes on Hondas have a tendency to wear more on the bottom edges than on top due to the slightly non-linear articulation of the initial contact points. The friction material will wear down eventually to conform to the drum's rotation. As long as the friction material is not heavily glazed/burnt, it should be OK. I say clean the brake dust with Brakleen and close her up.
If you look at your picture of the old shoes in Post #10, my picture in Post #11 and compare it to your new shoes in Post #36, you can clearly see the extra wear on the bottom edge of each shoe. This means the shoe's initial contact point is offset and not concentric with the internal circumference of the drum. This effectively creates a "high point" that will level off as the shoe wears. This can also create a strange wear pattern on the drum over time, possibly causing barely perceptible "out-of-roundness". However, few vehicles with drum brakes have drums that are perfectly concentric. I think within a few hundred miles of driving, the right side shoes will "seat" to align with the drum.I dunno. I realize you have much more experience than me however the driver drum rotates more freely than the passenger side. Is that cause for concern?
Similar threads
- Replies
- 18
- Views
- 693
- Replies
- 21
- Views
- 1K
- Replies
- 16
- Views
- 848