@clinebarger there's a guy on ebay that goes by trans_parts_direct that has the durabond TK-4AHP black coated bearings for 97+ in stock for $85
@jdr7 Can you post a link to P10's jig? Sounds like I need to build me one of those for my next tear down! I didn't have a jig when I did mine so I used wire rods and the case itself on a transmission stand that could be rotated. I also used a pair of saw horses with a board on top and a hole cut in the middle for the shaft to go through. Backyard builders special lol. You are in good hands with clinebarger. He helped me during my entire build and I had never even opened a transmission prior to talking to him lol.
I'll post what follows below, and then I will step away as clinebarger knows more than I ever can possibly fathom about these transmissions!
When I was dialing in my front endplay I got so tired of doing the math to re-check everything that I made an excel file that allowed me to just see what the theoretical endplay result would be when looking at various shim combination scenarios. I basically entered in the rear end play that I dialed in first, and then entered in the front endplay taking the ring float into account measured with a feeler gauge but the best way I think is to actually feel the ring float when you are pulling up on the shaft and just note what that number is on the dial prior to pulling up even further to measure the real end play. There's a .010" shim that can be fit under the bearing in the forward drum but most of the time that's not needed.

Most of this information that follows is what clinebarger shared with me. I apologize if any of this sounds redundant to you as you have already read Randall @ Sonnax excellent writeup, but I will post it here as this is exactly how I set mine up. Note that I machined a pocket in my reaction carrier to rollerize it and I replaced the 2 tang washer with a bearing I used a shim with that bearing as well to dial in the endplay correctly for the Reaction Carrier to Center Support. Also the rear unit endplay spec below applies if you have rollerized the rear. Note the differences in spec below.
Are you using a billet forward hub with a bearing on it or the stock forward hub. Note the differences in spec below.
Are you using a rollerized rear output setup?
Setting Endplay
Forward Hub to Direct Drum end play – If using a rollerized forward hub, the endplay should be zero.
Normally it would be .003"-. 008" if NOT using a rollerized forward hub.
Stack the gear train up to the direct drum, Place the Forward Hub over the Main Shaft, Hold the forward hub
down with your palms & lift the direct drum with your fingers.....The play you feel is the end play. Since a billet
rollerized forward hub is being used, endplay should be zero for this measurement
Reaction Carrier to Center Support - If the front planet is being machined for a Torrington bearing and the 2
or 4 tang washer removed off the rear planet, the spec changes from .008” - .015” to .005” - .010”
To measure Reaction Carrier to Center Support endplay, stack the gear train up to the center support, Place
the Forward Hub over the Main Shaft, Hold the forward hub down with your palms and lift up the center
support to separate it from the Reaction carrier. Or Hold/Push down on the Center Support & Lift up on the
Reaction Carrier. Add enough shims underneath the bearing so that you feel zero endplay. Then slowly
change the combination of shims by .005” increments until you feel slight endplay. Add another .005” to that,
and use that combination of shims in that location. The endplay with a bearing and machined pocket should
be considerably less than what you felt when in stock configuration. Max endplay here should not exceed
.010” but you have to go by feel, since you cannot get a dial indicator in this measurement.
Total rear unit endplay..... .003"-. 008" (Rollerized)
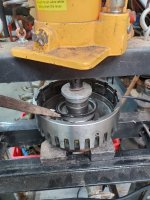
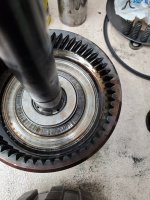
Assemble the unit up to the Center Support (with the beveled Snap Ring installed)....Do not install the front
planet. Makes it easier and lighter as it does not affect rear endplay. Lift up on the output shaft using a crow
bar and have a dial indicator on the main shaft. I like to use a long piece of steel tubing cut to 1 foot and set it
inside the main shaft and also drill a hole in the top of the tubing for the dial needle to rest on. The rod can be
purchased at home depot. The picture shows a 3/8 extension being used, but the rod is much better.
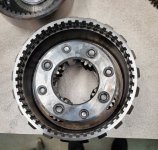
Parts list that does need to be installed to check rear unit endplay (Top to Bottom).....
*Beveled Snap Ring.
*Center Support.
*Thin (Fretting) Snap Ring.
*Rear Sun Gear to Center Support Bearing.
*Rear Sun Gear.
*Rear Internal Gear to Rear Sun Gear Bearing AND the factory .041" shim!!!
*Output Carrier (Only to keep everything assembled & center the Sun Gear)
*Output Shaft to Internal Gear Bearing.
*Output Shaft.
*Selectable TH350 Shims.
*TH350 Bearing.
Front unit..... .005-.008" more/greater than the Rear Unit
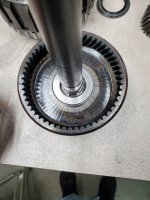
Stack everything listed above, and also the direct drum, forward drum, all washers and bearings, and install the input shaft. Input Shaft needs to be pointing straight up for this measurement. There is free play between the OD Carrier & Input Shaft Snap Ring, so use a feeler gauge on the bench to measure this. Mine measured .022”
*You will need to lift up on the shaft 'till the Snap Ring barely touches the OD Carrier & ZERO your Dial Indicator.
*However much further the Input Shaft will lift is the Front Unit Endplay.
*You're not going to be able to see the Input Shaft Snap Ring.....you have to go by feel or use the measurement with the feeler gauge and subtract it from the total play felt when lifting up on the shaft. I like to use a short piece of steel tubing cut to 3.5 inches and set it inside the input shaft and also drill a hole in the top of the tubing for the dial needle to rest on. The rod can be also be purchased at home depot.
Endplay adjustments can be made in the following locations:
1. Selective washers under the pump in position 211 on the diagram (front endplay)
2. Selective shims under the bearing in the output (rear endplay) position 269
3. A single .010” shim under the 217 bearing in the front drum (last resort)
4. Selective shims under the bearing in the front planet inside the machined pocket (bearing replaces 268
washer in between the front and rear planets (for measuring reaction carrier to center support endplay)
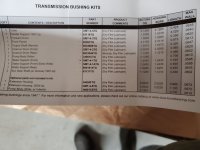
Your 211 selective washer sizes can be one of the 5 thicknesses: 0.059, 0.075, 0.091, 0.107, 0.123. These are all contained in the washer kit having part number 34200E.
Your selective shims in the output under the rollerized bearing, or in the front planet machined pocket can be any combination that is obtainable through the use of the shims which are offered in these sizes: .010”, 0.15”, .020”, .025”, .030”, .035”, .040” These are found In part #44200F. The individual sizes are part numbers 44212A, 44212B, 44212C, 44212D, 44212E, 44212F
The shim .010” shim under the 217 bearing in the front drum is part number 44255
The forward hub to forward drum washer (#232 in diagram) is offered in stock thickness of .063” but is also made in a thickness of .078” and .094” for helping with reducing front endplay adjustment. Sonnax part numbers 34301-078 (.015" oversized) and 34301-094 (.030" oversized).
To quickly determine needed washer sizes for adjusting front endplay, the quickest way is to make a excel sheet where you enter in your original measurements and shims/washers used (measurements A) to compute desired end result. For example if your rear end play is .005”, and your front endplay measurement was .052” (ring float included) with the snap ring float measured at .025”, shim size under the pump being .091” and the #232 shim being stock size 0.063”, your actual front endplay is .027” which is not in spec. Front endplay needs to be .005-.008" more/greater than the Rear Unit, so your target value is .010” - .013” based on the chart above, the best option is in column 18, which gives you a theoretical endplay of .012”. Note that the values in the first 7 rows need to be adjusted to YOUR measurements to get the correct theoretical value for
measurement B.
 20210205_150111.jpg97.8 KB · Views: 32
 20210205_150151.jpg93 KB · Views: 33
 20210205_150600.jpg143.5 KB · Views: 34
 20210205_150607.jpg144 KB · Views: 32
 20210215_135323.jpg82.9 KB · Views: 32
 20210215_135339.jpg79 KB · Views: 31
 20210215_135423.jpg82.6 KB · Views: 33
 20210215_135449.jpg98.5 KB · Views: 32
 20210215_135513.jpg120.1 KB · Views: 31
 20210215_135553.jpg146 KB · Views: 32
 .
.