If that's the case just get a whole new head. I had a new reman ATK motor (they are junk btw) with a misformed inlet hole for the HPFP plunger and lifter plunger - they sent a new head and problem solved and the paid me for the repair.Yep, have a shortage of time but hopefully I can at least pull the VC tomorrow to identify parts and confirm my suspicion.
If it is what I suspect (wrong cam & actuator), then the question becomes how do I get the part. GM has discontinued the 12608300 intake camshaft which is what goes in the 2010 and earlier design LAF (2.4L) engines, and I can't find it anywhere. Chevy Equinox and GMC Terrain also used this part.
I got it up on the lift and was impressed-- no leaks (just seeping in places), suspension & axles look good, decent exhaust, minimal rust. The underside of the engine looked very clean, so the jury is still out whether this is actually a reman Jasper engine or a used one. There was a huge difference in grime on the underside of the transmission vs the engine, with the engine being almost squeeky clean compared to trans, so the engine has definitely been replaced-- also some wiring harnesses not being tied down and just laid over the exhaust (!) was the other clue.
All in all it's a very clean car for 200K. Right now it sets at 199998, looking forward to get it fixed up right and the rollover being a fresh start.
You are using an out of date browser. It may not display this or other websites correctly.
You should upgrade or use an alternative browser.
You should upgrade or use an alternative browser.
2011 Buick Regal stuck in limp-mode
- Thread starter 92saturnsl2
- Start date
LKQ used motors also use those overheat indicatorsIt's just a camshaft, get a used one can call it good. Same with the actuator, GM never really had issues with those. It was the solenoids that were the problem. I'd have no issue using used parts.
That's DEFINITELY a reman motor. That little silver disc with the green around it is an overheat marker, if the engine overheats the center pops up like one of those turkey tab's you use at Thanksgiving.
If you're going to pull it apart to do the cam and actuator, just do yourself a favor and replace the timing kit too. They're cheap, and there's ZERO guarantee that Jasper replaced ANY of those components. Even if they did, you have no idea if they did it right. You obviously know your way around an engine, just DO IT.
R&R'ing the timing cover on an Ecotec is just about the easiest thing in the world. Not to mention, the crankshaft seal LOVES to spontaneously fail. Spend the $150 on a Cloyes timing set and a GM crank seal and timing cover gasket and be done with it. The extra time spent replacing the components is probably going to work out the same as trying to "sneak in" a new cam and sprocket.
R&R'ing the timing cover on an Ecotec is just about the easiest thing in the world. Not to mention, the crankshaft seal LOVES to spontaneously fail. Spend the $150 on a Cloyes timing set and a GM crank seal and timing cover gasket and be done with it. The extra time spent replacing the components is probably going to work out the same as trying to "sneak in" a new cam and sprocket.
Unless it is in a small body FWD Opel or SAAB 93, then its a royal PITA, on older SAAB using the iron block Ecotec you either pull the engine (easiest) or pull the cv axles, exhaust and engine mounts and rotate it CCW in the body, I cant speak about this larger Opel Insignia body. BTW Cloys suck for these timing sets since they are now being made in China. The best IMO is Iwis for the chain and OE for the rest.If you're going to pull it apart to do the cam and actuator, just do yourself a favor and replace the timing kit too. They're cheap, and there's ZERO guarantee that Jasper replaced ANY of those components. Even if they did, you have no idea if they did it right. You obviously know your way around an engine, just DO IT.
R&R'ing the timing cover on an Ecotec is just about the easiest thing in the world. Not to mention, the crankshaft seal LOVES to spontaneously fail. Spend the $150 on a Cloyes timing set and a GM crank seal and timing cover gasket and be done with it. The extra time spent replacing the components is probably going to work out the same as trying to "sneak in" a new cam and sprocket.
As long as it is a roller i would have no issues with a used cam.
If you cant find one it might be worth a call to Comp to see if they can make one - it is a long shot (and probably not cheap) but you never know.
The OCD side of me wants to know specifically what makes this happen, why change this and could for instance the HP Fuel pump be changed to restore compatibility and is that easier or cheaper...
I not the TSB says the position of the keyway is different , is it a lobe that drives the HPFP that causes the issue? Or is it the actuator?
92saturnsl2
Thread starter
That's what I figured, this is a roller setup so a used cam in good condition should be fine.As long as it is a roller i would have no issues with a used cam.
From what I gather from online forums and internet research, 2011+ model engines were flex-fuel capable, whereas 2010 models were not, and that was the impetus for the switchover.The OCD side of me wants to know specifically what makes this happen, why change this and could for instance the HP Fuel pump be changed to restore compatibility and is that easier or cheaper...
The fuel pump and injectors should have been transferred from the old engine to the reman replacement. There are plenty of internet forums/posts where people have done a 2010 to 2011+ engine swap and reported the HP fuel pumps are same (injectors are higher flow on newer models), but the cam and actuator is what HAS to be swapped over to make a 2011+ engine work correctly in a 2010 design vehicle.
I have to assume it is both. The fact that the new design cam/actuator installed into the old 2010-compatible ECU/vehicle results in max pressure (2500 psi on the high pressure circuit) at idle, which tapers down with throttle input is telling. Leads me to believe that the lobe position for the fuel pump and something in the actuator must be different. I wish I had to two cams side by side to compare. I will do that when I finally find the old style cam.I not the TSB says the position of the keyway is different , is it a lobe that drives the HPFP that causes the issue? Or is it the actuator?
92saturnsl2
Thread starter
Update: No luck finding a used 2010 (or very early 2011) cam at the local pick and pulls. Couldn't find a used one online either.
Finally got a hold of a new one, cost was about $200 shipped. Correct cam actuator/phaser (these are still readily available and inexpensive) arrives Thursday.
I'll do a side by side comparison of the cams to see what's really different about these. If it's just the locating notch for the actuator that's different on the cam, I wonder if one can't simply drill a hole in a new style cam to accommodate the old style actuator.
Interesting read
92saturnsl2
Thread starter
If I can swap the cam & cam gear (actuator) without pulling the timing cover, that's my preference. I pulled the upper guide and it looks brand new, as does the chain and related components that I can see from above.If you're going to pull it apart to do the cam and actuator, just do yourself a favor and replace the timing kit too. They're cheap, and there's ZERO guarantee that Jasper replaced ANY of those components. Even if they did, you have no idea if they did it right. You obviously know your way around an engine, just DO IT.
R&R'ing the timing cover on an Ecotec is just about the easiest thing in the world. Not to mention, the crankshaft seal LOVES to spontaneously fail. Spend the $150 on a Cloyes timing set and a GM crank seal and timing cover gasket and be done with it. The extra time spent replacing the components is probably going to work out the same as trying to "sneak in" a new cam and sprocket.
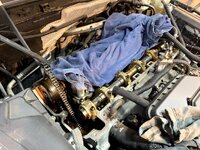
What has me scratching my head is how I'm going to pull the cam out-- I see that on HPFP side, the cam doesn't just slide out. The reluctor wheel at the end of the intake cam (for the cam position sensor) is sandwiched in a housing that the HPFP bolts to. It looks like the housing is split where you can take the top half off to release the cam (after removing HPFP), but I'm not sure; haven't examined it closely enough.
If I can swap the cam & cam gear (actuator) without pulling the timing cover, that's my preference. I pulled the upper guide and it looks brand new, as does the chain and related components that I can see from above.
What has me scratching my head is how I'm going to pull the cam out-- I see that on HPFP side, the cam doesn't just slide out. The reluctor wheel at the end of the intake cam (for the cam position sensor) is sandwiched in a housing that the HPFP bolts to. It looks like the housing is split where you can take the top half off to release the cam (after removing HPFP), but I'm not sure; haven't examined it closely enough.
Does that help at all?
92saturnsl2
Thread starter
Yes it does! I found the section of the FSM which describes assembly / disassembly, looks pretty straightforward.
92saturnsl2
Thread starter
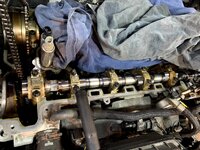
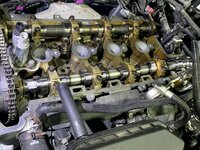
Success! All in all it wasn't a bad job. The rear cam cap was pretty easy once I found the diagrams.
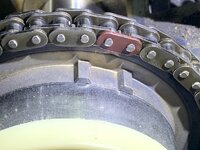
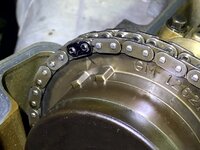
The chain in this motor only had two colored links. I spun the motor around until the one colored link I could see matched intake actuator mark, making sure the motor was set to #1 cyl at TDC (exhaust stroke) per the FSM. That put the timing marks for the actuators in the correct location (10 and 2). I colored the chain link on the exhaust side with a marker just so I knew where it went if the cams jumped when I pulled the tensioner.
With the tensioner removed, there was plenty of slack in the chain to separate the actuator from the cam & reinstall the new ones. Nothing difficult about the reassembly.
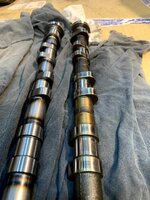
I put the cams side to side to compare the difference between the 2010 model (correct for this vehicle) and the 2011 (flex fuel) version.
The locating notch on the cam (that aligns the actuator) is 180 degrees apart, but I knew this because of the GM bulletin. Beyond that, the cam lobes are timed different in respect to a) the camshaft position sensor notches and b) the actuator notch/index. If I held them together as they would be installed in the vehicle, the cam lobes were a good bit more advanced on the 2011 cam. The cam grind seems the same otherwise.
I definitely had my fingers crossed when firing it up for the first time, and was greeted with some sputtering and a quick stall. Second time, she ran beautifully. Cleared codes beforehand and after a 10 mile or so test drive, it runs awesome with no stored or pending codes. Reading engine live data, the high pressure rail is around 600 psi at idle, and ramps up higher with RPM/load, just like it should be. With the 2011/wrong cam it was pegged at 2500psi at idle, and would drop with RPM/load.
Glad I solved the puzzle and many thanks to the forum members who contributed in making this repair a lot easier than it would have otherwise!
The chain in this motor only had two colored links. I spun the motor around until the one colored link I could see matched intake actuator mark, making sure the motor was set to #1 cyl at TDC (exhaust stroke) per the FSM. That put the timing marks for the actuators in the correct location (10 and 2). I colored the chain link on the exhaust side with a marker just so I knew where it went if the cams jumped when I pulled the tensioner.
With the tensioner removed, there was plenty of slack in the chain to separate the actuator from the cam & reinstall the new ones. Nothing difficult about the reassembly.
I put the cams side to side to compare the difference between the 2010 model (correct for this vehicle) and the 2011 (flex fuel) version.
The locating notch on the cam (that aligns the actuator) is 180 degrees apart, but I knew this because of the GM bulletin. Beyond that, the cam lobes are timed different in respect to a) the camshaft position sensor notches and b) the actuator notch/index. If I held them together as they would be installed in the vehicle, the cam lobes were a good bit more advanced on the 2011 cam. The cam grind seems the same otherwise.
I definitely had my fingers crossed when firing it up for the first time, and was greeted with some sputtering and a quick stall. Second time, she ran beautifully. Cleared codes beforehand and after a 10 mile or so test drive, it runs awesome with no stored or pending codes. Reading engine live data, the high pressure rail is around 600 psi at idle, and ramps up higher with RPM/load, just like it should be. With the 2011/wrong cam it was pegged at 2500psi at idle, and would drop with RPM/load.
Glad I solved the puzzle and many thanks to the forum members who contributed in making this repair a lot easier than it would have otherwise!
Attachments
- Joined
- Jun 26, 2023
- Messages
- 350
Great job, and happy trails to you! Glad you figured it out and were able to get it fixed. Always a great feeling!Success! All in all it wasn't a bad job. The rear cam cap was pretty easy once I found the diagrams.
The chain in this motor only had two colored links. I spun the motor around until the one colored link I could see matched intake actuator mark, making sure the motor was set to #1 cyl at TDC (exhaust stroke) per the FSM. That put the timing marks for the actuators in the correct location (10 and 2). I colored the chain link on the exhaust side with a marker just so I knew where it went if the cams jumped when I pulled the tensioner.
With the tensioner removed, there was plenty of slack in the chain to separate the actuator from the cam & reinstall the new ones. Nothing difficult about the reassembly.
I put the cams side to side to compare the difference between the 2010 model (correct for this vehicle) and the 2011 (flex fuel) version.
The locating notch on the cam (that aligns the actuator) is 180 degrees apart, but I knew this because of the GM bulletin. Beyond that, the cam lobes are timed different in respect to a) the camshaft position sensor notches and b) the actuator notch/index. If I held them together as they would be installed in the vehicle, the cam lobes were a good bit more advanced on the 2011 cam. The cam grind seems the same otherwise.
I definitely had my fingers crossed when firing it up for the first time, and was greeted with some sputtering and a quick stall. Second time, she ran beautifully. Cleared codes beforehand and after a 10 mile or so test drive, it runs awesome with no stored or pending codes. Reading engine live data, the high pressure rail is around 600 psi at idle, and ramps up higher with RPM/load, just like it should be. With the 2011/wrong cam it was pegged at 2500psi at idle, and would drop with RPM/load.
Glad I solved the puzzle and many thanks to the forum members who contributed in making this repair a lot easier than it would have otherwise!
Similar threads
- Replies
- 4
- Views
- 314
- Replies
- 3
- Views
- 670
- Replies
- 19
- Views
- 10K
- Replies
- 4
- Views
- 942