The Snake Pit : Stripping a Late 80's Carburettor

Status
Not open for further replies.
I now have some clues as to what might be causing at least part of the problem.

I tried using a vacuum gauge that I bought in Japan, to tune the idle. So far I can't see its much better than tuning by ear, but it did "accidentally" give me some info.

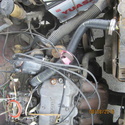
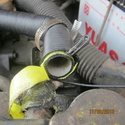
I wasn't sure where to plug it in, and tried one of the vacuum advance hoses to the distributor.

I noticed that the idle was steadier while doing this. Possible explanations include:-

(a) There is a vacuum leak via the vacuum advance circuit, perhaps due to a hole in its diaphragm. This will disturb the idle.

(b) As a result of (a), the vacuum advance doesn't work, so the spark happens late. This will disturb the idle too.

http://chevellestuff.net/tech/articles/vacuum/port_or_manifold.htm

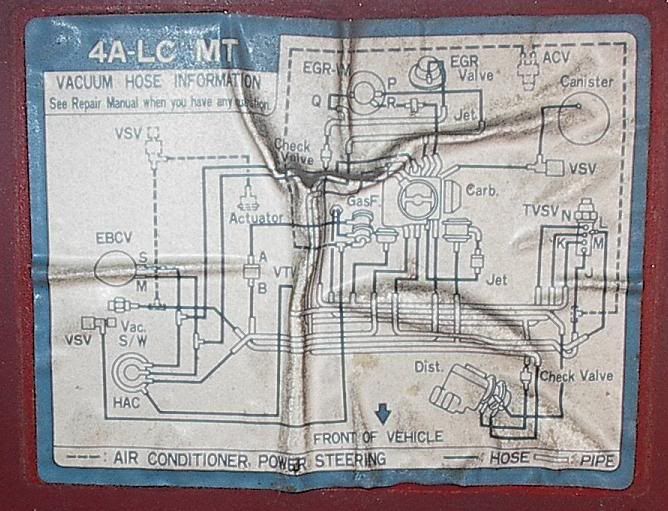
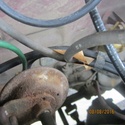
There are actually two vacuum hoses to the vacuum advance unit, one from the middle of the can, one from the base. I'm guessing one of them might be getting manifold vacuum, and the other "ported" vacuum (sometimes even more obscurely referred to as "timed" vacuum), via a port just topsides of the throttle plate, so it only sees significant vacuum when the throttle plate starts to open.

I tried the gauge on both ports and recorded the vacuum reading (inches Hg) at different rpm, read off the dashboard rev counter through the windscreen via a scooter mirror tied to the steering wheel.

rpm 600 800 1000 1100 1200 1400 1500 2000
mid vac 2 3 4 5 7 15
base vac 13*** 12** 12* 12 12.5

(Apparently tabs don't work. Lined up in the original)

From this I'd guess the mid vac is "ported" and the base is manifold. The * represent the oscillation of the needle.

I don't know how this works. Wikipedia has

https://en.wikipedia.org/wiki/Ignition_timing

"Some vacuum advance units have two vacuum connections, one at each side of the actuator membrane, connected to both manifold vacuum and ported vacuum. These units will both advance and retard the ignition timing."

Not sure why (or if) this one would be retarding the ignition. The CB-23 spec says centrifugal advance 0 degrees at 750 rpm. 10.5 degrees at 2.800 rpm vacuum advance 0 degrees at 100 mmHg, 11 degrees at 320 rnmHg, and doesn't seem to mention retardation.

I used my brake-bleeding enema syringe to apply 12"Hg vacuum to the distributor, "calibrating" it with the vacuum gauge, as below. After holding for 30 secs, if the piston returned most of the way, it was considered to be holding vacuum.

Piston displacement (mls) 10 20 30 40 50 60
Pressure (-)("Hg) 7 12 15.5 18 19.5 21

The base vac isn't holding vacuum, but if the tube is reversed, or my brake-bleeding tube substituted, it holds.

This suggests it may be the tube, (which looks OK) rather than the advance can, that is faulty, which would be a cheap fix IF its all that's wrong.

I'll need to use the timing light to confirm (or deny) that the vacuum advance is defective. My new old-stock timing light flashes but I couldn't see the mark. Will try again tommorrow, maybe with tipex etc.

Assuming its faulty, pending repair or replacement of the distributor, I'm wondering about my scope for quick and dirty work-arounds to (maybe) get through the overdue inspection.

I can block off the vacuum advance port to eliminate the vacuum leak.

Would it be worth cautiously advancing the static timing a bit?

I think the emissions test is only done at idle.
 
Last edited:
The top pipe of the vacuum advancer connects the subdiaphragm to the intake manifold through a check valve and and gas filter. The only function of it is to advance the timing by 8 degrees only at idle (high vacuum). The bottom pipe connects the nain diaphragm to the EGR P port just above the closed throttle plate (lower EGR port, there is an EGR R port just above it). I'm not sure how much the main diaphragm advances the idle and whether continuously or all at once as the subdiaphragm but it does so when the throttle plate is above the EGR P port and the manifold vacuum is high (not heavy loads). There is also a third upper pipe that connects the subdiaphragm to the high-altitude-compensation valve on some models, to advance timing by 8 degrees above 991 m (3250 ft) altitude.

You might be able to replace the vacuum advancer if the subdiaphragm or main diaphragm is torn.

These cars run much better at about 5 or 10 degrees more advanced ignition timing than the OEM spec. OEM spec is for reducing the emissions. However, advancing the timing further smooths the idle, increases the horsepower, improves low-throttle response, and increases the fuel economy.
 
Originally Posted By: Gokhan
I'm not sure how much the main diaphragm advances the idle and whether continuously or all at once as the subdiaphragm but it does so when the throttle plate is above the EGR P port and the manifold vacuum is high (not heavy loads).

Just checked:

Main diaphragm (lower diaphragm): Starts advance at 11 kPa, 6.9 degrees at 26 kPa, 12.0 degrees at 39 kPa, 14.0 degrees at 47 kPa.
Subdiaphragm (upper diaphragm): Starts advance at 29 kPa, 4.0 degrees at 40 kPa, 8.0 degrees at idle vacuum (above 60 kPa or so).

Governor advance advances the ignition gradually by 10.1 degrees at 3,000 RPM. Chances are that it doesn't work in your distributor either because the sleeve bearing packed with high-temperature grease is cooked. I repacked my bearing after less than 100,000 miles and it was already scoring. I used Valvoline Full Synthetic moly grease. Nippondenso uses cheap Japanese grease at the factory and doesn't pack it generously.
 
Originally Posted By: Gokhan
The top pipe of the vacuum advancer connects the subdiaphragm to the intake manifold through a check valve and and gas filter. The only function of it is to advance the timing by 8 degrees only at idle (high vacuum). The bottom pipe connects the nain diaphragm to the EGR P port just above the closed throttle plate (lower EGR port, there is an EGR R port just above it).


Thanks a lot for your response.

Not the other way around?

My readings, such as they are, suggest (to me, anyway) that the mid-pipe is "ported" and the base pipe isn't.

rpm /mid-vac /base vac
600 /2 /13***
800 /3 /12**
1000 /4 /12*
1100//12
1200//12.5
1400 /5
1500 /7
2000 /15


This could suggest the hoses are switched. They look right relying on "elastomeric memory" though (base pipe is larger diameter and the hose is spread) but I suppose they could have been switched before I got the car.

Originally Posted By: Gokhan
These cars run much better at about 5 or 10 degrees more advanced ignition timing than the OEM spec. OEM spec is for reducing the emissions. However, advancing the timing further smooths the idle, increases the horsepower, improves low-throttle response, and increases the fuel economy.


That'd poses a bit of a dilemma, then, because I'm overdue for an inspection which will include an emissions test.

However, I'd guess less advance mostly means less NO, and I think they only check CO, CO2 and HCO. Naively, without having researched it, I'd guess they'd be improved by advancing the ignition.
 
Last edited:
I set the static timing against the mark on the flywheel, using a test light across the points, as described here:-

http://www.camaros.net/forums/13-performance/110638-my-timing-mark-missing-2.html

I roughly determined TDC with a chopstick down cylinder 1 plug hole.

The more accurate method is apparently to bisect the angle of obstruction caused by a fixed stop down the plug hole, but that'd be difficult on this car because the flywheels inside the bell housing, and the crankshaft pulley isn't very accessible either.

I'd expect the relationship between TDC and the timing mark would be fixed anyway unless the engine had been rebuilt or a harmonic balancer prone to breakage was involved.

Started right up. (with both vac hoses plugged).

Pulling 20 ml equivalent vacuum on either vac pipe via my PVC brake bleeding tube sent the spark north (ie advanced the timing, as observed with my shiny NOS timing light) so the distributor vac advance seems to be working to some extent.

Revving the engine ditto (though less steadily) so the distributor centrifugal advance seems to be working to some extent too.

Took it for a couple of circuits of the campus and it drove OK, though the idle (initially turned down to about 800, was low after at about 400. Good that it was still running at that, not so good it wasn't stable, but these vac hoses may still be leaking.

Not sure if or how to advance the static timing since I don't know what circumferential distance corresponds to 10 degrees, though if I can find out the flywheel dimensions I could work that out.

Did notice what seemed to be another timing mark (these are shallow holes drilled in the flywheel circumference). This one was closer to the edge and probably would be obscured by the timing mark "back sight" plate. perhaps its an (unofficial?) "advanced" timing mark? Didn't establish where it was in relation to the other one, but may be able to tomorrow.

Might also try switching these two hoses, and of course I need to stop the vac leaks.
 
Swapping the hoses and taping them with PTFE, it initially drove OK, but after about 15k the idle started to rise. Adjusting it down led to stalling at lights and on the overun (which is probably a clue, if I could interpret it). Turning the idle up, it started to surge under acceleration. I could almost see the fuel gauge needle moving downward.

Best guess is I've still got a vacuum leak. I'll have to make a smoke machine. Might also try disconnecting everything that isn't absolutely essential and seeing if it'll run more steadily then.

After that, next steps seem to be:-

1. Do as full tune-up as possible with my limited gear. Do /compression test/valve clearance and check electrics again (though I think this is all OK)

2. Replace all hoses and/or paint them with a sealant of some kind. PVA, Sunflower oil, RTV, Permatex or plasti-dip seem like possibilities.

3. Take the carb apart again, only this time replace all gaskets (IF I can get them) or use Permatex sealant on them if I can't

4. Do a "deep clean" on the emulsifier jet units, involving long soaks in carb cleaner, brake fluid, boiling detergent, water, and alcohol, flushing with syringe and/or running water.

These things apparently draw air into a sintered metal matrix to froth up the petrol, which is about as fragile a design as I can readily imagine.

5. Get a new fuel filter

6. Drain and flush the petrol tank

7. Make a gas analyser (this probably won't happen)

8. Buy another carburettor/give up


This Aisan seems to be a horrible design, (though of course that doesn't cause vacuum leaks.) Admittedly the last carburettor I think I understood was a 1972 SU, but the emulsifier jets on this one seem designed to clog and are not designed to be cleaned.

Its surprising that the legendary Land Cruiser used the same design carb, and there is information on its operation on this Land Cruiser website.

http://www.ih8mud.com/tech/carbinfo.php

Must have been VERY dependent on the fuel filter in Third World operation.
 
Also try disconnecting the two air-bleed hoses and plugging the hose ends. Perhaps EBCV or something else in the carburetor feedback is not working.
 
Originally Posted By: Gokhan
Also try disconnecting the two air-bleed hoses and plugging the hose ends. Perhaps EBCV or something else in the carburetor feedback is not working.


Thanks. In general terms, of course, thats covered above by "Might also try disconnecting everything that isn't absolutely essential and seeing if it'll run more steadily then." though I was mostly thinking of the vacuum advance hoses.

I'll identify and specifically try the hoses you mention, probably tomorrow.
 
Feedback carbs are terrible. They had a hard time staying running AND meeting smog requirements when new. Now that it's 30 years old and you can't buy parts*, there is basically no hope.

Just my opinion but you really would be better off replacing the car with one that has fuel injection.

* I mean even if your locality didn't have the weird "car owners can't buy parts" thing going on, you still couldn't buy parts. Manufacturers dropped support for feedback carbs decades ago. They disowned those cars.
 
Last edited:
Here is the vacuum diagram for my engine (found in the Internet, not from my car).

VACUUM.jpg
 
Originally Posted By: mk378
Feedback carbs are terrible....
...Just my opinion but you really would be better off replacing the car with one that has fuel injection.


It may come to that, in fact its looking increasingly likely.

Another possibility is getting something REALLY old, with a simpler carb.

Old cars are extremely rare here, but there are some old Datsun's, including some light pickup trucks, that have a "cult" following and so have been preserved.

I havn't researched this, but I believe some Datsun's had SU copies, which I used to actually understand. The survivors may not be old enough for that though.

Would be hard to find and expensive, and there are legal restrictions on foreigners registering trucks, but there may be ways around that.

IMG_1110 by ed_lithgow, on Flickr
 
Last edited:
Thankee, Matey

Can't be right though. Don't see "Here be booty" anywhere.

What kind of pirate map is that?
 
Compression test (cold, manual doesn't specify) seemed ok, though there was blowby past the conical push-on adapter which probably reduced accuracy.

The plugs looked sootier than they have in the past, which isn't surprising.


Plugged all the hoses I could see except the one from the solenoid valve, with (mostly double-ended, if there was space) chopstick segments and silicon (?) rubber tubing, so its only getting centrifugal advance.


Car started easily and was drivable, but it was surging a bit, though not as badly as before, and I don't know how well its expected to run in this configuration. Rush hour and getting dark so just a short trip and only in top gear a couple of times due to crowds for some sports event.

It idled with the adjustment screw turned right in, which tends to confirm the seat or needle is damaged.

Today, harder to start but drove about the same. Longer run of maybe an hour and a half / 20 k, mostly narrow country roads but some dual carriageway. Noticed that the surging went away on some steep up-grades, suggesting it might be load sensitive. No obvious deterioration during the test run, which IS an improvement, though the earlier test run was longer and at higher speeds.

Next move might be to add some static advance, then re-instate the vacuum advance, preferably with new tubing

I''ll try and establish what the other tubes do and then decide if they're worth re-instating.

If its still running badly with the core functionality carefully restored, do the other peripheral stuff (electrics, valves)

Then take it apart again.

I'm wondering if those IR thermometers are capable of giving accurate enough exhaust temperature information to be of any use in tuning. There is, however, apparently no provision for mixture adjustment (apart from at idle, which is probably broken) on this carb, so base ignition timing is the only variable I can control.
 
I'd guess not, and that's just the idle nixture adjuster, but with an anti-tamper plug (which I don't have) fitted.
 
Yes that's an idle mixture needle. Like every carbeurator made after the 1940's, it appears that on this one the running mixture is pre-set by the size of the hole in the main jet(s). Unless you're trying to tune the car for racing or live at a high altitude, it should not be necessary to change it. Runnability problems at speed with the throttle open usually aren't the carb.
 
Carburetors don't have mixture adjustment other than the idle mixture as far as I know. In feedback-equipped carburetors, the mixture is adjusted automatically through the oxygen sensor and an an-electric-valve-controlled feedback air bleed. At the end of the day, the main thing mixture adjustment does is to reduce or increase the emissions and fuel economy because if you put too much fuel, it goes unburned through the exhaust or if you put too little, you generate more NO_x. However, if it's too lean (like a vacuum leak or incorrect and excessive air bleed), you could have a very rough-running or stalling engine. I remember when my high-altitude air bleed kicked in at too low altitudes, the engine would stall at low speeds. Apparently there was a stuck bellow in the altitude sensor and after I tapped on it, it was fine.
 
Originally Posted By: mk378
Like every carbeurator made after the 1940's, it appears that on this one the running mixture is pre-set by the size of the hole in the main jet(s).


I think that's perhaps a little too sweeping a generalisation, although it appears to be true in this case.

My second and third cars, like many British cars, had SU carburettors, and on them the choke involved mechanically moving the main jet downwards relative to the metering needle. This meant that you could effectively change the size of the main jet while driving, by pulling the choke knob out, and this would have the effect of enriching the mixture throughout the operating range.

In conjunction with information from say, an EGT sensor and/or a fuel/air meter, and perhaps manual ignition timing control, as on my Best-40-Quid-I-Ever-Spent Lada, this would give you a lot of dynamic tuning options.

The Mikuni motorcycle carbs I have more recent experience with were quite similar. They lacked the movable main jet, so couldn't be tuned on the move, but you could alter the effective length of the needle (by varying its fixed depth in the carburettor piston) and/or change to a metering needle of a different profile (I THINK you could also do this with the SU's) which gave you tuning options which seem to be entirely lacking with the Aisan.

I have seen descriptions of SU installations with this engine. That'd be an attractive option for replacement, but it'd be hard to source and hard to conceal, which is a consideration since it'd be illegal here.

A Weber would probably be easier to source and conceal, and would still be tunable by exchanging jets, which seems better than nothing.
 
Last edited:
Back from Japan, and still with all the vacuum hoses blocked off, I tried advancing the static timing.

There is one timimg mark on the flywheel. I assume this is the specified base timing rather than TDC. I don't know what the specified base timing is. The CB20 engine manual gives 10 degrees BTDC, the CB23 engine manual gives 5 degrees BTDC.

This engine is the CB22 and I have no specs for it.

I advanced the timing by half the width of the timing window in the bellhousing, so that the timing mark was just visible at the top of the window. I struck a vertical chalk line (using a plumb bob) on the crankshaft pulley corresponding to the specified timing and guesstimated the additional advance was maybe 5-7 degrees, but this was very imprecise.

With this additional advance, the car was more drivable, and the surging much reduced.

Then the top radiator hose blew.

I improvised a replacement from a bit of garden hose, wrapped in glass-fibre reinforced polythene packing tape (using a chlorinated rubber impact adhesive), and electrical wire, (using common whipping.). I made this a bit too long which put a kink and strain in it, and after a while it started to leak from the radiator union, so I shortened it, wrapping the surplus wire back using clove hitches (must learn the constrictor hitch).


So far I havn't been able to buy a replacement so I might also do a similar repair to the original as backup, but for now I'm keeping it unchanged so I can show it to mechanics/parts people with less resulting confusion/derision. So far I've had two places tell me the hose didn't come from where I say it did ([censored]?), and three places tell me they could'nt get one. (Lost in translation: couldn't be arsed, probably).

I re-set the timing dynamically with a timing light.

I was interested in testing the effect of advancing the timing on EGT, using an IR thermometer I bought in Japan aimed at the exhaust manifold. I had, however, lost the instructions, which were in Japanese anyway.

For what its worth the temperatures seemed to be systematically higher with the timing advanced, but there was a lot of scatter, it was unpleasantly hot, and working directly over the improvised radiator hose seemed to be courting a bad scald, so I gave up on that "tuning aid" idea for now.


Re-connecting the upper vacuum advance hose didn't make drivability any worse.

Connecting the lower vacuum advance hose re-introduced surging. That hose has two branches via a 4-way connector. These branches are hard to seal reliably and are connected to "mysterious" (to me, anyway) emissions system (?) components, so I bypassed that line with a direct hose. I sealed all the hose and blanking connections with masking tape and some rather old pertex sealant.


None of the system diagrams in the G100 manual (which vary geopolitically) are exactly like this one (which isn't a G100 anyway, probably mostly a G11), but there seems to be a possibility that the upper and lower vacuum advance hoses are switched, though it looks OK by "hose memory".


Car is now drivable, though it idles high at about 1200 rpm, cuts out on overrun sometimes and, judging by smell, is running rich. I suspect this is due to a damaged idle control needle valve and/or seat. I may try and coat the needle in solder.
 
There are universal fit radiator hoses which are corrugated in the center and have smooth ends to clamp on to the engine and radiator. With those you only need to match up the fitting diameter and approximate length, and bend them to reach. They're kind of cheesy but may be the only choice on an old car.

Take the #1 spark plug out and probe the piston while turning the crank by hand to see if the mark you're using is zero degrees or something else. Setting base timing should be done with the vacuum advance disabled. At idle it should only be a few degrees BTDC. Then reconnect the vacuum advance and confirm the timing advances by several degrees as you first crack the throttle off of idle. You want to be running well advanced at cruise. I always look at the operation of this system as retarding the timing severely-- but only at idle-- to slow the engine down.
 
Status
Not open for further replies.
Back
Top