98 V70: P0455: Gross Evap Leak

Status
Not open for further replies.
I disconnected the vac line that leads to the rear of the car at the radiator purge valve and fed in low-pressure air from my airbrush compressor. I removed the gas cap and listened for air. OK. Tightened it and waited a few minutes then cracked open. No whoosh. Hmmm.

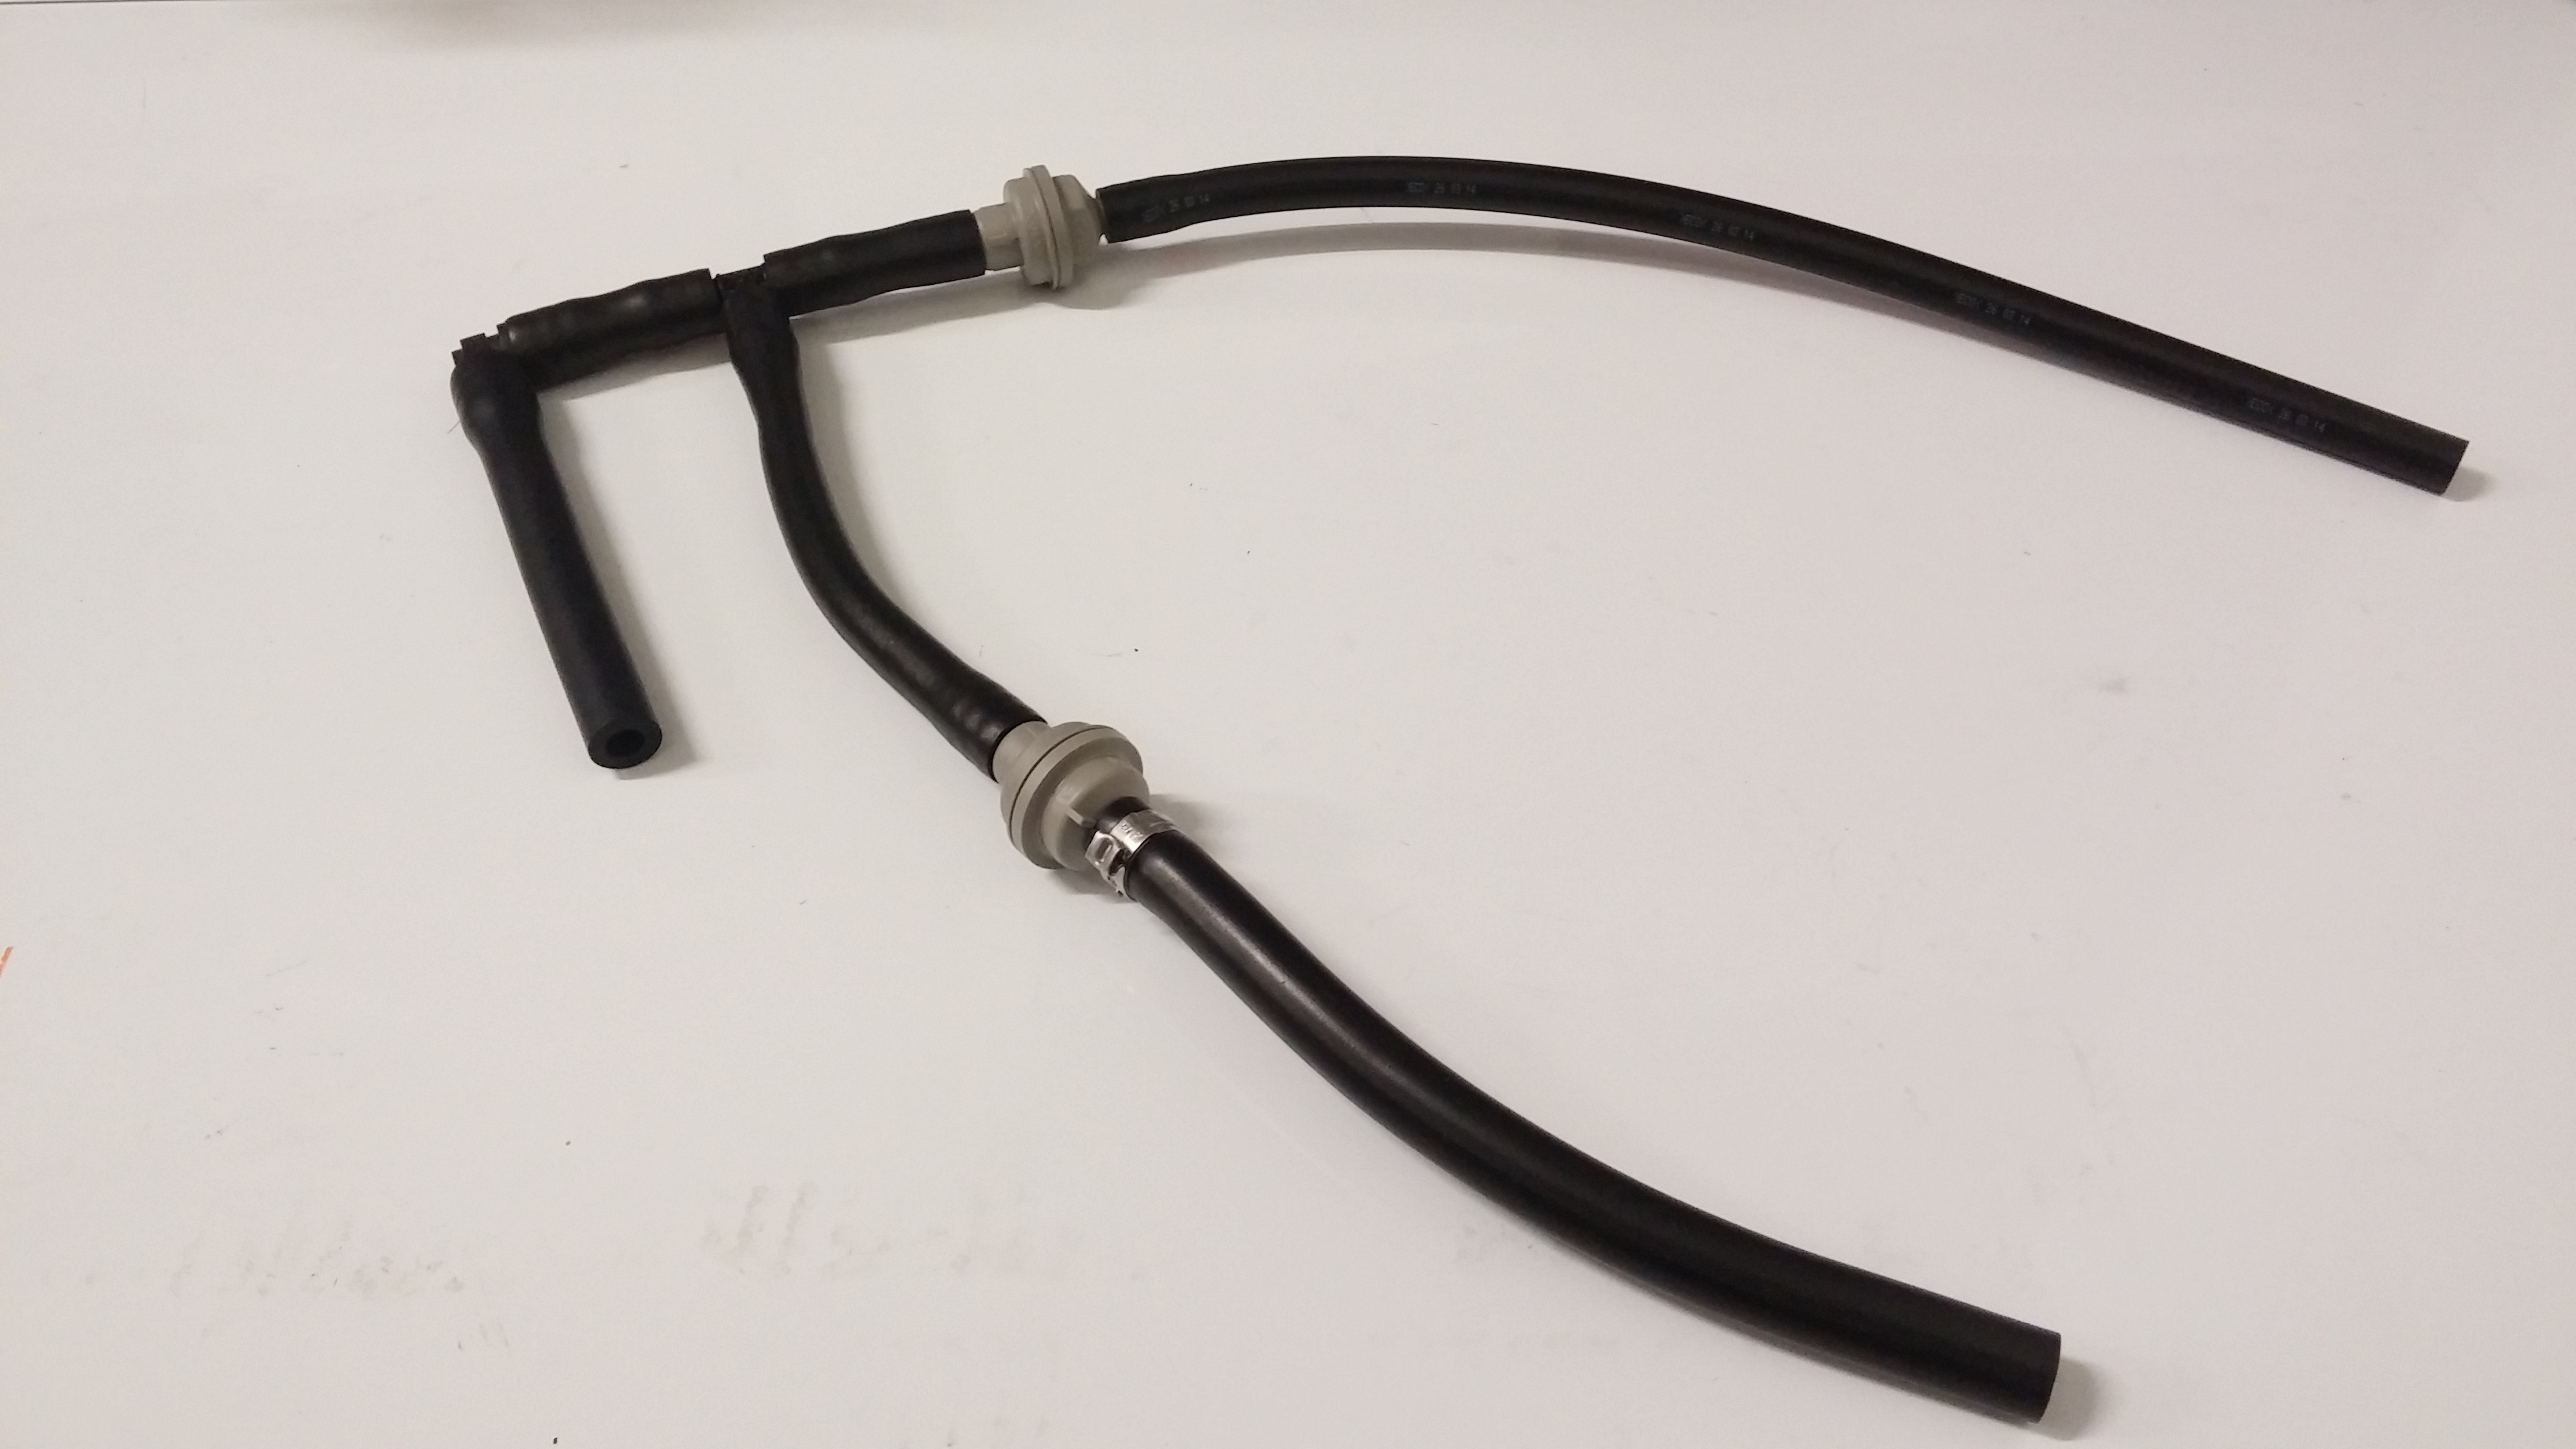
So crawled under the rear for a listen. I heard a faint hsssss. It's coming from the air filter that's zip-tied to the fuel inlet line running to the gas tank. I followed this line fwd to the shut off valve, which is then connected to the charcoal canister.

Evidently this shut-off valve controls fresh air into the system via the air filter. This valve is open with key off, allowing the tank to vent via it and the air filter.

So I put a finger over the air filter intake to let pressure build. I noticed the gas tank beginning to expand, then heard it creak due to being inflated. Removed my finger and it 'exhaled', but I smelled no gas. Did this several more times.

So if the tank IS expanding with pressure, it leads me to believe that all the gas hoses & vac lines attached to the tank are OK. Otherwise the tank couldn't hold any pressure and I'd smell gas either under the car or inside the rear hatch.

Of course, the shut-off valve could be defective or leaking. I did test it last time I went through all of this, but I'll test again. Would be great if that was it!

Ideas?
 
This time, I pulled the fuel filter instead of the charcoal canister. Makes accessing the shut-off valve MUCH easier. BTW, when I dumped the gas out of the filter backwards, it's rather dirty. Been awhile since I've done a filter. I'll have to look it up.

So I disconnected & removed the shut-off valve. With no power, it's OPEN. Started the compressor again: > back of car > into char can (CC) > out "J" hose. Held my finger over open end of J hose. Let pressure build up in tank, heard it creak, released whoooooosh, repeat & repeat.

So the line back to the CC is tight, the CC itself & connections are tight, J-hose it tight, vapor hose from CC to tank is tight & tank is tight.

In order to pull gas vapor through the tank > CC > to engine to be burned, air has to be let in, else the tank would contract.

I wonder how much of it's life this system is cycled? This shut-off valve is energized meaning CLOSED?
 
Close inspection of the shut-off valve reveals when voltage is applied, the plunger pushes up towards the in-line hose connection, clamping the seal around its perimeter. The 90° fitting is connected to the air filter mentioned earlier.

Once the valve is closed and a vac is pulled on the in-line fitting, the valve will remain CLOSED even with power removed as the vac is pulling the internal diaphragm against its seat. You have to remove the vacuum for the plunger to retract.

Using a 12" piece of silicone vac hose, I pulled a vac on the in-line connector, energized the valve, turned off the compressor, removed power to the valve and counted 14sec before the valve returned to its de-energized state.

I sprayed some silicone lube in the in-line port, then repeated the above test. Still about 14sec.

I need a vac gauge so I can measure the drop in vac vs. time.

So far, none of this amounts to a 'gross' leak. Minor, perhaps, but the compressor could also be leaking (slowly) internally when turned off.

However, the tank pressure sensor could be tango uniform, giving an incorrect (too low) reading to the CM so it 'thinks' there is a BIG leak when in reality there is none.

I need to get my DVM on the tank pressure sensors lead and take some resistance measurements under different pressures & vacuums.

Still scratching my head. . . . .
 
OK. I may have found it! I pulled out my old SunPro hand vac pump. It DOES have a vac gauge on it, meas in " Hg. Note: 1" Hg = 3,386 Pascals.

Hooked up a 4' piece of silicone vac hose to it, clamped off the open end & pulled a 15" Hg vac. Watched it for a minute. Still 15" Hg so the pump, fitting, and hose is air-tight.

Hooked it up to the shut-off valve. Energized the valve. Pulled a 15" Hg vac, started a 30sec timer and watched the gauge. When the timer went off, the gauge read 10". I repeated the test. This time 9". So during the test, it's dropping 37%.

I'm not sure how long the CM runs this test, nor what the idling vac on the sled is, nor how long the CM measures for any delta-P's while both valves are closed.

So I reran it a few times at a 10" Hg. First time, it dropped to 6". Second time 5.5". Third time 5.5". So the vac is dropping about 50% over 30 sec.

Took about a 10min break, then ran a test at 5" Hg. Didn't drop a bit. Did it again. Same thing. Upped it to 10" Hg, didn't drop. Ran again. No drop! Went to 20" Hg. No drop either.

I wonder if the rest gave the seal a chance to absorb some/more of the silicone I sprayed? I sprayed two more shots into each port, then inserted a q-tip into the in-line end, rolled it around: It came out black. Rotten rubber residue looks like.

I redid my tests and noticed no drops in pressure. This might explain why the code went away last year after I replaced the purge valve. I sprayed the shut-off valve then to clean it with silicone and it lasted about 6 months or so. So I thought I had it fixed. When the 14 yr old rubber dried out again, it started leaking and the code resurfaced.

I'll put it all back together, and use the Volvo tester at the shop to do the test. It's capable of reading the tank pressure sensor.

Interesting! Very, very interesting. . . .
 
Update: Cleared the P0455 code on my indy's Volvo scanner. Then ran the diagnostics test. Initial tank pressure meas. 24 Pascals! That's mighty small.

1"Hg = 3,386 Pa. and 1"WC (water column) = 249 Pa.

The smallest my hand vac pump will read is 0.5" Hg, so that's equiv to 1,693 Pa.

The first time I ran the test, the purge valve duty cycle was 14% and the tank pressure dropped to -341 Pa. before the test was interrupted.

Turns out I had too little gas in the tank, so I filled to 3/4 full. Retested: This time tank pressure dropped to -732 Pa. before the test was interrupted again. Not sure why this time. May be that it's too warm. So I'll have to retest before the car gets too hot.

What I have learned is the level of vac. the system is being tested at is FAR below what I thought. 732 Pa. = 3"WC or 0.1psi. 1psi = 6,895Pa.

Very small indeed. And given that the system is already sensitive, such a low vac isn't going to help "pull the valve shut" to make up for a weak seal.

With the code cleared, I'll have to wait until the CM runs the test again in the near future. I think it has to fail twice before a CEL occurs.
 
Update:

Time to update this old thread from Nov 2012. I managed to evade problems with getting an inspection done due to lucky timing....until this year. Seems my luck ran out.

I opened a new thread "EVAP System Operation Q", hoping for more answers from others. I posted lots of new information there, more tests & results and what I hope is the final slaying of the P0455 dragon that's possessed the sled for many years.

I might add that this system, in this year Volvo, is very touchy, finicky, will go off with the slightest of looks, and remain ON, in your face, from the IDIOT CEL light. My indy said P0455 in a 98 Volvo, is the most difficult code to extinguish and usually incurs many hours, thus $$$$$....even with a smoke machine. (Hat tip to JOD. No wonder he recommended just replacing EVERYTHING in an older car.)

For the final chapter on this problem, click "EVAP System Operation Q"

Note that certain parts locations may be different, valves may look different and vacuum tubing may be routed different. Even within the 1998 model year. Though some parts are similar to a 97 850, not all are. For example the 850 used a rubber vent line on top of the gas tank, with a reputation for developing cracks, causing air leaks. But my 98 replaced this rubber hose with a hard-plastic one and updated connectors. Thus I had no problems with this hose leaking. I also had no leaks from the infamous "J-hose".

Another example is the roll-over valve: There is no separate one on my car, unlike previous years. Volvo incorporated this into the tank on my 98 V70. Hopefully, this will save the DIY'er Volvo owner some time, frustration and $$$$.
 
Update II:

After two & a half weeks of no CEL, it lit and the culprit was (once again) P0455 GROSS EVAP. Not sure why...I cleared it last Fri. we'll see how long it remains off.

My indy asked if the PURGE valve was clogged. I said I didn't think so, it was replaced a few years ago, and the charcoal canister on my car is in the rear, thus I doubt any charcoal particles/granules had clogged it. I said I would recheck this.

Today I did and noticed that there is a one-way vacuum valve (check-valve) between the PURGE valve & the intake manifold. I replaced this a decade ago because the OEM original no longer checked. Unable to obtain a single one, I used an aftermarket black/white check valve.

Turns out this check valve has far more resistance than the other OEM one still in place (and checking) that goes from a vacuum "T" down to a nipple on the intake pipe close to the turbocharger. I pulled it as well to compare. This last one has nearly zero resistance when sucked on. The previous one has quite a bit. Given its location, it could make the PURGE valve behave as though it were "clogged". IOW, the vacuum drop across this check valve is higher than it should be when OPEN. Thus insufficient vacuum is being delivered to the PURGE valve & charcoal canister. I'd never even considered this before.

My indy checked both on VADIS & WorldPac for one of these and found no joy. Evidently, you have to buy the hose assembly + two check valves as all-in-one from Volvo. Unobtanium otherwise!

I started the car, pulled the gas tank vacuum line off the PURGE valve and stuck a latex gloved finger over the outlet. I could feel the valve pulsing in my hand and noticed engine vacuum pulling on the glove, but it felt a bit weak. I blew & sucked on the valve itself and its fine. With this non-OEM check valve removed, the suction applied to the input of the PURGE valve is much greater. Could be a possible reason why the system thinks there is a GROSS leak.

A search revealed no pictures, nor hits, of these valves. FCP nor e-Euro shows them. You can see them here in this vacuum diagram however. There's two of them near the PURGE valve:
6txzxa8.jpg

This diagram reminds me I still have a couple of OEM vacuum lines to replace with new silicone: One remaining to the TCV, two leading to the fuel pressure regulator and a big one leading to the brake booster (not shown).

And the hits just keep on coming........
 
Here's a picture of this vacuum hose with the two check valves.
a_20150811_1829392042.png

Volvo wants ~ $80 just for that!! Whiskey Tango Hotel???

I found a few other part numbers while searching:
9445436
30757308
30622238


I also discovered ATE #1228272. This is a vacuum check valve for a master brake booster. It might work as this is another high-flow vacuum area as well + critical! AutohausAZ has this under #0004313507 for about $8!

Also found a Volvo part #1275226 which is for a later model S/V40. It's only $18!! Used in those EVAP systems as well:
lg_bc319ba5-e6f0-42e5-8a22-749f6af724b7.jpg
 
Before buying a new check valve, can you try to clean them? I presume brake cleaner should be safe. Besides, if you have resigned to change it, why not take a chance?
 
Originally Posted By: JOD
If so, here's my suggestion: replace everything, J-hoses, all the vacuum lines, and elbows, etc. I totally get the desire to "not be a parts replacer", but you're about to travel down the road I have so many times with stuff like this, only to end up wasting a bunch of time.


Three years ago, he gave you the best advice possible.

Fast forward to now, and you're still wasting an inordinate amount of time and money on pulling off some sort of piecemeal solution when you could have had this rectified ages ago -- by just replacing everything with the proper (not things you've found that you think will work) parts.
 
Originally Posted By: Vikas
Before buying a new check valve, can you try to clean them? I presume brake cleaner should be safe. Besides, if you have resigned to change it, why not take a chance?
Nothing ventured, nothing gained!
 
Originally Posted By: Ramblejam
Originally Posted By: JOD
If so, here's my suggestion: replace everything, J-hoses, all the vacuum lines, and elbows, etc. I totally get the desire to "not be a parts replacer", but you're about to travel down the road I have so many times with stuff like this, only to end up wasting a bunch of time.
Three years ago, he gave you the best advice possible.

Fast forward to now, and you're still wasting an inordinate amount of time and money on pulling off some sort of piecemeal solution when you could have had this rectified ages ago -- by just replacing everything with the proper (not things you've found that you think will work) parts.

Since you did find JOD's quote, I'm surprised you didn't also find my hat-tip to him, in agreement, with the caveat that replacing EVERYTHING EVAP & emissions related would be well over a couple thousand bucks..just for parts. Further, I don't consider it the 'waste' of time you obviously do, to understand how this system works, when it works, the roles all the various parts play, etc. My persistence has paid off, though it's taken longer than I thought and hoped for. You clearly don't have the patience for this.

Lessons learned are like bridges burned. You only need to cross them but once. This trip has indeed been educational.

Finally, your condescending tone hasn't added anything of value here, just annoyance!
 
Hat-tip? Sure. Actually listening? No.

Addressing the issue here isn't a "over a couple thousand bucks just for parts" matter -- I figured you'd frame it as such in an attempt to justify what you're doing. Instead, it just takes ordering the correct items, but you "refuse to throw parts at it" and have a "WTH" reaction at paying for them. As the former owner of two Volvo wagons, I understand the feeling, but also recoginize the proper action(s) to take.

Additionally, nor is it about persistence or patience. You want to play-around and tinker with the issue, troubleshooting in your own way and cobbling together a solution that's devised from supposition and ability to search parts catalogs.

And Education? Right. People are earning bachelors degrees in the same amount of time you've been fiddling around here.

As for condescending -- I'm not here to coddle, and nurture our relationship. Get the job done!
 
It's clear that this system is very fickle, because it is expecting certain exact pressures and flows from the OEM parts. So I would also urge you not to engage in parts substitution, it is likely to lead to a situation of even greater unknown.

If the two check valves are the same (quite possible they are not of course), you could try swapping them. The valve before the turbo is only going to open if you happen to be driving positive boost during a purge cycle. The one on the manifold will be flowing the rest of the time, which is almost always.
 
Last edited:
It is indeed fickle & 98's are well known for it. My indy sold me an ATE check valve for $10. Said they use these on a regular basis and all he works on are Volvos. The valve it replaced was also an ATE, but about 8 yrs old or so. Both of the newer PURGE & SHUT-OFF valves are Pierburg, which is an OEM supplier to European auto manufacturers. Plus, even though my previous gas cap passed a recent test, I replaced it with an OEM Volvo cap to rule it out and it HAS made a difference.

So far, so good!
 
Originally Posted By: mk378
If the two check valves are the same (quite possible they are not of course), you could try swapping them. The valve before the turbo is only going to open if you happen to be driving positive boost during a purge cycle. The one on the manifold will be flowing the rest of the time, which is almost always.
I did follow your advice and swap them yesterday. So the OEM Volvo valve is now between the intake manifold and the PURGE valve. The ATE valve is now connected to the bottom of the turbo inlet.

I will add that I have noticed an improvement in MPG + boost, post fixing the bad hoses/elbows using my DIY smoker. The gas gauge has only slowly moved since. Also remembered to disconnect the battery, and allow the fuel trims to reset.
 
Status
Not open for further replies.
Back
Top