I spent a very pleasant morning today adjusting the valves on my wife’s 2005 Acura MDX. The service was due at 105,000, along with new spark plugs and a new timing belt. I intended to spread these three services out some, and did the new plugs at about 90,000 miles, did the timing belt just shy of 100,000 miles…but…never could seem to find time for the valve adjustment job. I’m just now getting around to it, at 128,000 miles. Fortunately, the valve lash was still fine (more on that in a minute).
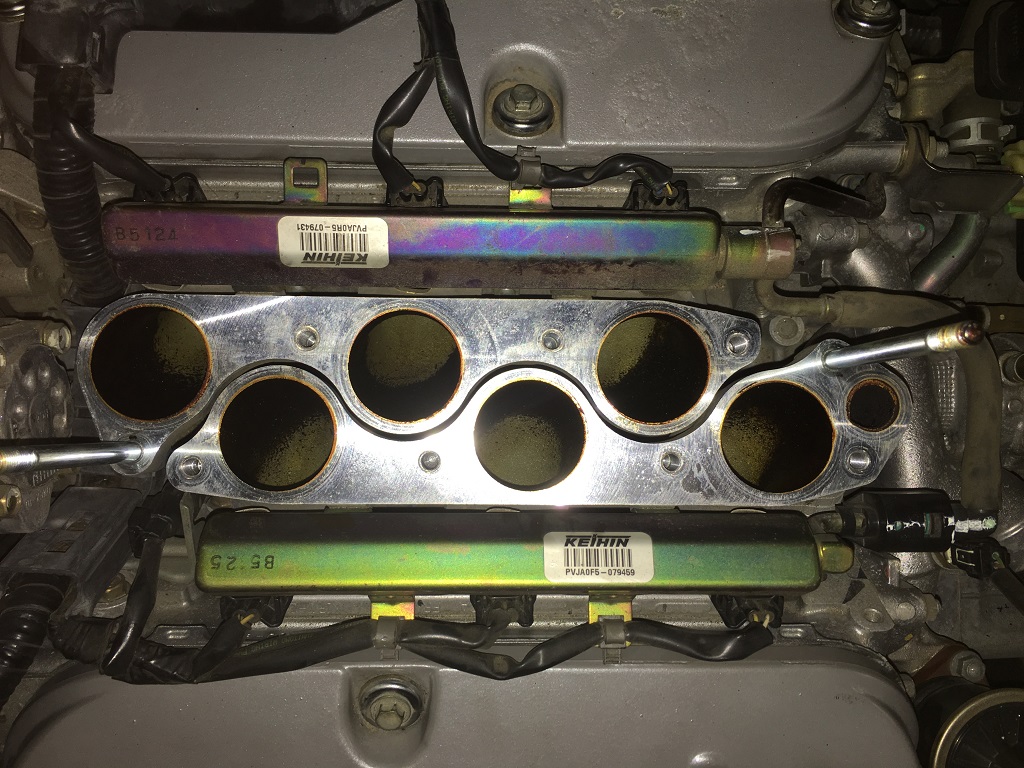
The upper intake plenum is a single cast aluminum unit, with a removable top cover that allows access to the fastening bolts and to the central chamber butterfly valve (which opens at 3,600 rpm to equalize the two plenum halves). It also delivers EGR to the engine, passed up from the lower intake manifold and delivered to each plenum half by an EGR pipe in the smaller top plenum chamber (the chamber nearest the throat of the plenum). There’s also a mass damper fastened to the bottom side of the plenum throat.
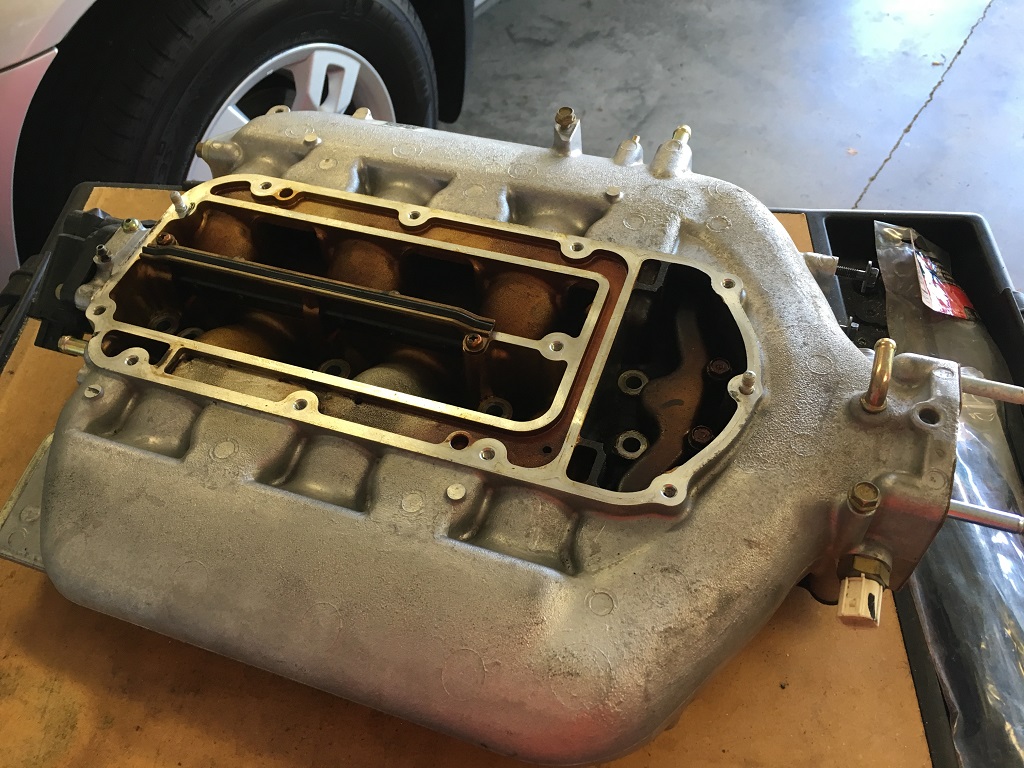
The upper plenum sits atop an aluminum spacer on the 3.5L engines destined for Honda’s vans and SUVs. This spacer lengthens the intake runners and adds low- and mid-range power to the curve. This is a somewhat common addition that owners of TLs and Accords make – those engines lack the spacer from the factory.
The seals are very high quality 3-layer metal seals that are reusable.
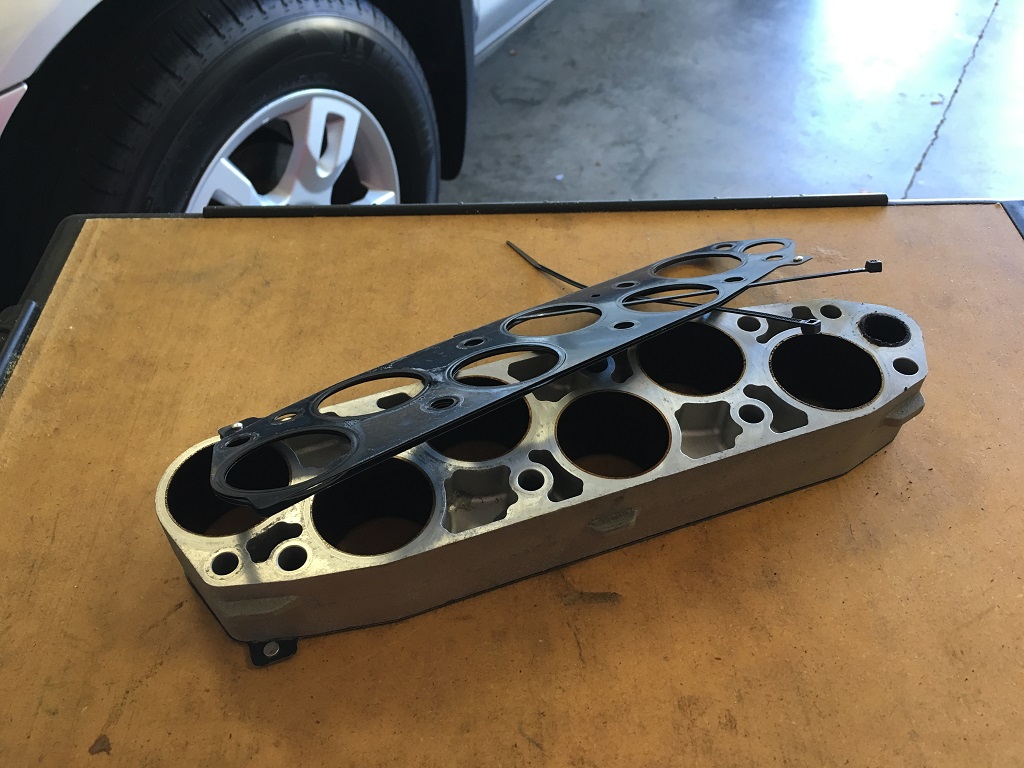
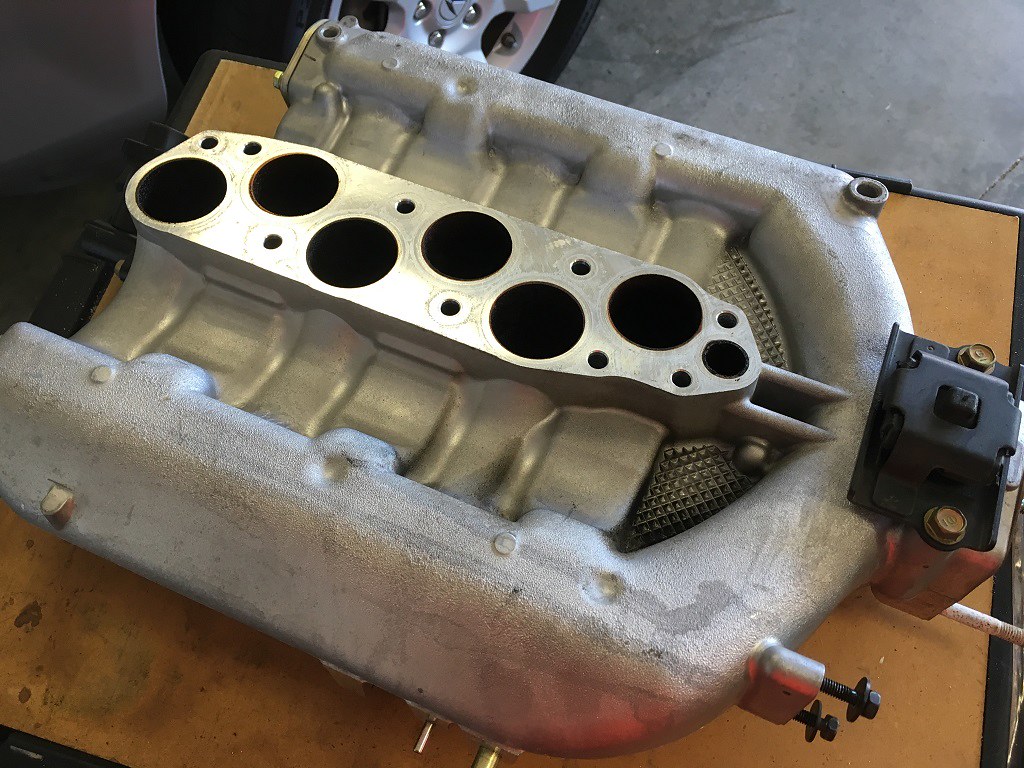
Interestingly, the lower intake manifold is actually two pieces – and bolts to the engine in halves. The small passage on the right side of the pictures next to the #6 intake passage is the EGR passage. Intake gasses are moving DOWN through the system in the first six passages and EGR gasses are moving UP through the system in that seventh passage.
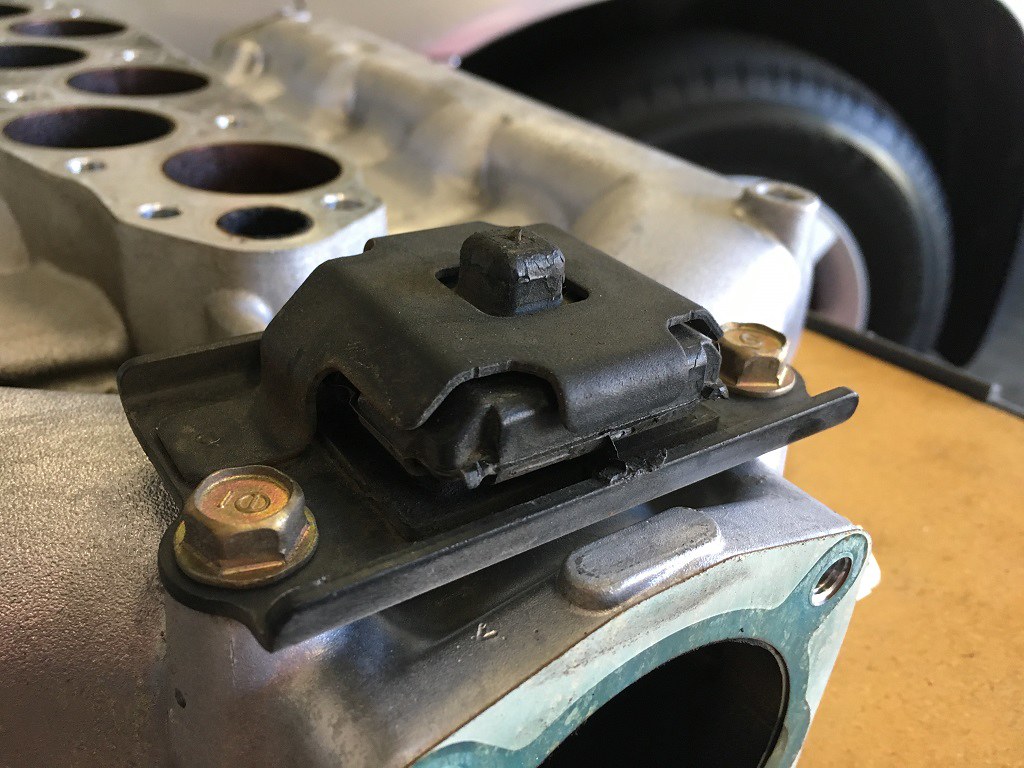
Keihin is a fuel systems supplier to Honda, and their emblem or label is adorned on the fuel rails and on the upper intake plenum. Keihin is also the carburetor supplier for Honda on their small engines (found on equipment like lawn mowers and pressure washers).
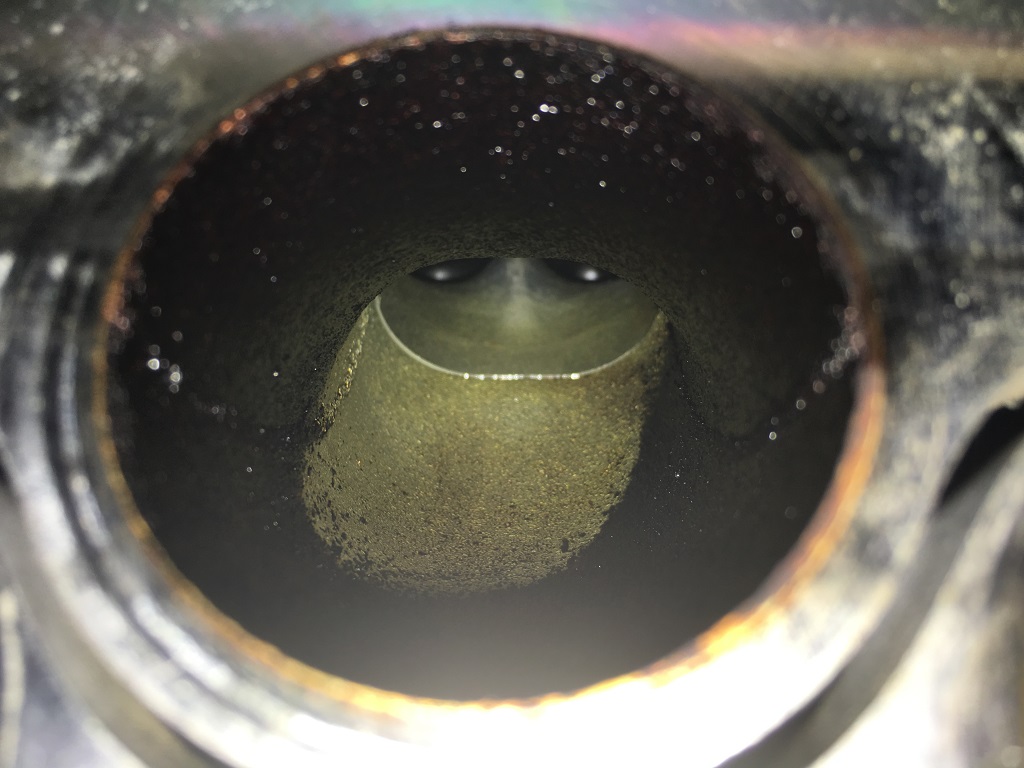
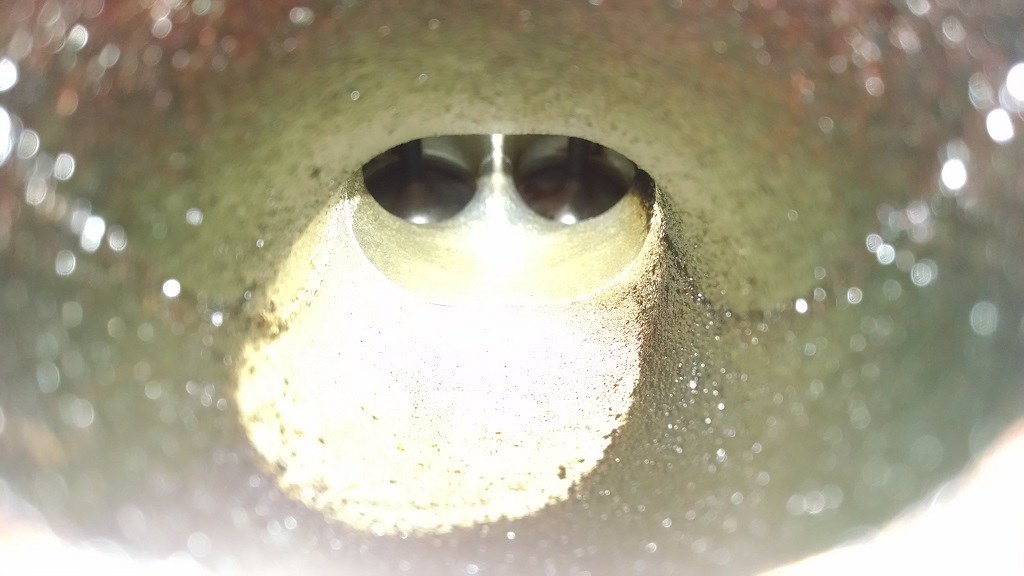
In the picture above, you can begin to make out the fuel injector spray pattern – by the lack of deposits on the intake passages downstream of the fuel injector. As an aside, I have really begun to enjoy doing maintenance work like this, because I learn something about my vehicle or about engines in general every time I do it. This really drives home for me the challenge engineers face with direct injection, where fuel is injected directly into the combustion chamber and not into the intake manifold or cylinder head. I’ve heard of “deposit buildup” and the need for more frequent valve cleaning on some of those designs, and this engine has very clearly demonstrated that potential challenge faced by powertrain engineers.
The pictures below are a close-up of one of the intake passages. It’s incredibly clear where the fuel sprays – and where it doesn’t! Look at how clean the tops of those intake valves are.
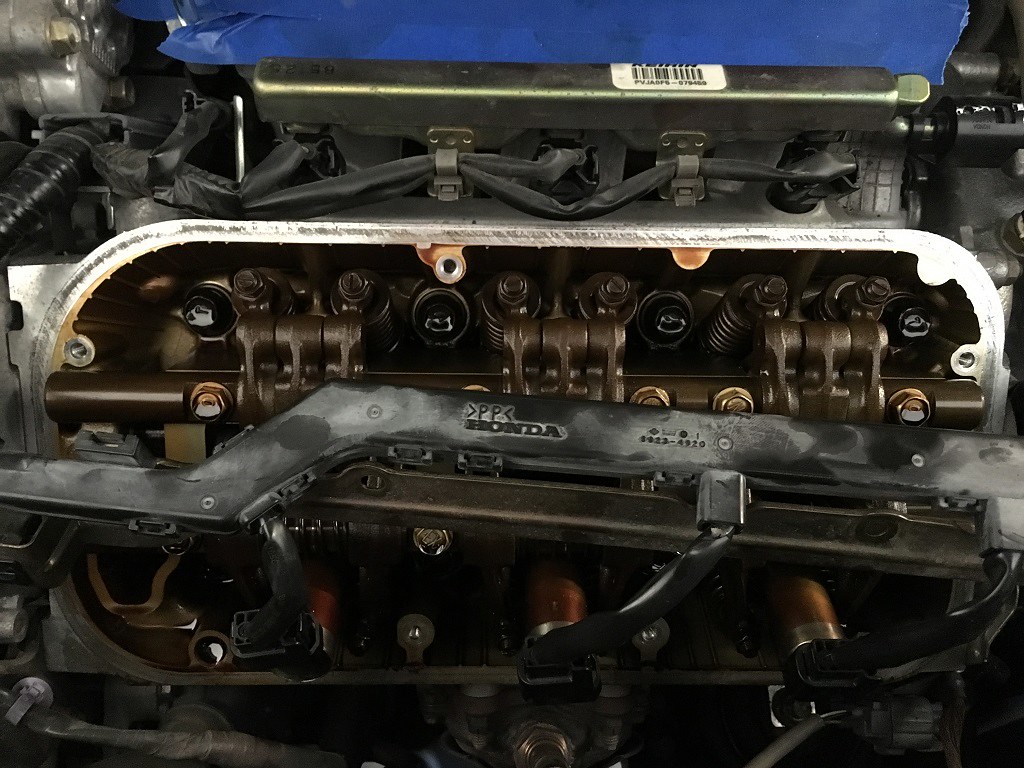
Everyone likes valvetrain pictures, right? I don’t have great ones here – if you want to see a Honda J-series valvetrain, there are a ton of pictures on the internet. But this is what this engine looks like. This oil, which is Peak Synthetic 0W-20, has about 3,000 miles on it. As you might expect from a transverse mounted V-6 engine, the front cylinder bank has a little more discoloration and varnish than the rear cylinder bank – the front bank gets that hot air blast from the radiator fans. This engine has had pretty consistent oil changes every 5,000 miles since new, and with everything from conventional Super Tech to synthetic Mobil 1.
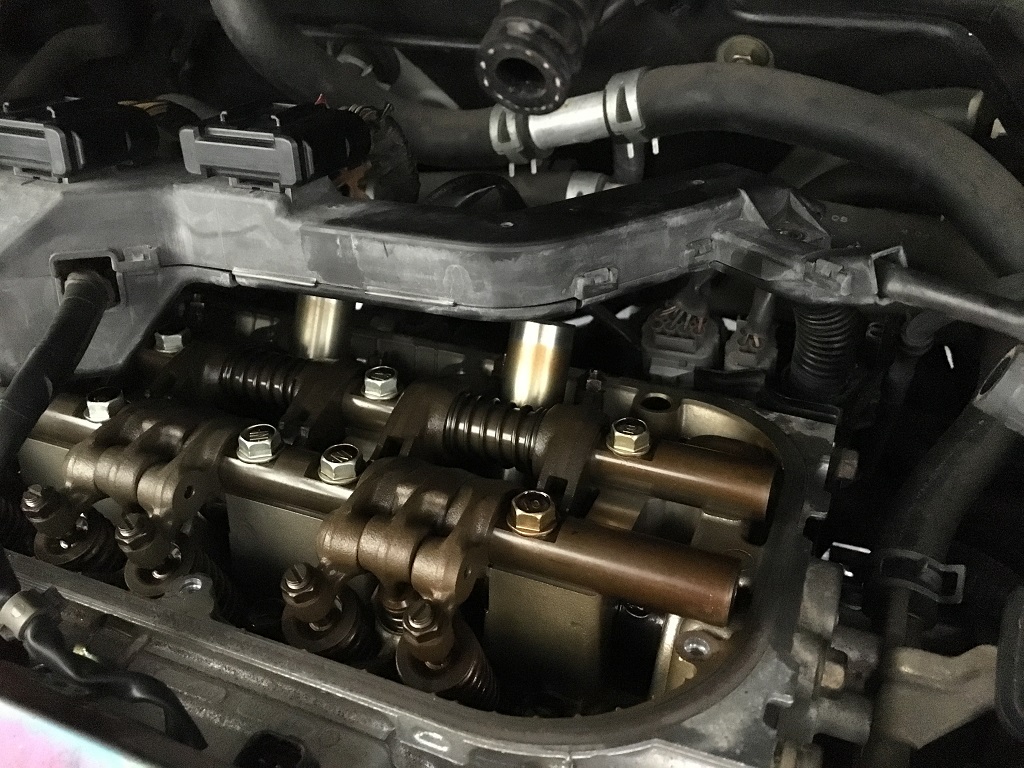
Okay, to the real work – adjusting the valves. The hardest part of the entire job was getting the rear cylinder head cover off the engine from underneath that recalcitrant wiring harness draped across it. The front cover was easier to wiggle off the engine, but the rear one was a challenge. It took me about 5 minutes of fiddling with it to get it out. Once I had access to all the valves, the job was a breeze.
The spec is 0.22mm +/- 0.02mm for the intake valves and 0.30mm +/- 0.02mm for the exhaust valves. That converts roughly to 0.009” and 0.012” respectively. I found all of the intake valves to be either perfect or ever so slightly loose, so I didn’t touch ‘em…any of ‘em. The exhaust valves were all tight, and I expected this. I expected worse, though. The engine was silent like a church mouse, and I was afraid that the valves were…too…quiet. The exhaust valves were pretty consistently dragging about 0.009”, just like the intakes. They need to be 0.012”, so I re-set all of them. I don’t have the special Honda valve adjustment tool, and I find the screwdriver-and-wrench method sort of awkward, especially when you’re reaching across an engine of an SUV (with a taller front fascia).
I found the best method was to crack the lock nuts loose with a 10mm socket, and turn the adjustment screw with my finger and thumb until it just barely trapped the feeler gauge against the top of the valve. I’d then turn the lock nut until first contact, then cinch it down with the 10mm socket. This worked well – it turned the adjustment screw a little tighter and locked the whole works in one motion. The 0.012” feeler gauge would have just a little drag as I moved it. I feel that there’s plenty of room for error here, especially erring on the loose side. They’ll tend to get tight over time, and there’s still plenty of tolerance – anything from 0.010” to 0.014” is okay according to Honda. I actually might have been able to squeeze a 0.010” gauge through many of the exhaust valve gaps before I started, and they’d have barely been within spec. My only concern was making sure the lash wasn’t closed on any of them, and that was far from happening – great news.
Tools used were few – Honda engines are just so easy to service. All I needed was a 10mm socket (which took care of most of it), a 12mm socket (for the intake manifold and throttle body fasteners), a 6mm hex cap screw socket (for the coil pack cap screws), the two feeler gauge sizes, various ratchets and extensions, and pliers for the various vacuum hose clamps. I didn’t replace a single part or gasket during this job. The cylinder head cover seals are very pliable rubber seals – both on the perimeter and sealing the spark plug tubes. No replacement necessary. Likewise, the intake manifold spacer and plenum seals are 3-layer metal seals and it’s just not necessary to replace those. As I was after the timing belt job, I came away very impressed with the quality of material and design, here. Not once did I try to access a fastener to say, “well, THAT’s dumb – I can’t even get to it!” Not once did I break a cheap plastic clip or tear a vacuum line – the clips are durable and many of the “rubber” lines I had to touch are actually silicone in material – and seem to last forever.
Start-to-finish, it took about four working hours. It was a pleasant and enjoyable four hours. I learned a lot about the engine’s design and construction and gained an appreciation for how a lot of this stuff works. I put it all back together and it runs smooth and silent, just like it did before I started.
I look forward to doing all three services at once on our 2009 Ridgeline in the spring – it’s got 99,8xx miles at the moment, and I’ll schedule the plugs, the timing belt, and the valve adjustment for a fair weather Saturday in the spring some time. Parts for the whole service total about $500 from a discount Honda dealer online, and it’s a $1,500-2,000 job if you have a Honda dealer do all three.
Or a very relaxing Saturday out in the garage!
The upper intake plenum is a single cast aluminum unit, with a removable top cover that allows access to the fastening bolts and to the central chamber butterfly valve (which opens at 3,600 rpm to equalize the two plenum halves). It also delivers EGR to the engine, passed up from the lower intake manifold and delivered to each plenum half by an EGR pipe in the smaller top plenum chamber (the chamber nearest the throat of the plenum). There’s also a mass damper fastened to the bottom side of the plenum throat.
The upper plenum sits atop an aluminum spacer on the 3.5L engines destined for Honda’s vans and SUVs. This spacer lengthens the intake runners and adds low- and mid-range power to the curve. This is a somewhat common addition that owners of TLs and Accords make – those engines lack the spacer from the factory.
The seals are very high quality 3-layer metal seals that are reusable.
Interestingly, the lower intake manifold is actually two pieces – and bolts to the engine in halves. The small passage on the right side of the pictures next to the #6 intake passage is the EGR passage. Intake gasses are moving DOWN through the system in the first six passages and EGR gasses are moving UP through the system in that seventh passage.
Keihin is a fuel systems supplier to Honda, and their emblem or label is adorned on the fuel rails and on the upper intake plenum. Keihin is also the carburetor supplier for Honda on their small engines (found on equipment like lawn mowers and pressure washers).
In the picture above, you can begin to make out the fuel injector spray pattern – by the lack of deposits on the intake passages downstream of the fuel injector. As an aside, I have really begun to enjoy doing maintenance work like this, because I learn something about my vehicle or about engines in general every time I do it. This really drives home for me the challenge engineers face with direct injection, where fuel is injected directly into the combustion chamber and not into the intake manifold or cylinder head. I’ve heard of “deposit buildup” and the need for more frequent valve cleaning on some of those designs, and this engine has very clearly demonstrated that potential challenge faced by powertrain engineers.
The pictures below are a close-up of one of the intake passages. It’s incredibly clear where the fuel sprays – and where it doesn’t! Look at how clean the tops of those intake valves are.
Everyone likes valvetrain pictures, right? I don’t have great ones here – if you want to see a Honda J-series valvetrain, there are a ton of pictures on the internet. But this is what this engine looks like. This oil, which is Peak Synthetic 0W-20, has about 3,000 miles on it. As you might expect from a transverse mounted V-6 engine, the front cylinder bank has a little more discoloration and varnish than the rear cylinder bank – the front bank gets that hot air blast from the radiator fans. This engine has had pretty consistent oil changes every 5,000 miles since new, and with everything from conventional Super Tech to synthetic Mobil 1.
Okay, to the real work – adjusting the valves. The hardest part of the entire job was getting the rear cylinder head cover off the engine from underneath that recalcitrant wiring harness draped across it. The front cover was easier to wiggle off the engine, but the rear one was a challenge. It took me about 5 minutes of fiddling with it to get it out. Once I had access to all the valves, the job was a breeze.
The spec is 0.22mm +/- 0.02mm for the intake valves and 0.30mm +/- 0.02mm for the exhaust valves. That converts roughly to 0.009” and 0.012” respectively. I found all of the intake valves to be either perfect or ever so slightly loose, so I didn’t touch ‘em…any of ‘em. The exhaust valves were all tight, and I expected this. I expected worse, though. The engine was silent like a church mouse, and I was afraid that the valves were…too…quiet. The exhaust valves were pretty consistently dragging about 0.009”, just like the intakes. They need to be 0.012”, so I re-set all of them. I don’t have the special Honda valve adjustment tool, and I find the screwdriver-and-wrench method sort of awkward, especially when you’re reaching across an engine of an SUV (with a taller front fascia).
I found the best method was to crack the lock nuts loose with a 10mm socket, and turn the adjustment screw with my finger and thumb until it just barely trapped the feeler gauge against the top of the valve. I’d then turn the lock nut until first contact, then cinch it down with the 10mm socket. This worked well – it turned the adjustment screw a little tighter and locked the whole works in one motion. The 0.012” feeler gauge would have just a little drag as I moved it. I feel that there’s plenty of room for error here, especially erring on the loose side. They’ll tend to get tight over time, and there’s still plenty of tolerance – anything from 0.010” to 0.014” is okay according to Honda. I actually might have been able to squeeze a 0.010” gauge through many of the exhaust valve gaps before I started, and they’d have barely been within spec. My only concern was making sure the lash wasn’t closed on any of them, and that was far from happening – great news.
Tools used were few – Honda engines are just so easy to service. All I needed was a 10mm socket (which took care of most of it), a 12mm socket (for the intake manifold and throttle body fasteners), a 6mm hex cap screw socket (for the coil pack cap screws), the two feeler gauge sizes, various ratchets and extensions, and pliers for the various vacuum hose clamps. I didn’t replace a single part or gasket during this job. The cylinder head cover seals are very pliable rubber seals – both on the perimeter and sealing the spark plug tubes. No replacement necessary. Likewise, the intake manifold spacer and plenum seals are 3-layer metal seals and it’s just not necessary to replace those. As I was after the timing belt job, I came away very impressed with the quality of material and design, here. Not once did I try to access a fastener to say, “well, THAT’s dumb – I can’t even get to it!” Not once did I break a cheap plastic clip or tear a vacuum line – the clips are durable and many of the “rubber” lines I had to touch are actually silicone in material – and seem to last forever.
Start-to-finish, it took about four working hours. It was a pleasant and enjoyable four hours. I learned a lot about the engine’s design and construction and gained an appreciation for how a lot of this stuff works. I put it all back together and it runs smooth and silent, just like it did before I started.
I look forward to doing all three services at once on our 2009 Ridgeline in the spring – it’s got 99,8xx miles at the moment, and I’ll schedule the plugs, the timing belt, and the valve adjustment for a fair weather Saturday in the spring some time. Parts for the whole service total about $500 from a discount Honda dealer online, and it’s a $1,500-2,000 job if you have a Honda dealer do all three.
Or a very relaxing Saturday out in the garage!

