I wanted to share some GM fitting related discoveries with this group.
In my quest to add a spin-on transmission filter and trans-cooler to my 2004 Chev Avalanche, I have to interrupt the trans cooler lines into the radiator. To do so cleanly, you have to mess with the elusive (and irritating)GM Push-fit connectors.
The aftermarket provides a machined tube with the male push-fit profile, to go into the female push-fit connector in the radiator. Then you are supposed to use hose-clamps to connect this to a hose to the cooler.
The aftermarket recommends connecting hose to the cooler onto the male steel factory cooler lines with hose-clamps...but in order to get a semi reliable connection here, you need to flare the factory line.
I don't like messing with factory lines, and I don't like hose clamps. I wanted a positive connection to all steel lines.
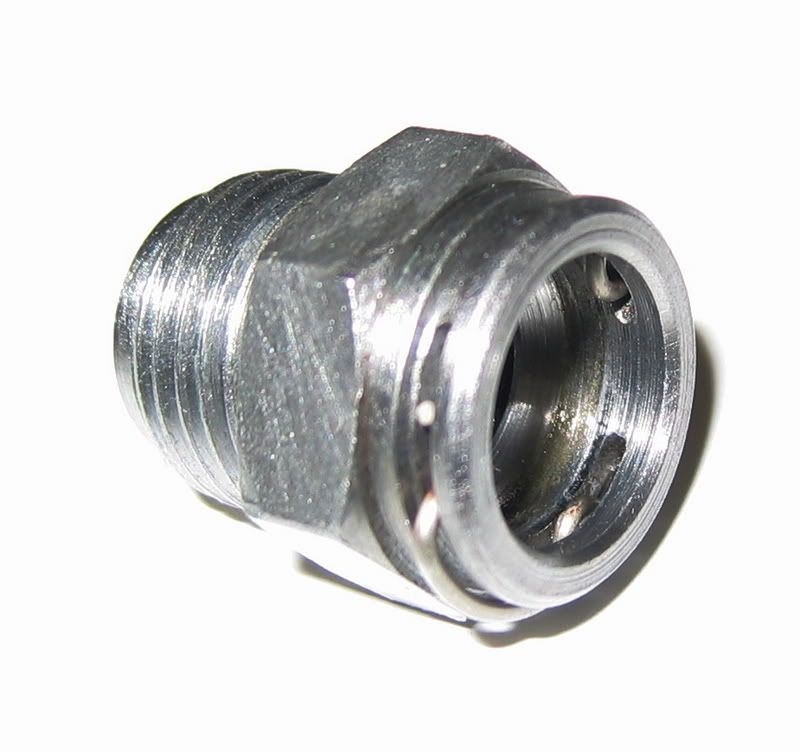
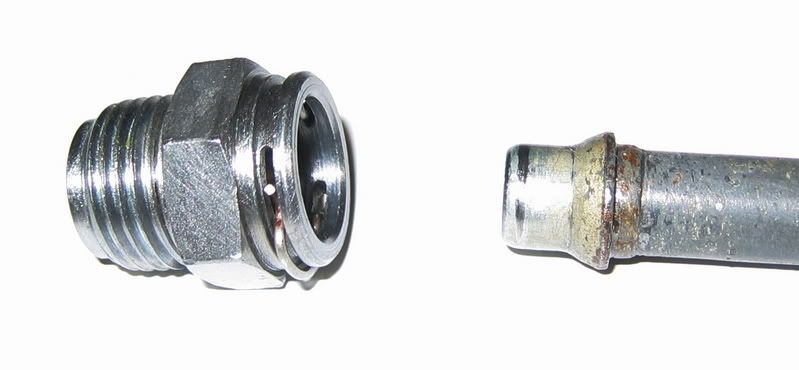
Here's the GM push fit connector, and the GM line profile. The E-clip holds the GM line in the connector, and an O-ring inside seals it off. The part that screws into the radiator is a 3/8" inverted flare if I am not mistaken.
Anyhow, I called the dealership to ask how much the push-fit connector is...... $45! And even if I blew this money, I still wouldn't have a proper GM steel line that I could slip into this fitting, and flare the other end to an SAE 45* female for a leak free coupling to a custom line I would build.
Off to the junkyard, and after a fair amount of looking, I found two of these babies (plus around 6" of the lines with proper proprietary push-fit flare on the ends)...$90 worth of parts for a $1 admission fee and $2.50 for the two lines/fittings. A little chemical rust stripper and they look almost new.
A couple of learnings for those wanting to use these Push-fit fittings:
1. 1995 and earlier (AFAIK)GM radiator internal coolers (on full sized trucks and vans) use a 3/8" inverted flare fitting to the radiator.
2. 1996 and later (AFAIK) GM radiator internal coolers (on full sized trucks and vans) use a push fit fitting like the one above, which threads in to the un-coincidentally 3/8" inverted flare radiator fitting.
3. Due to point 2. above, you could avoid all of this hassle by just threading the push-fit fitting out of the radiator and hooking up your cooler lines to interrupt the factory trans or oil cooling the system using a:
a./ female 3/8" inverted flare (now at end of the push-fit fitting that you removed from the radiator and clipped to the end of the factory cooler line); and
b./ male 3/8 inverted flare fitting that would be threaded into the radiator in place of the push-fit adapter pictured above.
This would be the simplest because 3/8" steel lines are easy to find at any auto parts store with inverted flare fittings already installed.
Why didn't I just do this? I didn't know what was on the other end of the push-fit fitting where it threaded into the radiator tank. More importantly, my radiator tanks are plastic, and after unsuccessfully applying a fair amount of force to this fitting to attempt to thread it out (there is thread-locker applied), I chickened out. I had visions of shattering the plastic radiator tank around the fitting before it broke free of the radiator tank. So I thought it would be better to experiment on a junked vehicle at the junk-yard.
The good news is that after finding the right vehicle, I really reefed on the fittings at the junkyard to get them out of a 10 year old plastic tanked radiator, and there were no signs of cracking. With a fair amount of force they came out without drama.
The bolder among us may have the courage to try this on their own car. This saves the $45 fitting, and alot of hassle, and with some female and male 3/8" inverted flare fittings, adaptors and 3/8 tubing, you'll have a bulletproof connection.
After all of this, I will say that the push-fit fittings are nice pieces and function very well. Pulling them apart is as simple as sliding back a plastic sleeve (not shown) over the e-clip, removing the e-clip, and sliding the hose out. Very handy for the trans-powered trans fluid pump out and refill. If you know what the e-clip looks like and how it works, you can easily remove a clean one with your finger-nail. A dental pick also works well.
I hope this information is helpful to someone, and I'll post pictures of my all-steel-lines aux trans cooler and filter when available.
In my quest to add a spin-on transmission filter and trans-cooler to my 2004 Chev Avalanche, I have to interrupt the trans cooler lines into the radiator. To do so cleanly, you have to mess with the elusive (and irritating)GM Push-fit connectors.
The aftermarket provides a machined tube with the male push-fit profile, to go into the female push-fit connector in the radiator. Then you are supposed to use hose-clamps to connect this to a hose to the cooler.
The aftermarket recommends connecting hose to the cooler onto the male steel factory cooler lines with hose-clamps...but in order to get a semi reliable connection here, you need to flare the factory line.
I don't like messing with factory lines, and I don't like hose clamps. I wanted a positive connection to all steel lines.
Here's the GM push fit connector, and the GM line profile. The E-clip holds the GM line in the connector, and an O-ring inside seals it off. The part that screws into the radiator is a 3/8" inverted flare if I am not mistaken.
Anyhow, I called the dealership to ask how much the push-fit connector is...... $45! And even if I blew this money, I still wouldn't have a proper GM steel line that I could slip into this fitting, and flare the other end to an SAE 45* female for a leak free coupling to a custom line I would build.
Off to the junkyard, and after a fair amount of looking, I found two of these babies (plus around 6" of the lines with proper proprietary push-fit flare on the ends)...$90 worth of parts for a $1 admission fee and $2.50 for the two lines/fittings. A little chemical rust stripper and they look almost new.
A couple of learnings for those wanting to use these Push-fit fittings:
1. 1995 and earlier (AFAIK)GM radiator internal coolers (on full sized trucks and vans) use a 3/8" inverted flare fitting to the radiator.
2. 1996 and later (AFAIK) GM radiator internal coolers (on full sized trucks and vans) use a push fit fitting like the one above, which threads in to the un-coincidentally 3/8" inverted flare radiator fitting.
3. Due to point 2. above, you could avoid all of this hassle by just threading the push-fit fitting out of the radiator and hooking up your cooler lines to interrupt the factory trans or oil cooling the system using a:
a./ female 3/8" inverted flare (now at end of the push-fit fitting that you removed from the radiator and clipped to the end of the factory cooler line); and
b./ male 3/8 inverted flare fitting that would be threaded into the radiator in place of the push-fit adapter pictured above.
This would be the simplest because 3/8" steel lines are easy to find at any auto parts store with inverted flare fittings already installed.
Why didn't I just do this? I didn't know what was on the other end of the push-fit fitting where it threaded into the radiator tank. More importantly, my radiator tanks are plastic, and after unsuccessfully applying a fair amount of force to this fitting to attempt to thread it out (there is thread-locker applied), I chickened out. I had visions of shattering the plastic radiator tank around the fitting before it broke free of the radiator tank. So I thought it would be better to experiment on a junked vehicle at the junk-yard.
The good news is that after finding the right vehicle, I really reefed on the fittings at the junkyard to get them out of a 10 year old plastic tanked radiator, and there were no signs of cracking. With a fair amount of force they came out without drama.
The bolder among us may have the courage to try this on their own car. This saves the $45 fitting, and alot of hassle, and with some female and male 3/8" inverted flare fittings, adaptors and 3/8 tubing, you'll have a bulletproof connection.
After all of this, I will say that the push-fit fittings are nice pieces and function very well. Pulling them apart is as simple as sliding back a plastic sleeve (not shown) over the e-clip, removing the e-clip, and sliding the hose out. Very handy for the trans-powered trans fluid pump out and refill. If you know what the e-clip looks like and how it works, you can easily remove a clean one with your finger-nail. A dental pick also works well.
I hope this information is helpful to someone, and I'll post pictures of my all-steel-lines aux trans cooler and filter when available.
