How much should I thin spar urethane?

Status
Not open for further replies.

JHZR2

Staff member
Joined
Dec 14, 2002
Messages
52,795
Location
New Jersey
I have a real old can of spar urethane which Ive been trying to use up. The instructions for my new tool chest said to install two coats of urethane, so I used this.

Last time I used it, on some wood inside my shed, it went on with a beautiful, smooth coating.

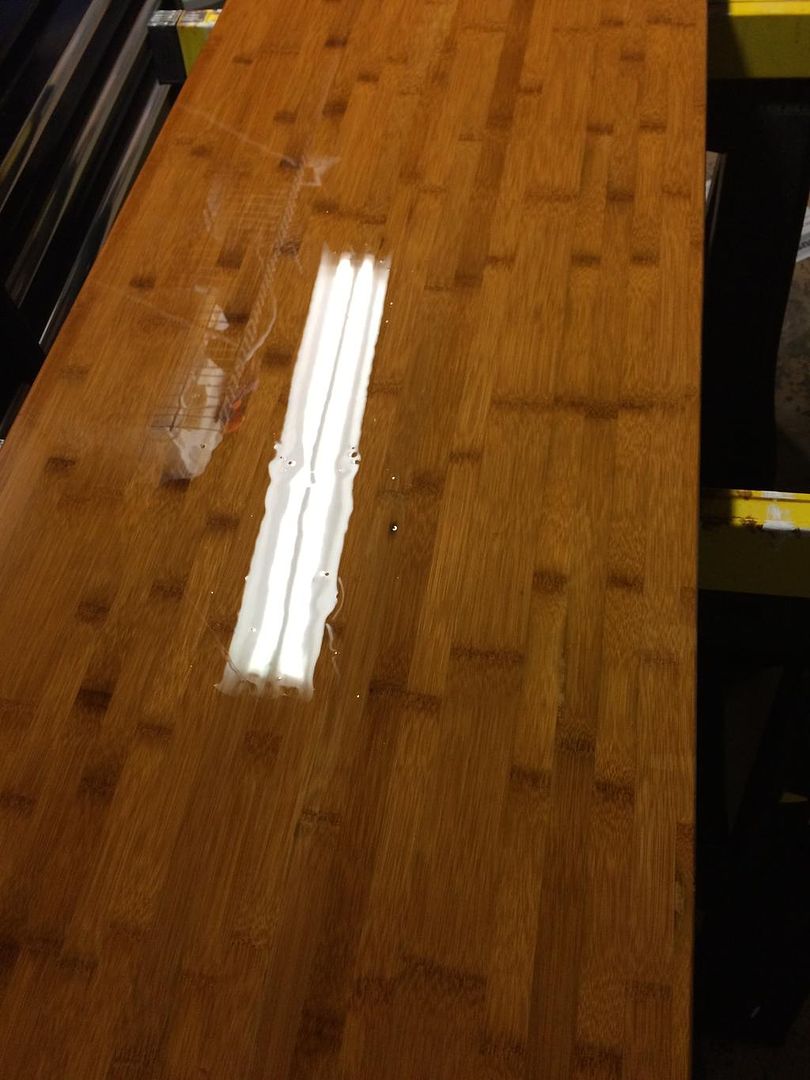
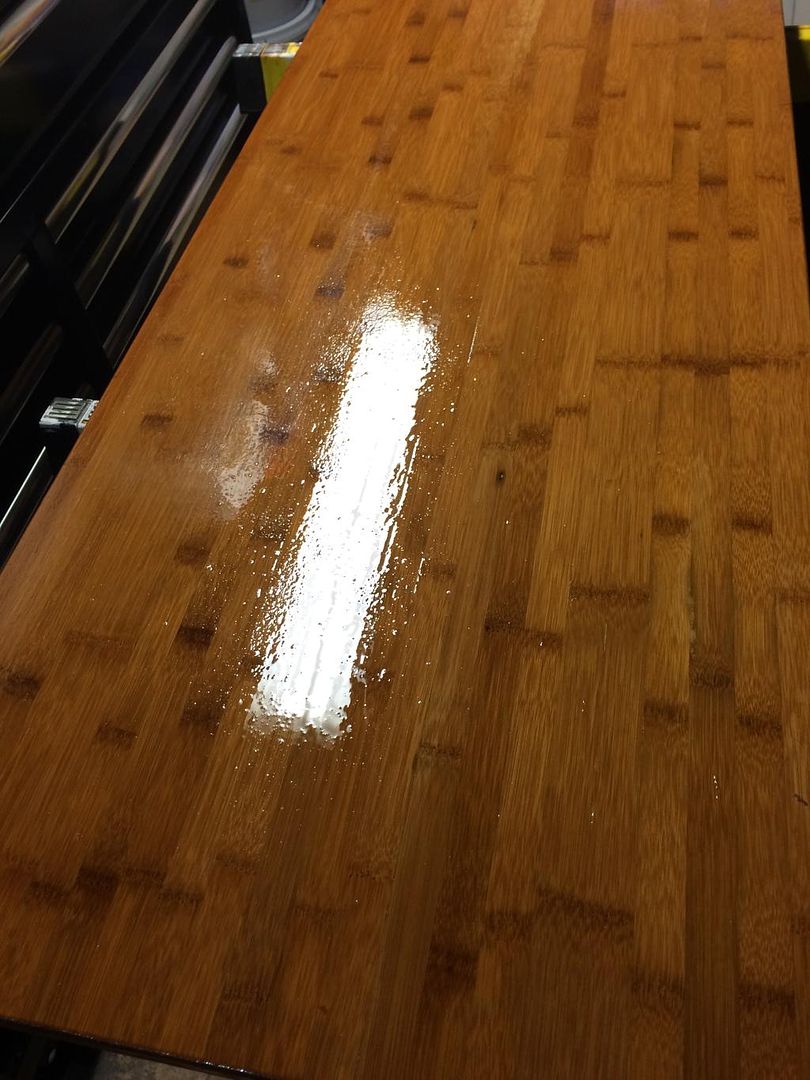
I sanded, tack clothed and vacuumed, and then wiped with mineral spirits. After it dried, I put the urethane down...

I got this:

0A3B217A-DDBD-410B-86F0-B1EA0BA9B2D0_zpsu9xc5dyo.jpg


There is some polymerized material in the bottom...

6752A3E7-6208-4B83-A86F-A1636ED5F1FD_zps3bbc0d0b.jpg


So Im not sure if after sanding it, if I should buy some other urethane new, or just thin this down or what...

Recommendations? This isnt furniture and doesnt need to be perfect, but I dont want a million tiny bubbles.

Thanks!
 
It's gone over....air will oxidize the finish, even in the can, and when the finish gets too oxidized, no amount of thinner will work. I would get a new can. I would sand this smooth, and I would apply at least 3 coats, according to the can directions. 3 coats will get you a durable finish...and this is your workbench, right?
 
On older cans you have to bring them inside to warm them up and then stir A LOT, never shake, in order to get the polymer that has fallen out of suspension back into them.
I have a few cans that this did worked on.

I do the same thing to work benches, coat them with a couple layers of polyurethane/spar urethane. The first layer you put on thick, as the wood/MDF/whatever absorbs lots. Then each coat afterwards you put a lighter coat and sand lighly between coats.

I've also thinned it out 50/50 with mineral spirits and put on several very thin coats on some furniture I was working with. I did the insides of drawers and the inside of the furniture as it came out of my Grandmother's house and she smoked since she was 16.
I disassembeled the furniture, washed it with soap and water, sanded, stained, then poly on the inside to seal it off, then more layers of stain to the outside.
I did it when it was warmer out, and gave it 12-24 hours between coats.

For really old cans I'd have no issue with just pouring in some mineral spirits and stirring it up and experimenting. I've done it before on pieces that I wouldn't of cried if I had to trash them.
They all turned out well.
 
After using varnish I like to Flush the remaining varnis in the can with inert gas
(from my MIG welder) befor replacing the lid.

Right now I would suggest you dump that old varnish or strain what is left, if you intend to use it right away.

Sand down the project and start over again.
 
Originally Posted By: Astro14
3 coats will get you a durable finish...and this is your workbench, right?


Its "a workbench" sure, more like a space to put stuff Im working on. I have a very large wood workbench and then another old wood 24x48 cabinet with a heavy plywood top for doing real stuff. Its the tool chest that I got a killer deal on - discussed a bit in another thread (damage repair). Instructions said to put two coats of poly on it...

As it has dried, many of the bubbles have gone away and it has smoothed a bit. But I wont be using that stuff again. I think that even a fine grit sandpaper (180 or even maybe 200+) will smooth it, and then Ill vacuum/wipe with mineral spirits and take it from there. If I need to more aggressively remove whats left then, so be it.

I wonder how the absorbency of bamboo plays into things. Its awful dense.
 
Real old can...has it been stored indoors or out? I've never seen clumped poly like that ever before. Is there a date on the can? IOW, it may not fully harden, leaving a sticky surface. If so, you'll have to scrape it off with a plane or cabinet scraper as it'll quickly gum up sandpaper.

BTW, not sure what applicator you used, but I've learned that a foam brush is great for a bubble-free poly finish. After it's fully cured, you can flatten it if you'd like.
 
This stuff is probably from 2008 or 2009... Yeah its old.

I went to check on it in my basement shop, which is fairly cold, and most of it was still a bit sticky. Ill work on it this weekend, not a big deal. Many of the bubbles were gone and it actually looked pretty good.

Im a bit surprised at how it went down, since I applied some to a few spots in my shed this summer and it went down nicely.

It has always been stored indoors in my basement.
 
Bubbles can be caused by increasing temps after application. Always best to coat wood initially in falling temperatures.

So the polymerization is not necessarily to blame for the bubbles. Does it feel gummy still, or did it dry as hard as can be expected?

With epoxy I like popping bubbles with a torch moved quickly over the bubble at a distance and a very obtuse angle.

But epoxy is not flammable.
Epoxy is exothermic, so application causes the surface it is applied to to heat up slightly, So best to have the object hotter than the epoxy could get the surface as it cures.
 
Im pretty sure bubbles were my technique and perhaps to some extent issues with the solvents and thinning of the urethane (I should have added turpentine or mineral spirits I guess).

Yes it feels gummy. Im going to try to get it off with a thin, sharp scraper (I dont want to mess up my plane) with some solvents and then sand and go again... With new Poly.

For the new poly, should I select spar utethane or just a floor type polyurethane? Intent is some water/solvent/acid resistance and easier cleanup when a mess is made...
 
How long has it been drying, and at what temperature?

I think yo umight be underestimating the difficulty of removing it, and you might wind up gouging the bamboo with a scraper.

Spar varnish usually has more uv protectents in it.

For Indoor wood, my favorite polyurethane has been Zar brand.

Much better than Varathane or Minwax products in appearance and ease of application(self levelling). not sure about durability though.

I've also found water based finishes have little chemical resistance, but would cure on a Pau Ferro oily hardwood where oil based Minwax would not.

Toughest polyurethane I have used by far is System 3 WR-LPU with the cross linker mixed in. The price is scary though, But the finish is beautiful without adding an amber tint, and very scratch resistant, and chemical resistant. This has no issues curing on Pau ferro.
 
Originally Posted By: wrcsixeight
How long has it been drying, and at what temperature?

I think yo umight be underestimating the difficulty of removing it, and you might wind up gouging the bamboo with a scraper.

Spar varnish usually has more uv protectents in it.

For Indoor wood, my favorite polyurethane has been Zar brand.

Much better than Varathane or Minwax products in appearance and ease of application(self levelling). not sure about durability though.

I've also found water based finishes have little chemical resistance, but would cure on a Pau Ferro oily hardwood where oil based Minwax would not.

Toughest polyurethane I have used by far is System 3 WR-LPU with the cross linker mixed in. The price is scary though, But the finish is beautiful without adding an amber tint, and very scratch resistant, and chemical resistant. This has no issues curing on Pau ferro.


When I checked it last, it had been drying for over 24 hours but in cold conditions, say 55 degrees or so.

Im sure it will be tough. I think if it isnt gummy I can sand it lightly and then put some fresh poly over top. It just needs to get to that point.

Im sure with the right flex and edge on a scraper, I could at least scrape some of it off. Whether that is prudent or not is another story. It is after all, only a tool chest top...
 
I'd give it more time at a higher temp and see if it hardens up. Can you stick it where it will get some sun light?

If it does, sand with 220 on a flat sanding block, get the dust out of the broken bubble craters, and put a couple more layers of New product on it, in warmer temps.

55f is too low for these types of finishes to cure properly, IME. But that gunk stuck on the bottom of your old can is the unknown as to if it can cure completely or not. I have found similar stuff on a can I used and it still got hard, but I think it was just the particulates to make glossy poly into satin finish, because it did not dry satin, but mostly glossy

If it remains gummy, I'd get harbor freight's cheapest power planer, and sacrifice it and a few sets of steel blades, or a belt sander and sacrifice a bunch of 40 grit belts.

If you can hook a vacuum to the planer, you might not even destroy it. Depends on how gummy it is, and how much it bogs down the planer taking a pass just deep enough to get to wood on one pass.
 
Originally Posted By: JHZR2
I think if it isnt gummy I can sand it lightly and then put some fresh poly over top. It just needs to get to that point.

Im sure with the right flex and edge on a scraper, I could at least scrape some of it off. Whether that is prudent or not is another story. It is after all, only a tool chest top...

Anyway you can bring it indoors, into a heated environment? If not, perhaps you can shine a couple of flood lights on it?

I would advise against putting new PU over old, uncured PU. You'll have a hard layer on top of a soft one. The result is greatly diminished durability.

Since PU cures by polymerization, not evaporation one way to test is to flood the surface with mineral spirits, let it sit a few minutes, then attempt to wipe it off. If some is removed, then it's Tango Uniform and you'll have to completely remove it down to bare wood, and start over...but wait until your neck-of-the-woods warms up to the 70's at least.

Mineral spirits will not dissolve cured PU. I know because I use it as a lubricant when flattening a PU finish.
 
A little better:

93481186-6C43-45A8-8860-5D1A63B0C9AD_zpsnl16fiw0.jpg


I sanded with 150 then 220, lots of white messy dust...

Wiped clean, then wiped with mineral spirits, then tack clothed.

I'm still getting some spots, even with fresh urethane thinned down about 25%.

I think some are bubbles, because I can pop some by blowing on them. But others I think are actually a raising of the bamboo fibers (remember this is cheap hd bought on massive discount due to damage, not fine wood) when I put the poly on it.

I'm thinking maybe next time I'll just scuff very gently and then put more on, and perhaps it will come out real smooth and flat? How necessary is a lot of sanding for adhesion?
 
I'm glad you tossed the other can of poly! A few things come to mind here, so a few questions follow.

How long between coats are you allowing?

What kind of brush are you using?

Is it dusty in the area where you're applying the finish coat?

A few tips for anyone who is interested. Your first coat should be the thinnest coat. The reason is you want it to penetrate deep into the wood, seal the grain, and raise it slightly. Sand with #220 sandpaper, thoroughly dust and tack cloth the surface. Avoid washing it down with mineral spirits. The reason is the mineral spirits can soften the uncured coat below it, and cause a reaction and mess up the finish. It can also cause the sanding dust to adhere to the uncured finish ruining the smooth surface you're trying to achieve. If you sand and find the finish balling up on the sandpaper, that means it didn't dry long enough! You want dust, not balled up finish. I recommend 3 coats on top of the sealer, sanded with #320 between finish coats 1&2, then use #440 to sand coat #2 [220 is only used to sand the first sealer coat]. 220 gives too much of a cut, and the poly has to fill and level those cuts. 220 also is aggressive for poly type finishes. For a painted surface 220 is perfect. All the sanding does is makes the surface smooth and gives it some tooth for the next coat of finish.

After the sealer coat, which is thinned 60/40 or 70/30, thin the product just enough to get it to flow and level nicely. Too thin weakens the film.

Use a hogs hair brush. Hand spin the brush before using it and then comb it. Then soak the brush in mineral spirits and spin it before dipping it into the finish. That is a little trick I use which helps a lot. You want to spin the thinner out of the brush so that it is dampened with, but not dripping thinner. Work fast with long brush strokes.

Final thoughts, everyone wants to know how long the product should dry between coats. The short answer is over night, over night as in finish the coat by 11:00 AM start the following morning. Finishing at 4:00 in the afternoon and re-coating at 9:00 in the morning might not be long enough. Quality work takes time! HTH this helps someone...
 
Ok thanks for the tips! The first level looks great with just a few of those tiny bumps seen still there. I'll do the finer grit, I may only do two coats since it's just a workbench, and I still used a spar urethane which seems to go down thicker.

Thanks!
 
Sounds good. Make sure its dry! I'd use 320 paper, and apply a coat, if decide on another coat use 400 for the last coat.

Let me know how it turns out.
 
I'm in no rush. I did it in the basement for space/fume/vent reasons (I have an exhaust fan plumbed into the dryer vent to help exchange sir for exactly this reason). I may bring it up to enjoy 60-65F in the house.

How important is an absolutely completely cured before the next coat? I'd guess it isn't, so long as it dusts and doesn't ball up as mentioned.

Is a foam brush or a clean cloth smarter to use for a final coat?
 
Status
Not open for further replies.
Back
Top