You are using an out of date browser. It may not display this or other websites correctly.
You should upgrade or use an alternative browser.
You should upgrade or use an alternative browser.
Compact Fluorescent Lighbulb Q?
- Thread starter 123Saab
- Start date
- Status
- Not open for further replies.

Originally Posted By: Quest
@jrustles:
yes, I have taken apart those SMPS inside CFL bulbs before (and still doing so to all of the burnt CFL bulbs that I have before I send them off to proper CFL recycling facilities here.). I take them apart to investigate their failure modes, component/design safety margin, etc.
That is pretty cool, Q! I have always been afraid to try and crack the cases open, I'd love to upgrade the components like you do. Would you ever consider posting a how-to next time you do it?
@jrustles:
It took me quite a few trial-n-error to figure out how to pry open the case but once it's opened, provided that you know how to properly do soldering, you shouldn't have too much difficulty (again, usual safety precautions must be observed...not for the faint of heart)...
Will try to compose one of these diy steps to share later..
Q.
CFL's are definitely cheaper vs. incandescent when you factor in the energy savings. The warm-up time is about 2 minutes for the bulbs I've used; not a big issue for me.
However, you should expect 5 useful months from a bulb that's used 7 hrs a day. After that point, they grow dimmer until they finally fail a few months later. The mfr claims of 5+ years lifespan border on blatant false advertising. I've used many bulbs over the years and none has ever lasted over 9 months before failing or becoming so dim that it's useless
However, you should expect 5 useful months from a bulb that's used 7 hrs a day. After that point, they grow dimmer until they finally fail a few months later. The mfr claims of 5+ years lifespan border on blatant false advertising. I've used many bulbs over the years and none has ever lasted over 9 months before failing or becoming so dim that it's useless
I can't speak for the CFLs. I have used a few in the past and wasn't impressed with the quality of light or the longevity, especially in fixtures that are frequently cycled on and off.
I can speak to the LEDs that we've used throughout the house for the last 3 months. I've been completely satisfied with them-the light quality is excellent, there have been no failures, nothing buzzes or flickers, and so far they've saved us about $1/day in lighting costs (we changed about 90 bulbs over to LED).
I can speak to the LEDs that we've used throughout the house for the last 3 months. I've been completely satisfied with them-the light quality is excellent, there have been no failures, nothing buzzes or flickers, and so far they've saved us about $1/day in lighting costs (we changed about 90 bulbs over to LED).
Originally Posted By: Pop_Rivit
I can't speak for the CFLs. I have used a few in the past and wasn't impressed with the quality of light or the longevity, especially in fixtures that are frequently cycled on and off.
I can speak to the LEDs that we've used throughout the house for the last 3 months. I've been completely satisfied with them-the light quality is excellent, there have been no failures, nothing buzzes or flickers, and so far they've saved us about $1/day in lighting costs (we changed about 90 bulbs over to LED).
What LED's are you using?
Originally Posted By: xfactor9
CFL's are definitely cheaper vs. incandescent when you factor in the energy savings. The warm-up time is about 2 minutes for the bulbs I've used; not a big issue for me.
However, you should expect 5 useful months from a bulb that's used 7 hrs a day. After that point, they grow dimmer until they finally fail a few months later. The mfr claims of 5+ years lifespan border on blatant false advertising. I've used many bulbs over the years and none has ever lasted over 9 months before failing or becoming so dim that it's useless
I have CFLs in my house that are over four years old and while they may be slightly dimmer than a new bulb I'm not seeing the difference when compared to a new one. I read an article a while back that says the main thing to remember about CFLs is once you turn them on they should stay on for at least five minutes otherwise the life span takes a hit. I don't have CFLs in spaces that the light is only turned on for a short period of time like the pantry.
Around here the local utility offers subsidies on CFLs but not LEDs yet. Once the LED prices go down a bit more I'll be using those.
Triple_Se7en
$50 Site Donor 2024
Where do you purchase your CFLs?
Originally Posted By: kmcavin
I have CFLs in my house that are over four years old and while they may be slightly dimmer than a new bulb I'm not seeing the difference when compared to a new one. I read an article a while back that says the main thing to remember about CFLs is once you turn them on they should stay on for at least five minutes otherwise the life span takes a hit. I don't have CFLs in spaces that the light is only turned on for a short period of time like the pantry.
Around here the local utility offers subsidies on CFLs but not LEDs yet. Once the LED prices go down a bit more I'll be using those.
How many hours per month do you use your CFL's? I have some CFL's that are a few years old, like in the garage, but they're used a couple of minutes per day. The ones that are used 6+ hours a day only last several months, regardless of brand.
While incandescent lifespan is dependent on number of cycles, fluorescent lifespan depends mainly on number of hours; # of cycles is a secondary concern. The CFL's in my garage are cycled nearly as often as the ones in my house, yet last many times longer because they're used 5 minutes per day vs 6 hours per day. If they were incandescent, they would blow out after 3 months despite the low hours.
Just like anything else, it's amazing how they cheapened up CFLs over the years. I've got a house full of $1/ea 60watt equivalent CFLs. Many of them have "flamed" (not really!) out in as little as a year or two, where others go on. The ones used more, seem to last longer.
OTOH, I've got some ancient CFLs that go on and on...
Just yesterday I picked up a 60w equiv GE, LED for a light at the top of our basement stairs ($1 CFL lasted 3yrs and many hours/day use there). For the $10 sale price, that sucker better last more than 3yrs. Funny though, because I remember clearly back in the late 1980's when CFLs first became readily available, they were $10/ea easily.
Last edited:
Originally Posted By: xfactor9
Originally Posted By: kmcavin
I have CFLs in my house that are over four years old and while they may be slightly dimmer than a new bulb I'm not seeing the difference when compared to a new one. I read an article a while back that says the main thing to remember about CFLs is once you turn them on they should stay on for at least five minutes otherwise the life span takes a hit. I don't have CFLs in spaces that the light is only turned on for a short period of time like the pantry.
Around here the local utility offers subsidies on CFLs but not LEDs yet. Once the LED prices go down a bit more I'll be using those.
How many hours per month do you use your CFL's? I have some CFL's that are a few years old, like in the garage, but they're used a couple of minutes per day. The ones that are used 6+ hours a day only last several months, regardless of brand.
While incandescent lifespan is dependent on number of cycles, fluorescent lifespan depends mainly on number of hours; # of cycles is a secondary concern. The CFL's in my garage are cycled nearly as often as the ones in my house, yet last many times longer because they're used 5 minutes per day vs 6 hours per day. If they were incandescent, they would blow out after 3 months despite the low hours.
The oldest one I have is a 25 watt equivalent in a lamp that's on for six hours at a time every night (on a timer). A couple more (40 watt equiv) that are on a lamp that I use every night for four to six hours depending on the time of year. I have three 100 watt equiv on the porch and coach lights at the garage that are on about eight hours each night and have been since we built the house in 2011. Sure they take time to get to full brightness in the winter, but they're still going strong. I have numerous 60 watt equiv in the upstairs.
All the bulbs have been GE or Sylvania. I haven't bought the very low-end bulbs, but the ones I get aren't expensive.
Originally Posted By: Triple_Se7en
Where do you purchase your CFLs?
I think I got some from Lowe's and a few at the local Base Exchange because they were on sale (before the local utility started subsidizing them).
I forgot to mention in the other post, I also have a couple of the 40 watt equiv candelabra bulbs for my ceiling fans. They are Sylvania and they are also dimmable. They've lasted a couple years now, but they start with very low light so I decided to keep one incandescent bulb (out of three) in the fixture.
I paid 10 cents each for most of my CFL's from 60W to 125W. Many of them lasted 3-4 years, some only 1-2 years. But for 10 cents each I'm not complaining.
@jrustles:
This is the write up I promised you earlier:
@all others: warning! do not attempt this if you are not solder-iron savvy, and not familiar with the dangers of fooling around with AC 120V (for other countries, 240VAC). dangers including fire hazard, electrocution, the usual caveats and beyond. Also: handle the spiral CFL tubing with care when handling for it may crack when you least expected and you'll ended up inhaling the mercury vapour into your lungs.
**************************************************
Pic 1: this is a pic of a typical CFL innard (sans the tubing part).This is off of a 23Watt CFL made by Luminous. Notice that the electrolytic capacitors tops have deformed (bulged):

Pic: When tested, the ESR (aka "Z" reading, on the left side of the display) has gone up to becoming unreasonably "high" (in excess of 15+ohms @ 10kHz):
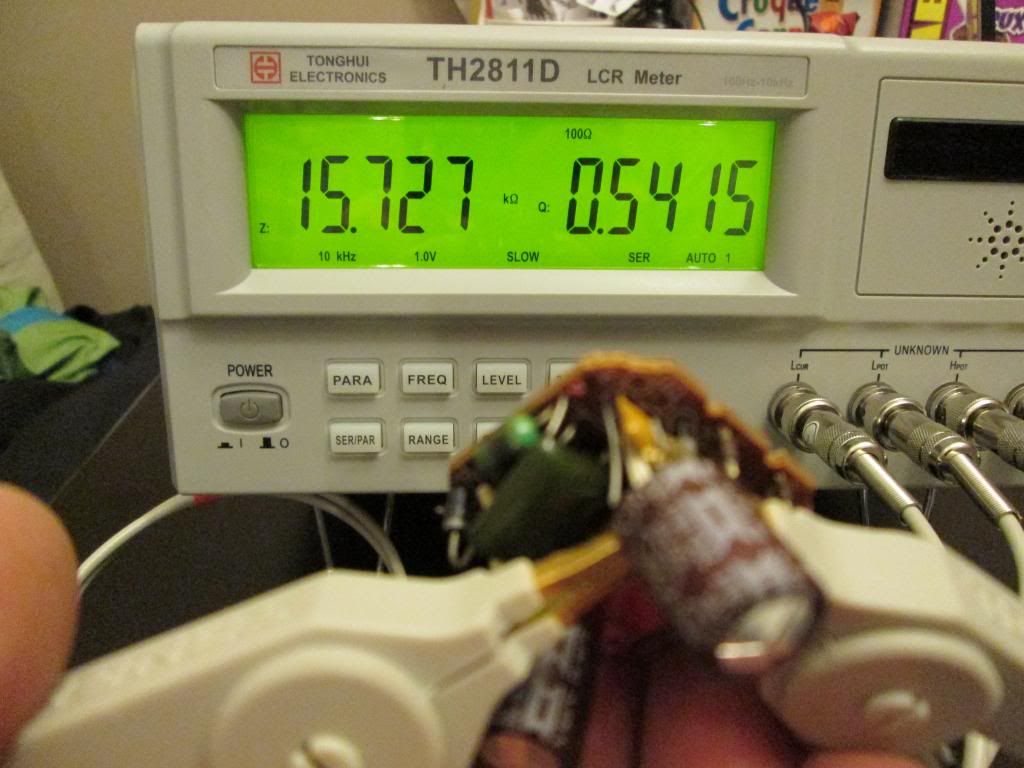
whereas the capacitance reading ("C", left side of the display) has dropped down to 2nF/0.002uF (from original value of 10uF). In other words: capacitance value lost by 5000x!
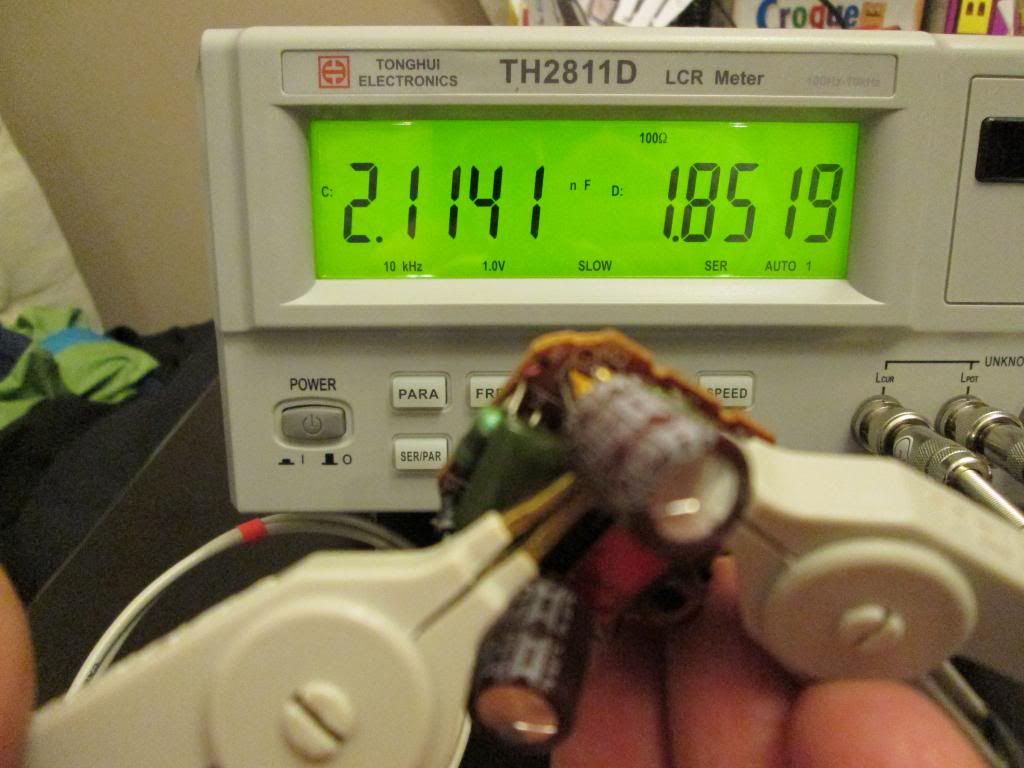
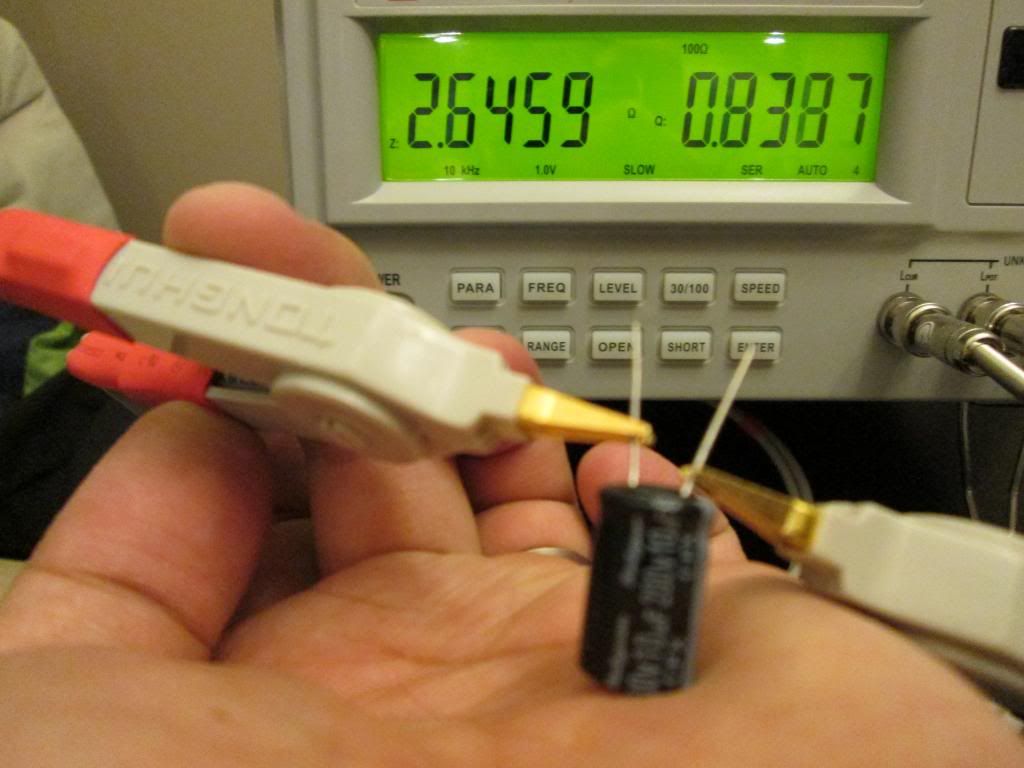
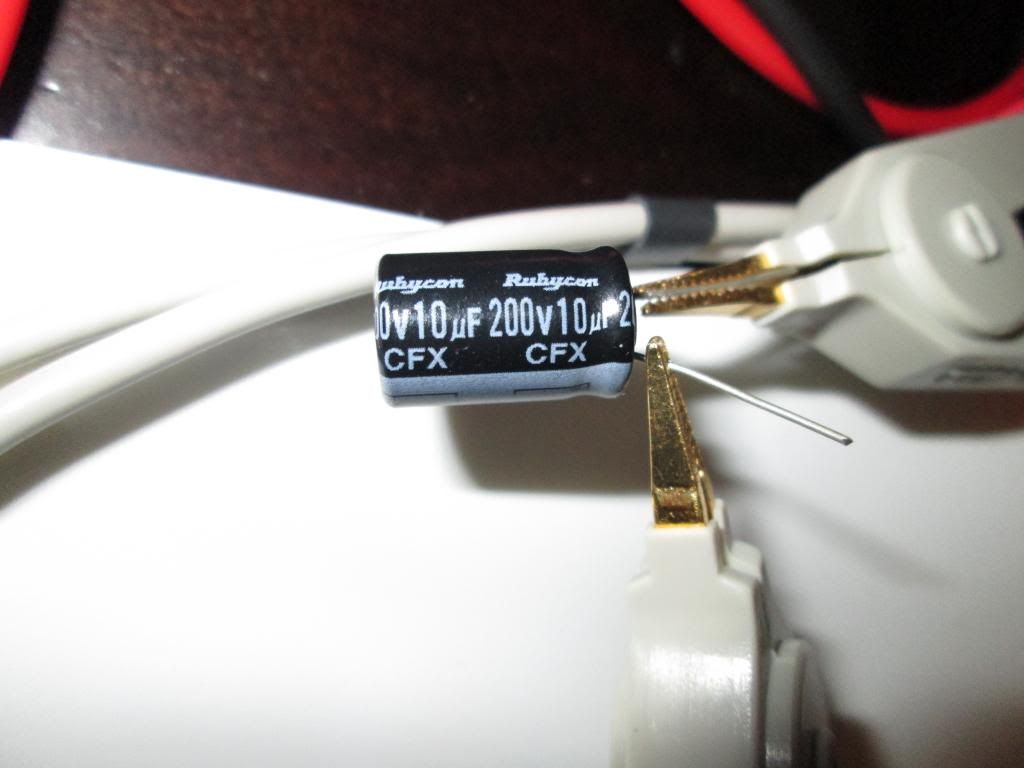
A new Rubycon (the real McCoy) 10uF 200V CFX capacitor is @ 9.3uF, which is very close to the listed capacitance value:

And the ESR (aka "Z" value @ 10kHz) as follows:
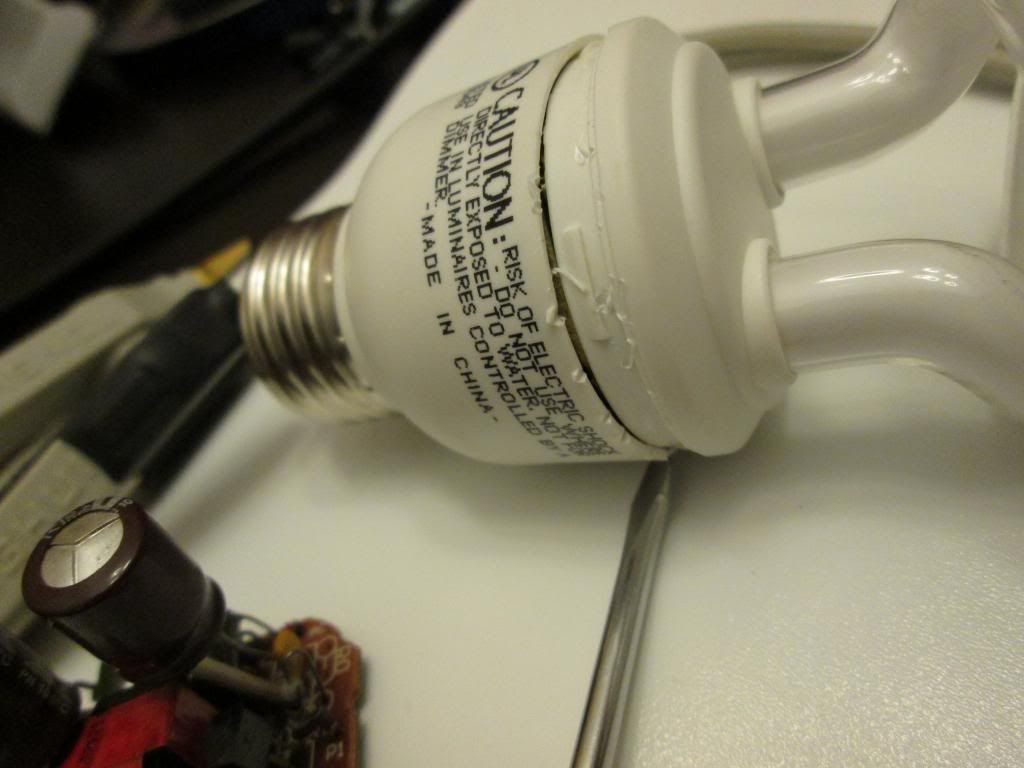
To pry open a typical (standard size) CFL, you need a small slot type screwdriver, and be able to secure it's blade (fresh new screwdriver with fresh new slot blade at the tip works best) and with care (one hand holding on the base case of the CFL body), carefully twist while turning the CFL body until you find a slight bending point...with care, you should be able to pry off the cover w/o cracking the entire case (in this case, I did caused a small piece of plastic to split, but otherwise, no structural related damage to the case):
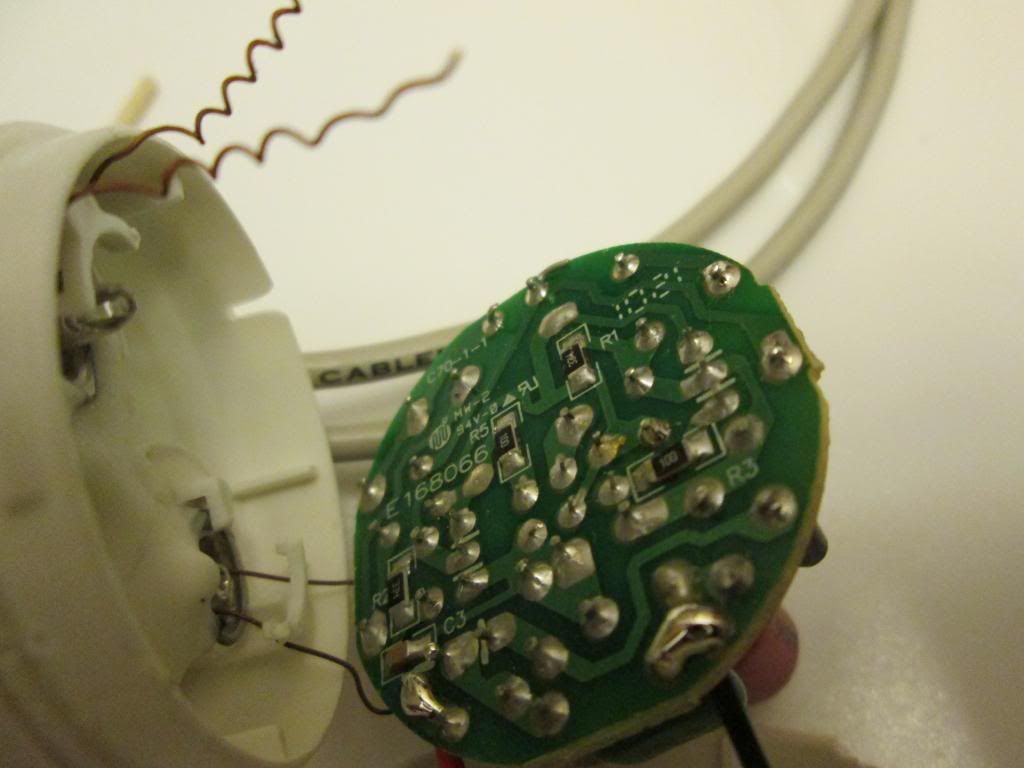
Here's how the guts look like inside. Notice that red can sez "Aishi" (sometimes with some unknown/unidentifiable brands with no company info available...all made in china BTW)? That's the electrolytic that typically fails prematurely. My usual mode of attack is the replace this can with either some Panasonic EEU series or Rubycon CFX series of similar value (10uF 200V for 120V AC regional use lightbulbs). To gain access to the back side of the PCB (so as to desolder the lytic can) is to uncoil that 2 coiled connection on the right-hand side of the picture. Those 2 are the 2 leads from one end of the CFL tube. Care must be taken not to break, short (crossed them together) any of these wires. Use a pair of needle nose plier to do the work.
Once the 2 leads have been uncoiled, the back side of the PCV looks like this:
Lastly: the restoration procedure is pretty much the reverse of all these steps, be extra careful when re-connecting the 2 CFL tube leads back to the PCB board leads, etc. Snap the 2 body pieces back together and then test it from an outlet with a fire extinguisher handy (make sure that wall outlet is on circuit breaker).
The 2 mentioned high quality replacement lytic capacitors can be had if you shop carefully. Also: lots of counterfeitted stuff online and other garbage stuff from china so beware of them.
I usually don't bother with the rest of the "weak link" components such as mylar film capacitors, etc. for I cannot find any high reliability yet economical enough for me to service my CFL bulbs and make them last longer.. (cost wayy...more than the original purchase price of the bulb many times over).
Good luck.
Q.
Lastly: this is what I put into this surgery: Rubycon CFX series 10uF 200V @ 105C rating:
This is the write up I promised you earlier:
@all others: warning! do not attempt this if you are not solder-iron savvy, and not familiar with the dangers of fooling around with AC 120V (for other countries, 240VAC). dangers including fire hazard, electrocution, the usual caveats and beyond. Also: handle the spiral CFL tubing with care when handling for it may crack when you least expected and you'll ended up inhaling the mercury vapour into your lungs.
**************************************************
Pic 1: this is a pic of a typical CFL innard (sans the tubing part).This is off of a 23Watt CFL made by Luminous. Notice that the electrolytic capacitors tops have deformed (bulged):

Pic: When tested, the ESR (aka "Z" reading, on the left side of the display) has gone up to becoming unreasonably "high" (in excess of 15+ohms @ 10kHz):

whereas the capacitance reading ("C", left side of the display) has dropped down to 2nF/0.002uF (from original value of 10uF). In other words: capacitance value lost by 5000x!

A new Rubycon (the real McCoy) 10uF 200V CFX capacitor is @ 9.3uF, which is very close to the listed capacitance value:

And the ESR (aka "Z" value @ 10kHz) as follows:

To pry open a typical (standard size) CFL, you need a small slot type screwdriver, and be able to secure it's blade (fresh new screwdriver with fresh new slot blade at the tip works best) and with care (one hand holding on the base case of the CFL body), carefully twist while turning the CFL body until you find a slight bending point...with care, you should be able to pry off the cover w/o cracking the entire case (in this case, I did caused a small piece of plastic to split, but otherwise, no structural related damage to the case):

Here's how the guts look like inside. Notice that red can sez "Aishi" (sometimes with some unknown/unidentifiable brands with no company info available...all made in china BTW)? That's the electrolytic that typically fails prematurely. My usual mode of attack is the replace this can with either some Panasonic EEU series or Rubycon CFX series of similar value (10uF 200V for 120V AC regional use lightbulbs). To gain access to the back side of the PCB (so as to desolder the lytic can) is to uncoil that 2 coiled connection on the right-hand side of the picture. Those 2 are the 2 leads from one end of the CFL tube. Care must be taken not to break, short (crossed them together) any of these wires. Use a pair of needle nose plier to do the work.
Once the 2 leads have been uncoiled, the back side of the PCV looks like this:

Lastly: the restoration procedure is pretty much the reverse of all these steps, be extra careful when re-connecting the 2 CFL tube leads back to the PCB board leads, etc. Snap the 2 body pieces back together and then test it from an outlet with a fire extinguisher handy (make sure that wall outlet is on circuit breaker).
The 2 mentioned high quality replacement lytic capacitors can be had if you shop carefully. Also: lots of counterfeitted stuff online and other garbage stuff from china so beware of them.
I usually don't bother with the rest of the "weak link" components such as mylar film capacitors, etc. for I cannot find any high reliability yet economical enough for me to service my CFL bulbs and make them last longer.. (cost wayy...more than the original purchase price of the bulb many times over).
Good luck.
Q.
Lastly: this is what I put into this surgery: Rubycon CFX series 10uF 200V @ 105C rating:

- Joined
- Jun 13, 2013
- Messages
- 3,084
The capacitor plague continues to haunt the electronics industry...
An attempt at industrial espionage, the thief got a flawed formula on how to make capacitors....
http://en.wikipedia.org/wiki/Capacitor_plague
An attempt at industrial espionage, the thief got a flawed formula on how to make capacitors....
http://en.wikipedia.org/wiki/Capacitor_plague
Last edited:
@vikas:
If you are referring to that meter I used in the background, that's an LCR meter.
Capable of testing capacitor for "C"(capacitance), "D" (dissipation factor), "Z"(ESR, or equivalent series resistance), and "Q" (Quality factor).
It can perform tests from 10Hz all the way up to 10kHz (the newer version can test capacitors up to 100kHz, which I like but cannot afford for the time being).
Also capable of testing L and Resistance.
I do a lot of SMPS/linear power supply design and failure mode analysis during afterhours...if I have the time.
Q.
Originally Posted By: xfactor9
CFL's are definitely cheaper vs. incandescent when you factor in the energy savings. The warm-up time is about 2 minutes for the bulbs I've used; not a big issue for me.
However, you should expect 5 useful months from a bulb that's used 7 hrs a day. After that point, they grow dimmer until they finally fail a few months later. The mfr claims of 5+ years lifespan border on blatant false advertising. I've used many bulbs over the years and none has ever lasted over 9 months before failing or becoming so dim that it's useless
ahem
I have 2 CFLs over my sink that have been on continuously for over 2 years.
Three others outdoors that have been on for the same amount of time, two of which are transplants from an apartment where they reliably provided a good 3 years of service prior.
OTOH 3 of the 5 in my bedroom ceiling fan already died, and they get very limited use. they lasted about 6 months, probably total time on of about 20 minutes a day.
Last edited:
- Status
- Not open for further replies.
Similar threads
- Replies
- 24
- Views
- 1K
- Replies
- 11
- Views
- 3K
- Replies
- 46
- Views
- 3K
- Replies
- 23
- Views
- 6K
- Locked
- Replies
- 21
- Views
- 3K