Q for Machinist

Status
Not open for further replies.
Joined
Feb 6, 2010
Messages
4,836
Location
Central Texas
I've been trying to find a replacement "driver" for an electric yard tool I've owned for years. (For more story, click here. Evidently it's no longer available individually, so I decided to make one.

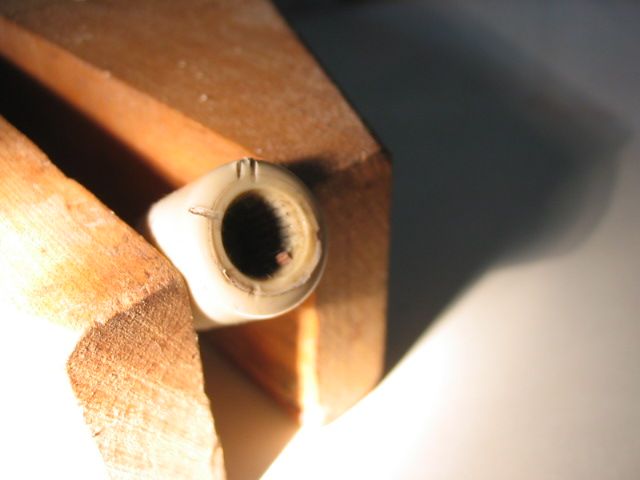
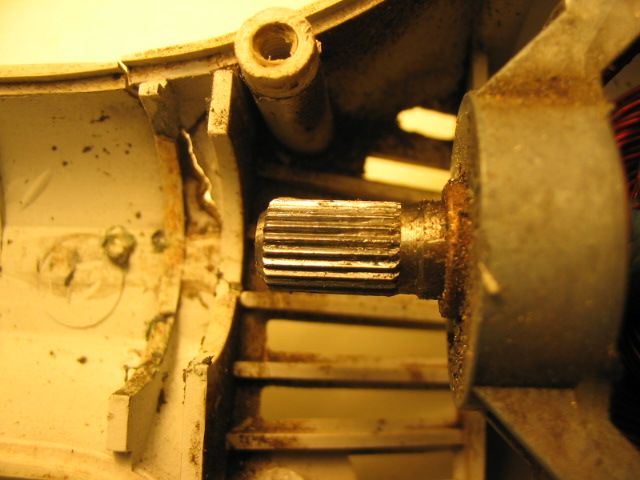
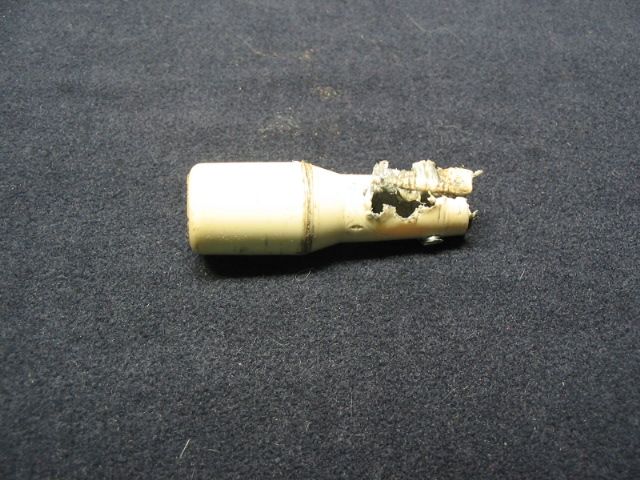
Here's the original part. The larger end contains splines and mates with the electric motor shaft. No problems there. The opposite end had a square shaped insert into which a steel, square shaped flexible shaft was inserted. Worked fine for 23 yrs until heat and fatigue caused the plastic corners to round over.
IMG_7395_zps94e69bd0.jpg


IMG_7399_zpscfa1d991.jpg


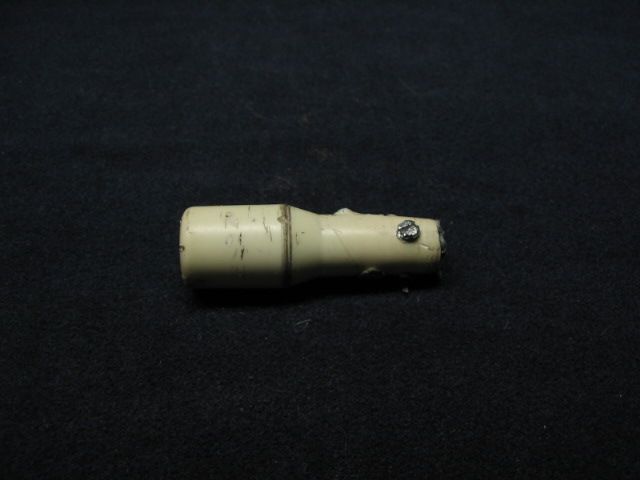
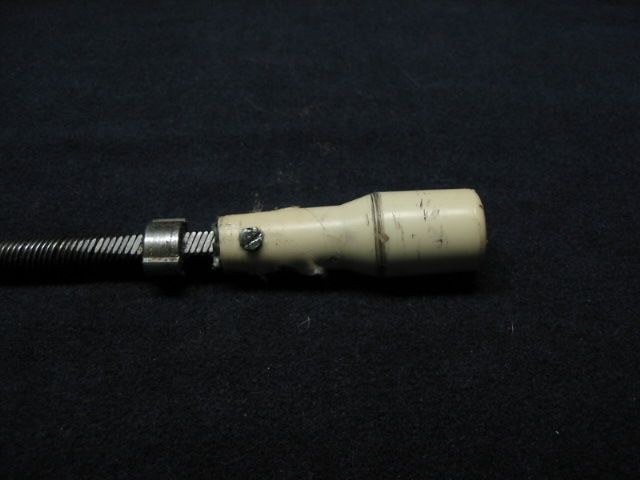
I inserted some set-screws in an attempt to prevent the shaft from spinning and this held for awhile. However, drilling the plastic further weakened it:
IMG_7396_zpsf4496f00.jpg


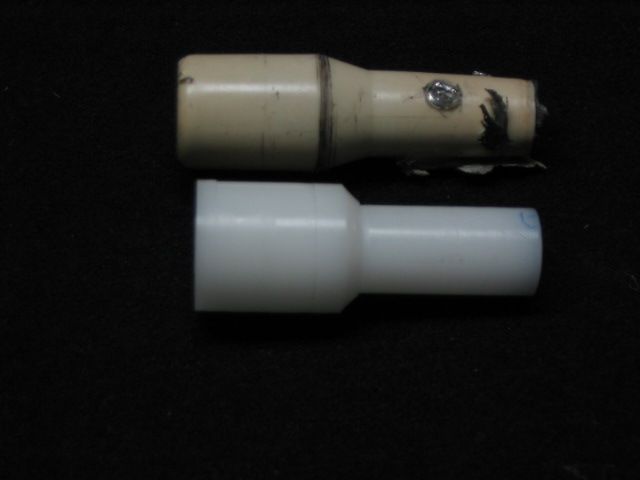
So I set up some 1" delrin (I think) rod in my Taig to turn one:
IMG_7400_zps4d6c777a.jpg


Here's the result. My taper is a bit steep at 45°. Wasn't sure how to cut a different angle. The 45 was done with a champhering tool.
IMG_7407_zps667be0aa.jpg


So my Q's are:

  • How to create splines inside the large end? Two ideas came to mind: (1) Remove the motor, position it with the spline end up, and tap the new piece with a hammer to get a 'force fit". (2) Heat the motor shaft with a torch and plunge it into the hole.
  • How is a round hole turned into a square one on the opposite end? Don't have any chisels that small. I could go with set-screws again, perhaps smaller ones. Or heat the flex shaft and plunge it into the round hole.


I went with plastic rod as it's what I had on hand. However, I could make the piece again from either brass or aluminum, which might hold set screws better.

I mainly use the Taig for turning pens and simple jobs. Haven't gotten into cutting tapers or dealing with splines and square holes yet. Any suggestions you could provide would be appreciated! Thanks.
 
Are splines in the Big end of the old piece in good condition?

I'm thinking to cut off the big end, turn down the diameter then insert the old splined section into a drilled hole in the new Delrin.
But I'm not sure what you could glue it with.

Alternatively you could grease the shaft of the motor, then build up layers of Devcon or other reinforced epoxy over the splines . Again, you would then turn it down and insert it in a drilled hole in the new piece.

I don't think I would have used Derlin, Brass may have been better.

For the Square end, I would have forced and hammered a section of copper tube over a similar Diamiter square shaft, until it formed a square tube.
Turn the square tube to make it as round as possible. Then insert it in a drilled hole in the new piece with glue, or if it's made from Brass, solder it.
 
In my world we'd broach the inside profiles or have the part cast with all of the details.

The chamfer would be cut with a taper attachment or setting up the cutting tool's edge at the desired angle and plunging it into the part.

I think your idea of press-fitting the part onto the shaft is worth a try.
 
A Broach would be ideal, but this is a blind hole which just makes life more difficult.

Is the Taper critical?
 
Last edited:
Originally Posted By: expat
Are splines in the Big end of the old piece in good condition?

They appear to be. I don't believe they've ever slipped as the other joints have failed first.

Originally Posted By: expat
I'm thinking to cut off the big end, turn down the diameter then insert the old splined section into a drilled hole in the new Delrin.
But I'm not sure what you could glue it with.

Yeah..what glue holds well with plastic in a blind insert like that? Interesting idea of yours..never thought of that.

Originally Posted By: expat
Alternatively you could grease the shaft of the motor, then build up layers of Devcon or other reinforced epoxy over the splines . Again, you would then turn it down and insert it in a drilled hole in the new piece.

I don't think I would have used Derlin, Brass may have been better.

I thought about something similiar using JB weld. However, we're back to having it adhere to plastic. Adhesion would probably be better in brass or Al.

Originally Posted By: expat
For the Square end, I would have forced and hammered a section of copper tube over a similar Diamiter square shaft, until it formed a square tube.
Turn the square tube to make it as round as possible. Then insert it in a drilled hole in the new piece with glue, or if it's made from Brass, solder it.

Interesting idea..I do have some similiar dia. copper pipe laying around.

During research, I found a video of a coupler being machined of aluminum to connect a model boat engine to a flex. shaft driving the prop. I need something similiar. Got me to thinking about not turning down the square shaft receiver section at all. I need enough diameter for setscrews, which is what the video showed.

It may take several attempts to get it right, but I don't mind. I'll be learning along the way.
 
Originally Posted By: tom slick
In my world we'd broach the inside profiles or have the part cast with all of the details.

The chamfer would be cut with a taper attachment or setting up the cutting tool's edge at the desired angle and plunging it into the part.

I think your idea of press-fitting the part onto the shaft is worth a try.


I'm rethinking the taper idea. See above reply.

I could still press-fit with brass, aluminum or delrin. Need to try out different approaches and see what works.
 
Originally Posted By: expat
A Broach would be ideal, but this is a blind hole which just makes life more difficult.

Is the Taper critical?

I'll have to look up broaching, not sure about what it means.

Re: Taper. I'm rethinking that now. It's not necessary for clearance inside the outer tube the flex shaft rides in as there's plenty of room. So I'm thinking of taking advantage of that.
 
Broaching info

I'm sure that part is plastic and tapered because it was injection molded. Injection molding is cheap and it can have a lot of details. It it tapered to use less material and makes it easier to get out of the mold.

I'd make it out of an aluminum or brass rod because it'll be easier to machine than plastic. Both would be soft enough to hammer onto the spline shaft and you could use a file to make the square end.
 
Found this on the site you ref'd:
Broach_types_and_examples.jpg


Top left rings a bell here. Your explanation of IM makes sense here. Thanks for clarifying. Re: filing, I do have a set of needle files, but nothing that small. I'd need about 1/8. I'll have a look though.
 
Can you show a picture of the splined shaft and give some dimensions.
I'm trying to think of a simple way you could make a Broach.

Another way would be, if the Driver were made of Brass or Aluminium, Drill a Hole just large enough in diameter to accept the splined shaft. then drill at 90 degs and Tap for Pointed set screws (or Grub screws) use several screws and stagger them along the inserted section of the shaft.

You could do the same at the other end, but with the flex drive I think you might be better making a square Broach hole than screwing onto the flex drive with Grub screws.
 
IMG_7409_zpsfa9a7649.jpg


IMG_7412_zpsb1c9f5ba.jpg


Outer dia. of splines: 7.7mm/0.3"
Spline length: 9.7mm/0.38"
Spline height: maybe 0.42mm/0.016" emphasis on maybe
Overall shaft length: 15.2mm/0.6"
 
That's a pretty fine spline.
It may be a little difficult to make a Broach like that, and using the motor shaft AS a broach, it might not cut too well.

If the Driver were made of Brass you could drill the hole for the motor shaft slightly undersize, heat the brass driver then press it on the shaft.
Heating will give you a little expansion of the driver, and help with you ending up with a tight fit.

On the flex drive end, it should be easy to make some Broaches (start small, get bigger) from Key stock.
Taper slightly the Key stock and cut series of fine grooves in the sides with a fine Hacksaw

https://www.youtube.com/watch?v=7n1r5XfVkyk

Finnish with a Full sized Key stock with a shallow hole drilled in the end. The diameter of the hole should be a little bigger than the width of the Key stock.
It will give you sharp corners on the end of the key stock, so you can Cut-out the taper left in the broached hole you made in the driver.
 
Found this interesting. This is similiar to what I want. Using setscrews might simplify things. (He's taken his little Taig a long way.)
 
I don't like the idea of the set screws on the Flex drive end very much.

My feeling is, all the torque is taken on the contact between the set screw and it's point of contact on the (Flexible) Flex drive.

I would much prefer the square end of the Flex Drive be seated in a Square hole, so the torque transmitted to the Flex shaft can be spread over as large an area as possible.

Set screws might work better at the other end, but again I would prefer not to rely ONLY on the set screw to transmit the torque.

Unless you file a Flat or drill a Pocket on the splined motor shaft.
 
I understand your point, force across a larger surface.

It's easy enough to try pressing the coupler onto the motor shaft since the splines are so short and then filing a round hole square. I can always shim with a beer can if it's a bit too large. I'll practice in scrap first.

I'll have some time this evening to work on it.
 
Update:

This evening I finally got it together....but made a mistake. More on that later.

I chucked my nylon plastic part into a vise, and marked four corners on the face. Then took a small, square needle file and made some grooves on each one, working up inside the bore.

Next, I held the shaft with a vise, set the plastic end on top and whacked it with a hammer. After a few times, I managed to fully seat the shaft into it. I can see where the metal corners of the shaft 'forced' the plastic to yield as I drove it home, creating four lines 90° apart. Didn't look like it would ever give.

I turned to the motor shaft end. I'd underbored it to be safe, then searched for a 9/32" drill with no joy. The OD of the shaft I'd previously measured at 0.3". A 9/32 is 0.28". 17/64 is 0.27. Unfortunately, I had neither.

Then I found a pen tool reamer that was very, very close to 9/32 so I thought "Why not"? It wasn't exactly straight though and was enough to widen it a fraction over what was necessary.

IMG_7413_zps6d96b6df.jpg


I tried it out with the string trimmer attachment and it worked for about 15sec., then I could hear the motor side of the coupler slipping. Sure enough, it was loose. @#$%!

I decided to cut a piece off of some 3/4" AL plate. It sure was slow going with a hack-saw. Then I spied a piece of 1" square Corian and thought of trying that. (I'm out of 1" round Delrin). However, the 3-jaw Taig chuck wouldn't hold the square Corian and I don't own a 4-jaw chuck.

So I marked and drilled the center to slide it onto my pen mill to turn it down to 3/4" round. The Taig was cutting very well and I had fine whisps of Corian flying right off of the tool.

Only then did I think to check if the drilled center was too large for the square end.....yep! Screwed the pooch on that one.

So I've decided to hang it up until tomorrow when I can get to the local HW store that carries drills in No. sizes. Even if the bore wasn't too large for the square end, I still wouldn't have an appropriate sized drill for the spline-end. And the dia. is too small for my inside boring tool. A more experienced machinist could figure this out, but I'm just a beginner.

It did occur to me that I could file a flat on the motor shaft, and drill my coupler for a set screw or two. Not sure so I've vetoed that for now.

I'll also have to deal with the assembly of order if I'm to press-fit both the flex shaft AND the motor shaft to the coupler. One is very easy because I can tap the end of the coupler, the other though requires me to set the motor upright on the bench, position the coupler and upper drive-shaft in place, then tap the end of the flex shaft to seat it into the coupler.

Any advice?
 
SUCCESS!!

Joy finally arrived yesterday! With both a 17/64 and 9/32 drill in hand, I sought to machine another coupler to replace the end I'd over-bored.

I cut a block of 6061 AL, but then encountered the same problem of holding a four-sided square in a three-jawed chuck. I thought of belt-sanding off the corners, but it still wouldn't be round. Unable to locate round AL or brass rod yesterday.

So I took another eye at the Corian I'd milled. Decided to try out my new bits on it. Discovered it doesn't like to be press fit! Even 1/64" undersized. It cracked along its length as I tapped the motor shaft into the end.

I then spied the 2" black delrin rod as a better option than getting stuck in late afternoon traffic, driving to a friends house 15mi away who did have metal rod.

I turned down the delrin rod to 0.65. This stuff just machines beautifully! One, continuous thin stream pealing off the tool, into the air. From this it was obvious the white plastic I'd used earlier wasn't delrin. HDPE perhaps. No tapers this time. For the square hole, I again marked the corners with a knife, filed a notch at each with a square needle file and then used a countersink to ease the transition into the hole.

On the opposite end, I started the hole with a small end mill then worked up a few sizes. 17/64 may have worked. I wasn't worried about the delrin cracking. But I went 1/64" further with the 9/32 bit. Countersinked this hole as well and champhered both ends with a 45° tool.

I carefully seated both ends, reinstalled and attached the weed eater tool for a test. SUCCESS! It ran for about 15s without a hitch. Tried it again on HI. Joy.

Reassembled the motor cover and went to test it with some weed-wacking. Did both the front & back yards without a problem!

YESSSSS!

Wow...was I clam-happy! Even blew through some tough weeds on HI power. Sounded the same as before.

I don't have a completed coupler pic. Too excited to try the thing out. Besides, I've taken this thing apart > 20 times in the past several weeks.

So far, so good. I'm looking fwd to plugging in the mini-tiller attachment to check its functioning soon.

When I do acquire the rod, I'll save it in case this one goes Tango Uniform. I've learned quite a bit here and enjoyed spinning a new part. I wish 1" AL & brass rod were easier to obtain.

Thanks to all who pitched in for suggestions!
 
Status
Not open for further replies.
Back
Top