99yota solara SLE, Just did Gunk Motor Flush HELP

Status
Not open for further replies.
Joined
Feb 22, 2011
Messages
41
Location
New Orleans,LA USA!
Hello everyone and thanks in advance for your help and replies. I have a 99 SLE V6(1MZ-FE) and i just did a Motor Flush Using the Gunk Brand. Next i was planning on taking off the valve cover and seeing what the situiation looked like.I have already purchased a new felpro valve cover gasket. Now i have to say i wouldnt know the slightest about any of this without the help of members on BITOG and Solara Guy Forum.Mostly Bitog because of the lubricant nature of my issue. Before i remove the valve cover, I have a concern about the engine flush. I have read that after doing an engine flush, because of the possibility of Large pieces breaking off, Its sometimes not enough to simply drain and replace filter, and that many reccomend taking off the oil pan and cleaning off a Sepereate oil filter or screen thats above the pan. I am hoping for some help with this. I am a noob and have minimal knowledge but am learning more every day. That being said i am hoping someone can help me with exactly what i need to do and what needs to be removed and how to get to the oil filter or screen that some say can get clogged after doing a motor flush. I didnt know this but after looking at a schematic of oem parts available for this engine, i now see that there is a upper and lower oil pan and then above that would a an oil pick up( i believe). Here is a link to the page that shows the engine parts and pictures i used as a reference. http://www.trademotion.com/partlocator/i...playCatalogid=0
So bottom line i just want to find out if this is really recommended before replacing oil and running enging, and also any pointers on how exactly to get to the part i need to clean, what needs to be removed and how and if its something i can do in my garage or if i should let my car sit until i can afford to have a professional help out. Please forgive my ignorance on all of this. Im sorry for the length of this post, i just didnt want to leave anything out that would make it harder for anyone to give me the help i need. Thanks
Also, i the drained oil after the flush was surprisingly close to factory color, but i know it been said color can mean absolutely nothing, but since i know absolutely nothing, i figured i should mention absolutely everything.
 
Last edited:
Why did you use this product if you knew that the potential for problems existed?
Do you know that your engine really was dirty?
It may have been pretty clean to begin with, in which case the flush wouldn't have loosened anything you'll need to worry about.
OTOH, if the engine really was dirty, it is possible to loosen up enough crud to block oil returns and maybe to clog the oil pump pickup screen.
Bad news either way.
You might try removing a valve cover just to see what it looks like.
If it is pretty clean, you probably didn't have sludge to begin with, since one application of a flush is not going to remove all of the sludge from the valve train.
If it's a mess, then good luck.
Incidentally, the BITOG way would have been to use either MMO or ARX, and allow things to clean up gradually over time and miles.
 
Take some good pictures when you take off the valve covers.

That will help in seeing if there is a sludge problem and then you will get some positive feedback from the knowledgeable members of BITOG.
 
The oil pick-up is # 36 in the diagram. That will be accessed via the removal of the oil pan (bottom of motor). You want to make sure that after you run the Gunk MF the screen isn't blocked which could cause oil starvation due to the inability for oil to get thru the screen.
This is the main reason why a slower acting cleaner like Auto-RX is preferred.

PS: I agree that it may not have been too dirty and you may be OK. If it is necessary to
remove the oilpan it shouldn't be too difficult unless there is a crossmember blocking removal of the pan. You need to take a look under the valve cover first and then at the ease of removing the oilpan if needed.
 
Slow down a bit,you don't really know the amount of sludge in the engine if any.
Remove the front valve cover first,if it looks decent there is no need to remove the rear one or the pan.
R&R the front valve cover is a simple enough job you can do in a short time in your garage.

Lets get a better idea of what is really going on before jumping into major disassembly.Take a picture of the valve train and post it,that will give a lot of info on the right direction to proceed.
 
OK thanks for all the responses, ill deal with the valve cover first, hopefully its as easy as it looks with just those bolts and the removing the cover, ill post pic when done. much appreciated
 
pics-http://www.flickr.com/photos/60059538@N05/5487545170/in/set-72157626045147247/
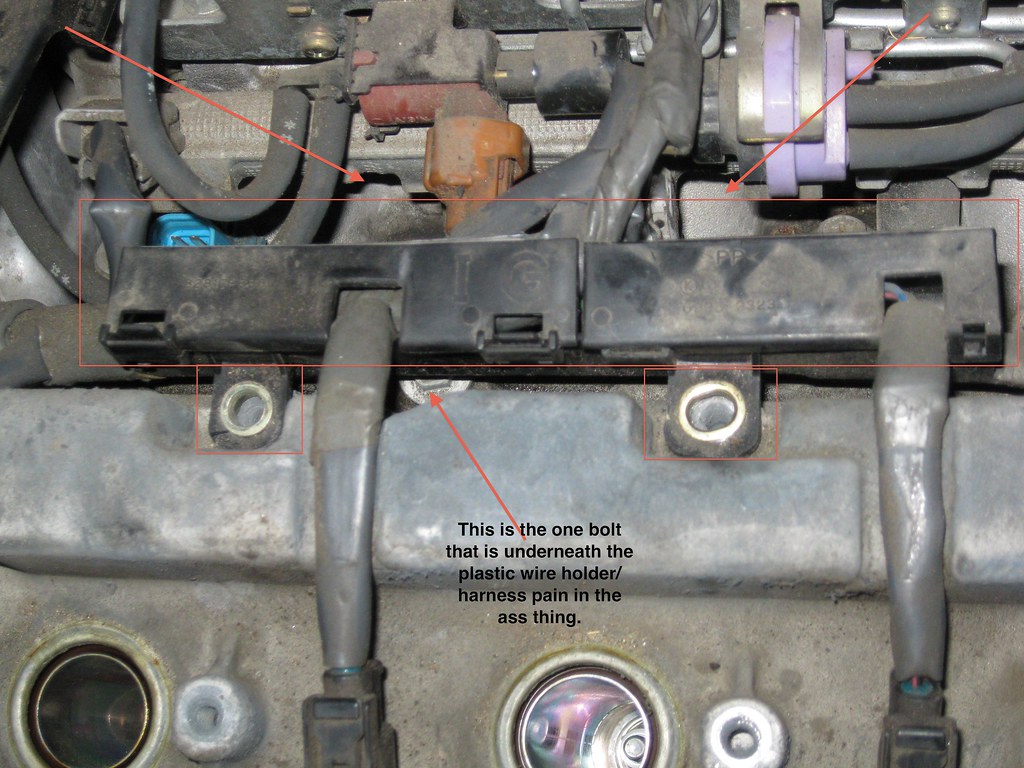
Ok now i have a new issue, just when i thought it was just going to be a simple removal of the valve cover, i find out im more incompetent than i thought and its more difficult than i once though. I just opened a flickr account to try and link to some images. I need to know if the piece that im pointing to that encases a group of wires and is bolted to the valve cover needs to be removed. There is a valve cover bolt directly below the plastic casing, but i could get to it, however im not sure if when reeattaching the valve cover it needs to be placed directly straight down or if it can be placed in at an angle, so as to allow me to slide the backside in first just low enough to get beneath that harness and then lower it evenly down. Obviously making sure that the gasket stays securley in place. thanks for your help, now that i half-way have everthing removed im panicking because this harness connects to at least 10 different connecters. [img:center]
Area of concern by 99solara, on Flickr[/img]
 
Somebody needs to market an illuminated boroscope/camera type deal that toyota users can use to see past the baffle in the valve cover to see if there is any sludge in the top of the motor.
 
Originally Posted By: Trav
You should be able to disconnect that harness and lift it out of the way,look for clips of some sort.


Yea im amazed, ive already removed about 5 of the clips and connectors that appeared to be anchoring it down the most but still hardly any play it splits in to every which way possible so its anchored from every direction. On a seperate note one really odd thing is if you look at the plastic Box that im talking about that conains a short length of the cabling, there are two empty hols that you can see from where it was bolted to the valve cover. When i began this process, i notice they were empty, it was already unbolted with no bolts occupying the space. I attributed it to some past work(by lazy workers) but not sure what was done, anyway yea im not sure what to do.Id like to just removee the bolt from underneath it but im just not sure if ican reattatch the valve cover by sliding it in at an angle and than dropping it straight down or if the only way to safely seal it is to drop it straight down from directly above. who know.
B.T.W yes an illuminated boroscope for this application would be awesome.
 
Last edited:
Just remove the connectors... They almost always only go on one specific device. Even if it's possible that they go to multiple connectors, the wiring harness will tell you where everything needs to go. Remove and label the vacuum hoses and the harness should lift out of the way.
 
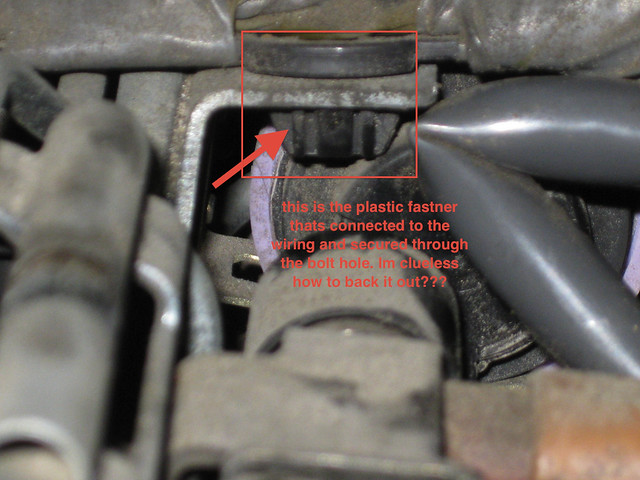
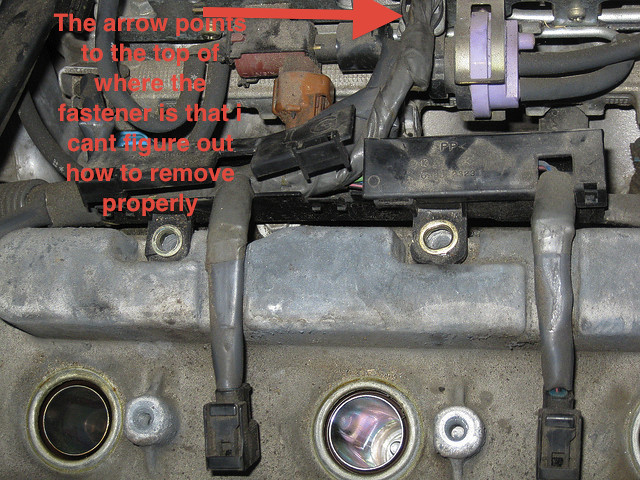
Well i found the issue, after disconnecting everything the plastic harness box still hardly had any play, definately not enough to move it out of the way. So i "felt up" the length of the wire coming out the back and a few inches behind the back its the whole group of wires is anchored to a bracket through a "bolt hole" with some type of plastic "bolt" that reminds me of a wall anchor,its thicker on the bottom side than the hole itself but it doesnt seem to have any tabs to squeze to be able to pull it out. Ive never seen anything like it, but theres lots i havent seen if anyone has seen anything like this or has any ideas of how to remove it properly, please let me know. The picture is below. Im at the point where all i can think of is breaking it.(maybe i should). Anyone with any pointers experience, suggestions, ideas or anything of help at all please let me know. Im up for anything. I cant believe a piece of plastic is stalled my work on removing the valve cover and has kept me out of my car for so many days. At least its mardi gras, so theres not much i have to do in way of driving, just look at other peoples beautiful classics and exotics in each parade. Thanks
5498210946_51388c33ab_z.jpg
5497617453_ca8c922b8c_z.jpg


Originally Posted By: The_Eric
Just remove the connectors... They almost always only go on one specific device. Even if it's possible that they go to multiple connectors, the wiring harness will tell you where everything needs to go. Remove and label the vacuum hoses and the harness should lift out of the way.
 
Originally Posted By: Papa Bear
The old saying "If it ain't broke, don't fix it !" is looping over-and-over in my head ....
35.gif


Firstly, let me apologize for my ignorance,incompetence, lack of knowledge, and overall limited experience with automotive troubleshooting/repairs and the pain and suffering it is causing you as your forced to read over it every time i post. It does appear from the
35.gif
smiley that you at least at times are enjoying it. I guess stating the im a noob, new to the forum, and inexperienced in what im trying to attempt obviously means that my questions/comments and posts should be of the highest quality and only be of a subject matter that would be expected of the most seasoned of veterans. I can see how a forum of this nature is the least proper place for someone with lesser knowledge to come seeking advise and expertise from highly experienced mechanics and d.i.y auto enthusiasts. (end of sarcastic rant)
All sarcasm aside though PAPA BEAR, look at all the other posts from other highly knowledgable and experienced people on this forum(some possibly as wise as yourself). All the posts are helpful, whether they answer the question, inform me im incorrect in the first place, and then follow up with the proper way and other constructive criticism. In all seriousness though, please enlighten me as to what my feeble attempts are trying to fix thats not broken. The whole point of everythig i've posted is of a diagnostic nature, less than of a fix it, to let me see what the sludge situation is in my engine so that i will know what actually does need to be fixed, and what don't need fixin cuz it ain't broke. So it would be of great help if you actually pointed out which thing im attempting to do is unnecessary because of the "If it ain't broke, don't fix it !" clause. lastly i can understand being aggrivated or annoyed at reading post questions and material you consider to be ignorant, futile, or just stupid. that is the point i think i would make the choice to no longer read it, but thats up to you of course. I guess i can even understand you finding the same foolish posts and questions that are beneath you to be funny or comical, but if thats the case just sit back and eat your popcorn as you've suggested, posting remarks that are of no informational use, or that use old sayings as a cheap insult, that just doesn't help anyone. Thats all, thanks to everyone for all your tips and sorry to everyone who made any attempts at helpful posts for such a long rant. Just couldnt leave it be with no reply, or else he might not have anything to read while eating his popcorn. If, im out of line, let me know. thanks
 
Last edited:
I'm much of a 'newb' at cars myself, but just let it roll off your back like water on a duck(any perceived criticism real or not).

Anyway, I'd suggest considering 'what' it is that the fastener is holding in place, and whether or not you could tie it back in place looping a twist tie etc or something of that nature around what is fastened at the location so it won't move after re-installation of the valve cover. Either that or wrapping the wiring/plastic piece around the metal clip with electrical tape.

Otherwise, is the metal piece that the fastener is plugged into able to be removed by removing a bolt or two?
 
Originally Posted By: ltslimjim
I'm much of a 'newb' at cars myself, but just let it roll off your back like water on a duck(any perceived criticism real or not).

Anyway, I'd suggest considering 'what' it is that the fastener is holding in place, and whether or not you could tie it back in place looping a twist tie etc or something of that nature around what is fastened at the location so it won't move after re-installation of the valve cover. Either that or wrapping the wiring/plastic piece around the metal clip with electrical tape.

Otherwise, is the metal piece that the fastener is plugged into able to be removed by removing a bolt or two?

@itslimjim- thanks for the reply, yea you are definitely right the post just caught me off guard i guess. Regardless, "what" is it the fastener is holding in place is how i've been going about researching its removal. Thats primarily why i requested pics of that area on from others with solaras/camrys, corollas, or just any application with the 1mz-fe v6 yota engine. From all the pics i've found, which were mostly pics taken by people during or after a front valve cover replacement such as i am doing. I found there was no shortage of posts and DIY guides for the process because engine sludge was a huge problem with this engine in all the toyota/Lexus vehicles it was in. In almost every case the wiring was either done slightly different, it was fastened in a different manner, or it just wasn't fastened at all in most cases. This along with the feedback i received makes me pretty comfortable with your suggestion of not worrying about the proper way to remove the "anchor" and just fasten it via a different method in the end, most likely duct tape or a zip-tie like fastener as you suggested. Now that this headache is over i can easily remove the cover tomorrow when the weather clears up, and while everyones at the mardi gras parades ill be finishing up. I'll be able to take a look and will be posting pictures for feedback on the situation under the cover. Anyway thanks alot for the reply. I really appreciate it, along with everyone else who has posted in an effort to help me out.So we will see what tomorrow bring, besides of course what might be the biggest party in the world and every time i get a little fatigued i'll just look up and there will undoubtedly be a beautiful woman flashing someone to receive some beads. Thats all the distraction i need to refresh and get right back to work. Thanks again everyone, and have a happy Mardi Gras Weekend.
 
I know that I have responded in your other post, but I really don't have anything of help for this.
I did not run into anything with that part on my 2003, so they must have changed something.


That part moved out of the way for me with no issue.
This is what I saw when I removed the valve cover.
I have AUTO RX in the oil at the point that this picture was taken.
The dark rough spots are rough surfaces in the casting, not sludge.

One thing you might look into is the larger size oil filter that I use.
I know folks on here don't like the word "FRAM" but their Extended Guard filters are very good.......look for the "XG" in front of the number.
That is the only FRAM that I would use.
My Sienna calls for the XG3614, but the XG3600 fits just fine......longer can, but otherwise same dimentions.
That is the filter that comes to mind for one that you can run out and get at your local Wall Mart.
The larger filter has more media, and the XG line has a higher capacity (will hold more dirt).

As mentioned, the oil pan is sealed with a RTV sealant, not a traditional gasket (like they use on the transmission pan).
So the oil pan removal could be a challenge.
You have to avoid bending the lip on the oil pan.

As mentioned, the first point to worry about getting clogged would be the pickup screen on the bottom of item #36 in the parts drawing you linked.

Maybe doing a couple of SHORT oil change intervals would be a good idea at this point.
 
I agree, regardless of how 'bad' it may be. It wouldn't hurt to do a couple 2k mile intervals with something like MMO for the entire time, and re-inspection under the valve cover afterward. Of course, it's all based on how things look once you get in there. Post pics after!
 
Originally Posted By: wiswind

As mentioned, the first point to worry about getting clogged would be the pickup screen on the bottom of item #36 in the parts drawing you linked.
Maybe doing a couple of SHORT oil change intervals would be a good idea at this point.

Originally Posted By: itslimjim
Of course, it's all based on how things look once you get in there. Post pics after!

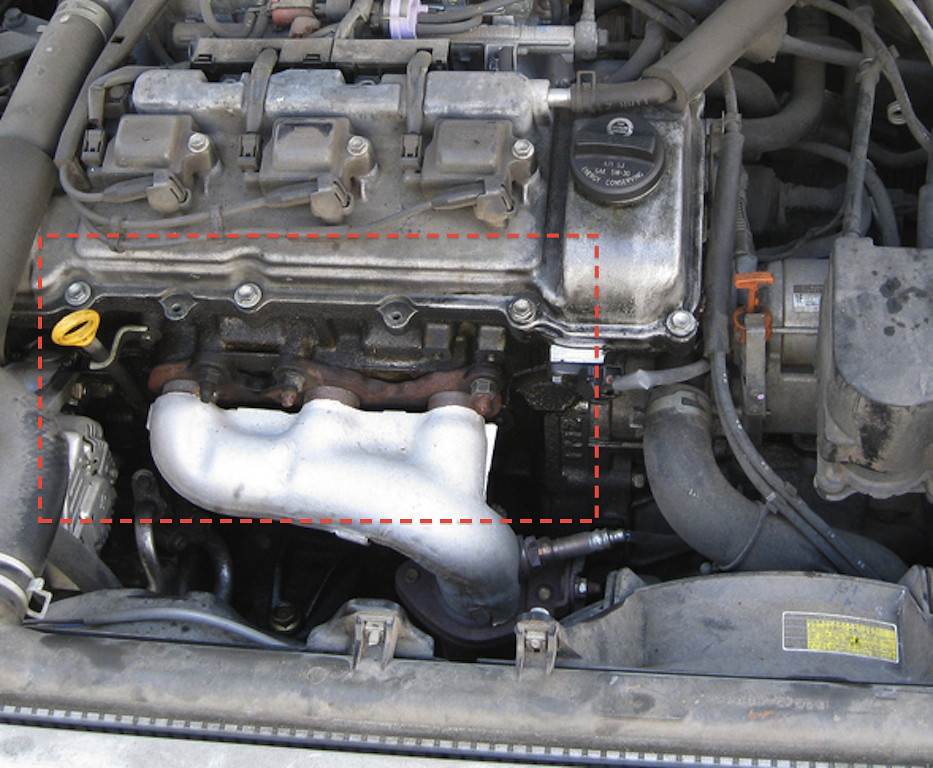
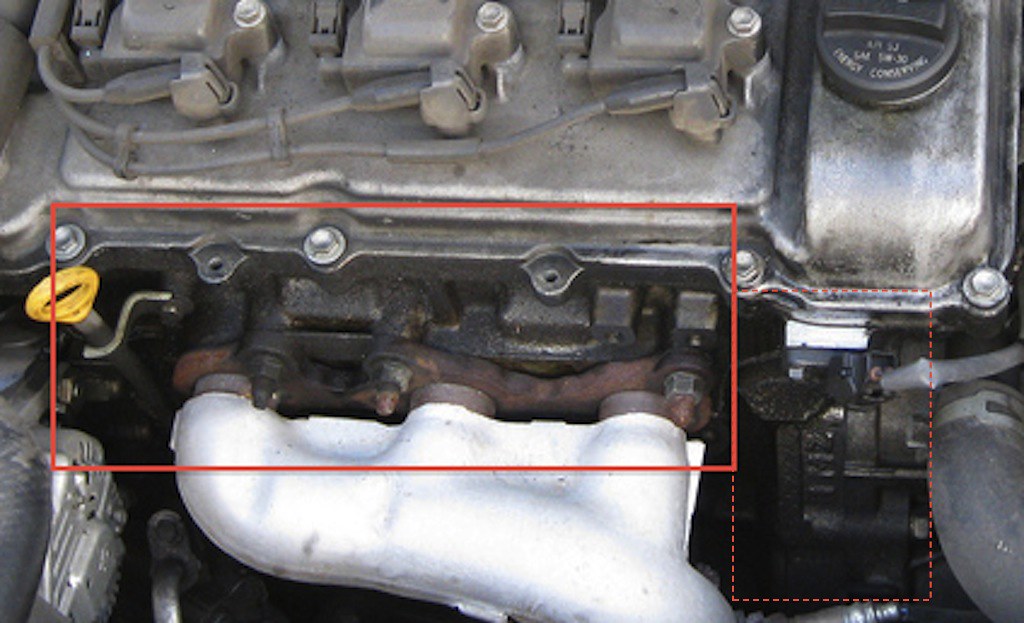
Thanks itslimjim and wiswind for your replies. Yall have helped more than you know. Firstly wiswind, yea i agree and am somewhat worried about whether the pickup screen is clogged or not. Especially after looking through my Haynes guide book and seeing the extent of what it takes to get to it. Im hoping that once i get the valve cover off and get some input that will give me a better idea as to the likelyhood of it being clogged?? Itslimjim yea from both of yall and countless others suggestions i plan to treat with MMO after its running again regardless of what unfolds sludge-wise. I'll be posting the pics once i get it off tomorrow. Im putting 2 pics in the post that i cropped of the area around the front valve cover(directly beneath the gasket is the highest concentration). I am wandering, and i know at best its purely just an educated guess from yall based on the pics, if the concentration of dried up oil residue all around there gives you any idea of the situation and if you can draw any conclusions from it. just leaky gasket, does this heighten the chance theres a sludge issue, or is it completely normal? I noticed on one of your pics(wiswind) that the same area on your engine doesnt have that resiue build-up all over, did u have that and the pic was taken after cleaning the area, or did you never have that issue? Maybe the pics dont point to anything conclusive at all and if thats the case just let me know and i can take them down. Thank for all the input.Also heres the link to all the pics untouched and at full res just in case: http://www.flickr.com/photos/60059538@N05/
5501072199_73dd0e66c0_b.jpg
5501665266_b9f9fd9c54_b.jpg
 
Status
Not open for further replies.
Back
Top