Removing a GM lug nut stud?

Status
Not open for further replies.

pbm

Joined
Apr 19, 2004
Messages
10,241
Location
New York
I'm trying to replace a lug nut stud on my 02' Buick Century and there doesn't seem to be any way to replace it without removing the hub.
I would have thought that GM engineers would have left an indent in the hub so that the stud could be pushed back/inserted without removing the hub.
Is there any trick to doing this that I'm missing?
 
Check the whole circumference of the assembly. Sometimes there's a notch to relieve the interference.

Sometimes the stud needs to be pushed free, then tilted to get it out of the assembly.
 
Is it likely that you can put a new one in without removing the hub? Not trying to be a smart [censored], just making sure that we aren't overlooking the obvious.
 
Originally Posted By: Kestas
Check the whole circumference of the assembly. Sometimes there's a notch to relieve the interference.

Sometimes the stud needs to be pushed free, then tilted to get it out of the assembly.


I was expecting such a notch but there is none.
I had my mechanic friend take a look and he was surprised. He recommends that I file the hole a little inorder to jiggle the lug nut stud in. I think that's what I'm gonna do.
 
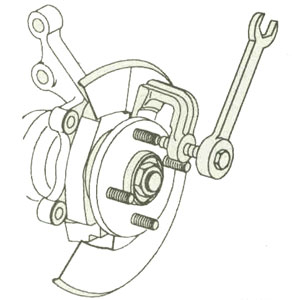
Here you go - no need to remove the hub. If you want the actual document with pics - PM me w/email and I'll get it to you:


Service Information

2002 Buick Century | Century, Regal VIN W Service Manual | Document ID: 678496
Wheel Stud Replacement
Tools Required

J 6627-A Tie Rod Puller

Removal Procedure

Raise and support the vehicle. Refer to Lifting and Jacking the Vehicle .
Remove the tire and wheel assembly. Refer to Tire and Wheel Removal and Installation .
Remove the brake caliper and bracket. Hang the caliper and the bracket from the vehicle. DO NOT allow the caliper and the bracket to hang by the brake hose. Refer to Front Brake Caliper Replacement .
Remove the brake rotor. Refer to Front Brake Rotor Replacement .


Use the J 6627-A in order to extract the stud (1) from the hub (2).
Installation Procedure


Install a replacement stud in the wheel hub.
Add enough washers (3) in order to draw the stud into the hub (2).
Install the wheel nut (1) with the flat side against the washers (3).
Important: Fully seat the wheel stud against the hub flange (2).

Tighten the wheel nut (1) until the wheel stud is fully seated against the hub flange.
Back off the wheel nut (1) and remove the washers (3).
Install the brake rotor. Refer to Front Brake Rotor Replacement .
Install the brake caliper and bracket. Refer to Front Brake Caliper Replacement .
Install the tire and wheel assembly. Refer to Tire and Wheel Removal and Installation .
Lower the vehicle.
© 2010 General Motors. All rights reserved.
 
BTW, the special J6627 tool is nothing more than a glorified C-clamp used to push the stud thru.
 
knock it loose with a sledge then wiggle. You'll find a path for it to escape.
 
Originally Posted By: eljefino
knock it loose with a sledge then wiggle. You'll find a path for it to escape.


The old stud is out because I sawzalled it.
There is absolutely no place to wiggle it out because the head of the stud hits the hub. It's the same re-installing the new stud....the head (largest diameter part) hits the hub preventing a straight push in. It's poorly designed,IMO.
I'm waiting until morning and then I'll file the hole a bit so the stud can come through from the rear.
 
Cut the old stud first to allow it to push through with no interference in back.
But what about the new one?
I'd have to see it to plan what you need.
Removal of the hub may be necessary.
But you may also be able to drill a hole or otherwise grind clearance to get the new one situated so you can draw it tight.
use lube.
 
Did the old stud have a D-head? That may be the clearance you're looking for on the largest diameter of the stud.
 
I had to replace a stud on my 1991 chevy lumina and there is a moon shaped cut out at the bottom of the hub assembly where it bolts to the knuckel.
If you turn the hub so the bad stud is at the bottom and then loosen the 4 hub to knuckel bolts at bit to get a little more clearence it came right out and the new one went in with no issue.
Try loosening the hub to knuckel bolts and pry the hub away from the knuckel at the bottom that might get you the clearence you need.
 
pull the caliper/bracket and rotor off. Hammer the wheel stud out. Use a tool or another lug nut and some washers and use a wrench or ratchet to pull the new stud in. It will fit. It just takes finagling. Every GM i have ever replaced a stud on (quite a few) i have never had to remove the bearing.

Air tools are your friend if you have access to them.
 
Last edited:
Originally Posted By: Ironduke4
I had to replace a stud on my 1991 chevy lumina and there is a moon shaped cut out at the bottom of the hub assembly where it bolts to the knuckel.
If you turn the hub so the bad stud is at the bottom and then loosen the 4 hub to knuckel bolts at bit to get a little more clearence it came right out and the new one went in with no issue.
Try loosening the hub to knuckel bolts and pry the hub away from the knuckel at the bottom that might get you the clearence you need.


You beat me to it. Even the seemingly impossible one have a little nook somewhere.

Just rotate the hub till you find it.
 
There's nothing special about the moon cut in the stud. Add your own with a grinder if it would help. I've also ground away a bit of the spindle casing to make studs fit. Choose a spot that does not substantially weaken the spindle casing.
 
I filed away a slight amount of the hole, lubed the stud and jiggled it in. Thanks for all the replys. There was no indent on the bottom.
 
Originally Posted By: mattd
pull the caliper/bracket and rotor off. Hammer the wheel stud out. Use a tool or another lug nut and some washers and use a wrench or ratchet to pull the new stud in. It will fit. It just takes finagling. Every GM i have ever replaced a stud on (quite a few) i have never had to remove the bearing.

Air tools are your friend if you have access to them.


That's what I said above when I posted the GM service directions.
 
Originally Posted By: GMBoy
BTW, the special J6627 tool is nothing more than a glorified C-clamp used to push the stud thru.


It looks a little more trick than a C-clamp:

Kent_Moore_J-6627-A_Picture.jpg
 
Originally Posted By: Merkava_4
Originally Posted By: GMBoy
BTW, the special J6627 tool is nothing more than a glorified C-clamp used to push the stud thru.


It looks a little more trick than a C-clamp:

Kent_Moore_J-6627-A_Picture.jpg


There are minor differences, true. However, most "J Tools" are unneccessary, but do make a particular job easier if used. In this case - a cheap C-clamp does the job well as opposed to the expensive J-tool that you may only use once.
 
Last edited:
Status
Not open for further replies.
Back
Top